In this tutorial I will show you how to create silver bullet buttons in Adobe Illustrator. These buttons are created using a chart symbol and a gradient.
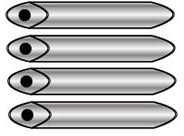
This tutorial will show you how to create the Silver Bullet Buttons shown to the left of the page. These buttons are a bit odd shaped but they are cool. The buttons were created using a chart and a gradient. In this tutorial I will show you how to create these buttons using Adobe Illustrator CS3. To download the .ai file for this tutorial, please click here .
Creating the Outline of the Button
The first step is to create the outline of the button. This is done by using a symbol from the Charts box. Click Window > Symbol Libraries > Charts. When the charts box opens, locate the chart titled “Direct Data”. You can place your mouse over the chart symbols to see the names of them. When you find the chart, grab it, and drag it to your document. The chart will not look like the one in my final image. We will have to make some adjustments.
Adjusting the Button
Click the chart to select it. Grab the bottom center point and bring it upward. This will shrink the button. Grab the end point and drag it outward. Basically play around with the size to get it the size that you want it. After you have it the size that you want it, you will need to rotate it. Right click on the button and click Transform > Reflect > Vertical.
Breaking the Link to the Symbol
Next, you will need to break the link to the symbol so that you can edit the button. Right click on the button and click Break Link to Symbol from the menu that drops down. Now your button can be edited.
Applying the Gradient to the Button
The next step is to apply the gradient to the button. Go to the top of Illustrator and click Window > Swatch Libraries > Gradients > Metals. When the box opens, you will need to look for the Silver gradient. It should be the fourth gradient in the box. Click the button to select it and click the gradient box to apply the gradient to the button.
Changing the Stroke of the Button
You will need to change the stroke color and size to get the outline of the button. Change the stroke size of the button to 2pt. Change the color of the stroke to black. Make sure the button is selected before you change the stroke properties.
Adding the Black Dot
The black dot on the bullet is a basic circle. Grab the circle tool and draw a circle on the button. Change the fill color to black and the stroke color to none.
Now you can create your other buttons. Select the button and the circle and group them together by pressing CTRL G. Click the button again to select it, press CTRL C to copy and CTRL V to paste. Paste as many buttons as you need. Then you can start adding your text.
This post is part of the series: Adobe Illustrator CS3 Buttons
This series will show you how to create buttons in Adobe Illustrator.
- Introduction to Creating Web Buttons in Adobe Illustrator CS3
- Adobe Illustrator CS3 Buttons: Rose Faded Drop Shadow Button
- Applying a Chrome Effect to Web Buttons in Adobe Illustrator
- Adobe Illustrator CS3 Buttons: Pink Gradient Leaf Buttons
- Adobe Illustrator CS3 Buttons: Green Gradient Cross Buttons
- Creating Glass Buttons With Illustrator
- Adobe Illustrator CS3 Buttons: Pink and Silver Bullet Button
- Adobe Illustrators CS3 Buttons: Water Blue and Yellow Buttons
- Adobe Illustrator CS3 Buttons: Black and Silver Chrome Pill Button
- Creating Slanted Gold Web Buttons in Illustrator
- Adobe Illustrator CS3 Buttons: Blue Steel 3D Slanted Button
- Adobe Illustrator CS3 Buttons: Silver Plastic Pill Button with Spirals
- Adobe Illustrator CS3 Buttons: Silver Bullet Buttons


