The Lightroom 3 noise reduction tool is a new and welcome addition to Adobe’s popular image editing software. This tutorial will show you how to use this functionality to fix grainy, noisy images that were shot at a high ISO.
What Causes Noise?
Whether you are using a compact camera, or the latest digital SLR , you are still likely to see digital noise appearing in your pictures at some point. Essentially, it is a byproduct of a high ISO camera setting . The higher the ISO, the more likely you are to see that grainy look associated with noisy images. Digital SLR cameras deal with noise much better than digital compacts, but no camera is immune to it, so you need a way to deal with it in post-processing. The Lightroom 3 noise reduction tool is one of the best ways to do this.
Using the Noise Reduction Tool
1. Find the image you want to work on, and make sure you are in the Develop module
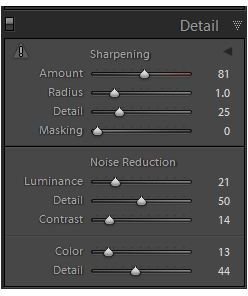
2. Locate the Lightroom 3 noise reduction sliders. They are in the Detail adjustment palette on the right-hand side, just below the sharpening tools, (see picture left).
3. Zoom in on your image so that you are close enough to see the image noise you want to fix. You will want to be at least at 1:1, but 2:1 is also a good start.
4. I like to start by working on color noise. You will see this in your picture as red, green or blue pixels that are mixed in with the original colors in your image. At a zoom ration of 2:1, or higher, you should be able to see them quite clearly. Slowly move the color slider to the right and you will see the color noise begin to disappear. Stop moving the slider when all the color artifacts have gone.
5. Once you have removed the color noise, it is possible that you will have lost some of the edge details in your image. If you notice this has happened, then move the color noise detail slider to the right, to bring back some of that definition in your image.
6. Next we will deal with the luminance noise controls. These will smooth out the graininess in your noisy image. As above, make sure you are zoomed in close enough to see the noise in your image, then slowly move the luminance slider to the right until you see the grain beginning to smooth over. Stop when the grain has gone, or has almost all gone. With this step it is usually better to underdo it, than overdo it.
7. If your edges are starting to look a little fuzzy, then it is time to bring back some definition with the luminance detail slider, but consider adjusting the luminance noise slider as well to get the best balance.
8. The last adjustment you are left with is the contrast slider. Adding noise reduction to an image can make it a little on the soft side, so adding some contrast will help bring back some clarity and definition to your picture.
Hints and Tips
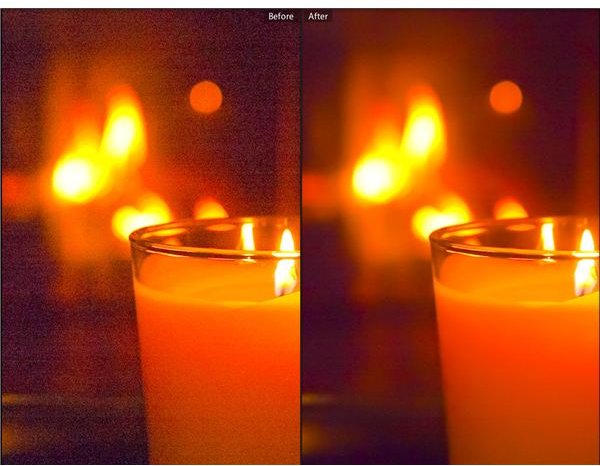
Adding noise reduction to an image will almost always have some effect on the level of detail shown in a photo. The Lightroom 3 noise reduction tool is very good, but you need to realize that there will always be a degree of compromise between noise free images and detailed images. The balance between these can be subjective. Just because you can remove all the grain from an image, doesn’t mean that you necessarily should. Often images retain more authenticity when there is at least some visible grain remaining in your image. While you do want to clean an image up, you don’t want it to look unnatural when you are done. Achieving this can be a bit of a balancing act, but with practice you will soon get a feel for what looks right.
This post is part of the series: Adobe Lightroom 3
Tips and information about Adobe Photoshop Lightroom 3 and what it can do for today’s digital photographers.


