Find out how to use Lightroom 3 with this easy guide on how to get started with Adobe’s professional grade image editor. These tips, tricks and helpful hints will be all you need to, get started.
Lightroom Modules
Lightroom is split up into five distinct modules - the Library, Develop, Slideshow, Print, and Web modules. Together, they will provide you with a complete solution for organizing and editing your images, but knowing how to use Lightroom properly requires an understanding of what tasks each of these modules can accomplish. The following guide will give you an overview of each of these modules, and provide some tips on how best to use them to make your image processing faster and more efficient.
Library

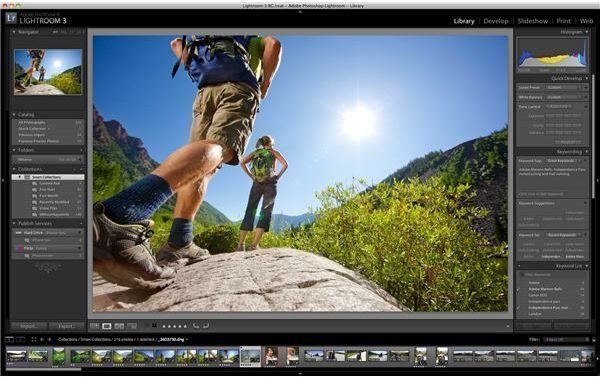
Lightroom’s Library module is used to organize and view your digital photos. It is here that you can import and export your photos, and create collections from your images . Collections are a way to group your images in the catalog. So, if you wanted to view all your landscape pictures in one place, you could create a collection and select photos from any location on your computer to be a part of a new landscape collection. The photos will not physically move from their stored location on your computer. Lightroom simply links to the original location and displays it in the collection folder.
Smart Collections constantly update based on a rule that you set up for sorting images. For instance, you could create a smart collection titled ‘Portfolio’, and tell Lightroom that any photo you rate as 5 stars should be added to this folder. This means that any photo, now and in the future, that is rated at 5 stars will be added to your portfolio collection automatically. Instead of stars, you may prefer to sort by color tags, location, camera or many other variables, but the end result is the same. Quick collections are just a temporary store for your images, and there can only be one of these per catalog. You may not use this very often, but it is there if you need it while you decide upon a more permanent collection for your photos.
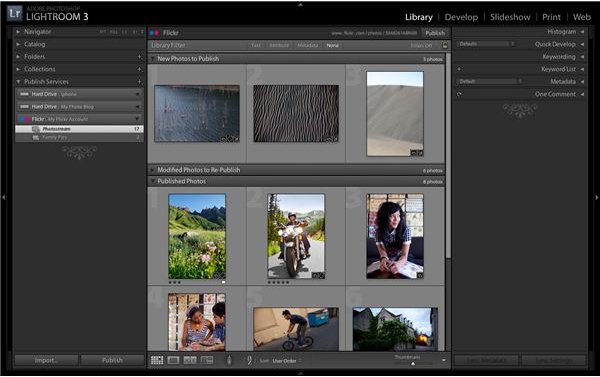
Viewing photos can be done in a grid mode (small thumbnails), or in the loupe (one large image). You can compare images side by side, or dim the lights for a distraction-free view by pressing ‘L’ on the keyboard. Zoom in on images with the zoom slider, or rate them with stars, colors and flags to indicate your favorites. Tagging photos, editing metadata and publishing to Flickr can also be done in the Library module.
Develop
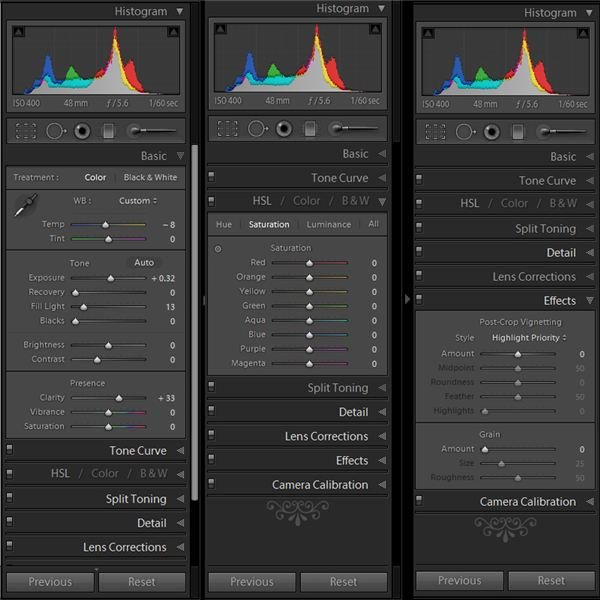
You can’t learn how to use Lightroom without learning how to use the Develop module. This is where you edit your photos, and will likely spend the majority of your time. The Develop module is made up of a bank of tiered sliders that are organized into several adjustment palettes. Click on a category like Basic, and you will be greeted with a variety of basic image adjustments like white balance, exposure, brightness, contrast, saturation , and so forth. Simply move the slider of your choice to apply an adjustment to your image. To make further adjustments, click on another adjustment palette like Tone Curve, or Effects, and continue to shape your image the way you want it.
One useful tip for working with the adjustment palettes is to turn on solo mode. Without this, every palette you open will remain open until you close it. With solo mode activated, when you move from one palette to another, the one you were previously working on will automatically close. To do this, right click (PC) or Command click (Mac) on one of the palettes and select solo mode. This will save you a whole lot of vertical scrolling.
It is important to note that Lightroom 3, like Aperture and Capture One , is a non-destructive image editor. This means that your original photo will not be altered in any way. Think of your adjustments as a layer of data that sits on top of your original photo to make it look the way you have decided it should look. Your changes are not permanent, and can only be seen outside of Lightroom if you export images from the Library module. In this way, if you decide to re-edit the photo a different way, six months or a year later, you still have the original photo to work with.
Please continue on to the next page to learn more tips on how to use Lightroom 3.
Slideshow
In the Slideshow module, you can create photo slideshows of your collections. Creating a photo slideshow is quick to do and easily customizable. You can use all the photos in a collection, selected photos, or flagged photos. Simply choose from the drop down menu above the film strip. Overlays, shadows, backgrounds, title slides and more, can be tweaked with the adjustment palettes on the right-hand side. New to Lightroom 3 is the ability to add a music track and automatically work out the timings of each slide so that it coincides with the length of the music you choose. Complete slideshows can be viewed in Lightroom, but you can also click the ’export video’ button to create an mp4 file in a choice of six resolutions that range from 320 x 240 to 1080p.

The Print module lets you create contact sheets and custom print layouts for your photos. You can create professional looking photo layouts using Lightroom’s bank of templates on the left of your screen, or you can build one from scratch to your own specifications by using the options on the right.
To create your own layout, simply click custom package from the ‘Layout Style’ palette and then click on ‘Cells’ to find some popular photo ratios. Add some to your page by clicking on the ones you want, then drag the cells to arrange them on your page. Add photos with drag and drop, and frame your images within the cell by holding the Ctrl key (PC), or Command key (Mac), and dragging the image around. Unlock the aspect ratio of your cells by unchecking the appropriate box in the ‘Cells’ adjustment palette, and you will now be able to click and drag your cells to any dimensions you want.
Click on the ‘Page’ adjustment palette and you can customize background colors, add a title, or include a watermark to protect your image rights. When you are finished, click the ‘Print’ adjustment palette and you get the choice to print to a printer, or print to a JPEG file, (which basically means you can save it as a JPEG), and upload it to an online print shop like Mpix or Shutterfly .
Web
Lastly, the Web module gives you the ability to create an HTML or Flash based photo gallery that you can use to upload to your own personal website or blog . Adobe has included lots of great templates for you to choose from on the left hand side of the Web module, and you simply click on one to see how it looks. You can customize colors and text with the adjustment palettes on the right-hand side, add a site title and contact info, apply sharpening, size your images and add borders and drop shadows. When you have applied all the settings you want, and chosen the photos you want to appear in your gallery, click ‘Preview in Browser’ to see how it looks in your default browser. With time and effort, some high quality results can be achieved.
Final Tips
Adobe’s Lightroom 3 is not for beginners, but it is still easy to pick up and learn if you have any previous experience of using digital photo editors . The best thing about learning how to use Lightroom is that it is a non-destructive image editor. You can experiment to your heart’s content and if you completely mess up, just hit the reset button, and your photo will return to its original state with all the original data intact.
This post is part of the series: Adobe Lightroom 3
Tips and information about Adobe Photoshop Lightroom 3 and what it can do for today’s digital photographers.


