Learning how to shoot tethered with Lightroom 3 is a useful skill that many photographers will benefit from. This tutorial provides step by step directions to get you started.
One of the best new features of Lightroom 3 is the ability to shoot tethered to your computer. With this addition, you can connect your camera to a desktop or laptop and have your shots imported directly into the Lightroom software.
This is great for studio photographers, as it can be used to give instant previews for clients, or constructive feedback to models. However, home enthusiasts can get just as much use out of this feature with product shots, portraits and more.
Compatible Cameras
Well, before learning how to shoot tethered with Lightroom, you had better make sure that Adobe has support for your camera, because not all cameras can take advantage of the tethered capture option. However, if you shoot with a relatively recent Canon or Nikon DSLR, you should be okay. Adobe found that some cameras worked better than others, so check the list below to see if yours is there.
Nikon: D3, D3s, D3x, D90 , D200 (Mac OS only), D300, D300s , D700, D5000 .
Canon: EOS 5D, EOS 5D Mark II, EOS 1D Mark II, EOS 1Ds Mark II, EOS 1D Mark III, EOS 1Ds Mark III, EOS 1D Mark IV, EOS 7D , EOS 500D/Rebel T1i, EOS 450D/Rebel XSI , EOS 1000D/Rebel XS, EOS 350D/Rebel XT, EOS 400D/Rebel XTi , EOS 20D (Mac OS only), EOS 30D, EOS 40D, EOS 50D.
Note: Users of the Canon 5D, 20D, and Digital Rebel XT must set their cameras to PC Connection Mode before starting tethered capture. Windows users who have a Canon 5D, 1D Mark II, 1Ds Mark II need a driver download from the Canon website before starting tethered capture. Owners of the Canon 1D Mark II, or 1Ds Mark II should use a firewire connection.1
If your camera is not listed above, then at this moment in time it may not be supported by Lightroom 3. Adobe are looking to add support for other cameras in the future, and are happy to receive user suggestions for which ones should be next if you fill out their feature request form online.
How to Shoot Tethered with Lightroom 3
1. Start by connecting your camera to the computer. Adobe recommends a USB 2.0 connection, but Canon 1D Mk II and 1Ds Mk II owners should use a firewire connection.
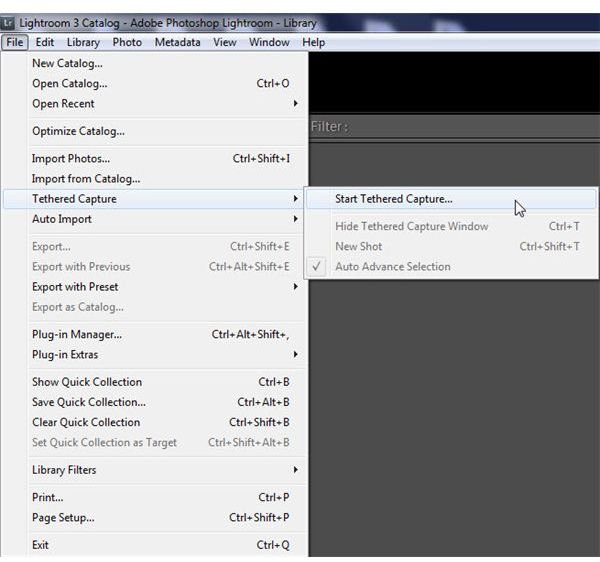
2. In Lightroom, go to File > Tethered Capture > Start Tethered Capture.
3. In the pop-up menu, choose a name for your session, a naming template, a destination for your captured images, and any metadata that you would like to add to the photos - then click OK.
4. A long rectangular bar will appear across the middle of your screen. This is your tethered capture control bar. If all goes well, it should display the name of your camera, your current shutter speed, aperture, ISO and white balance.
5. Now you can either shoot with the camera’s shutter button, or by clicking the round on-screen shutter button at the right-hand side of the tethered capture control bar.
Tips and Hints
-
If you don’t want the tethered capture control bar in front of all your images you can either drag it up to the top of the screen, or hide it with Ctrl + T (Windows), Command + T (Mac).
-
Clicking on the dropdown menu next to ‘Develop Settings’ gives you a whole list of presets that you can choose to have your images processed as when you are shooting with tethered capture in Lightroom.
Advertisement -
The small gear symbol on the bottom right of the control bar allows you to go back and adjust the import settings that you set up in step 3 of the instructions above.
-
Long USB cables give you more flexibility when shooting and don’t tie you too close to your computer.
Advertisement -
Click the ‘x’ on the control bar to finish your tethered shooting session, or go to File > Tethered Shooting > Stop Tethered Shooting if you hid the bar.
Now that you know how to shoot tethered with Lightroom, you are free to enjoy the flexibility and benefits associated with this photographic technique. Whether it is in the studio, in the field, or just around your own home, the ability to shoot tethered can give you a better chance at getting the images you really want.
Sources:
1https://kb2.adobe.com/cps/842/cpsid_84221.html#ionComHeading
This post is part of the series: Adobe Lightroom 3
Tips and information about Adobe Photoshop Lightroom 3 and what it can do for today’s digital photographers.


