Here is a step by step Compressor tutorial outlining how to compress a video that will be downloaded from an internet source.
Mega Download
Apple Compressor, as part of the Final Cut Studio , tries to accommodate every single type of format that your video could be used for once it is done with the post-production process. In the new media consumption model, people are actually watching videos in the form of a digital movie file. It is still difficult to transfer these movie files between people as most transfer methods are either too limited in terms of bandwidth or have limitations in the overall file size they allow. Instead, many people are uploading these videos to websites that are used specifically to host downloads. From here, the person looking for the video will download the file to their computer, and it will then exist as a self-contained movie that does not have to be watched in a streaming format like YouTube or Vimeo . Compressor includes preset formatting just to meet this specific need. Here is a step by step Compressor tutorial on how compress videos for internet download.
Internet Video Compression
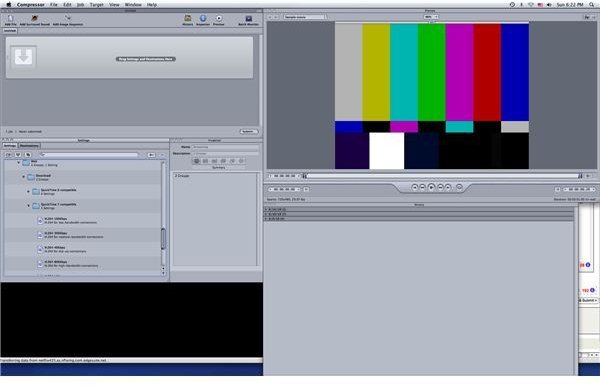
Begin by either taking your video file and opening it in Compressor, or using Send to Compressor in Final Cut Pro . When the file is opened in Compressor start out by selecting a destination point for the final compression. Once this has been decided go down to the Settings pane and select the Apple folder. Go down and select the Other Workflows folder, which is right below Formats. In the Other Workflows folder you will find the Advanced Format Conversions, Mobile Devices, Motion Graphics, Podcasting, and Web folders, and you should select the bottom Web folder.
Inside Web you are going to have three options: Download, Streaming, and Web Videocast. Select Download and you will have two folders: QuickTime 6 Compatible and QuickTime 7 Compatible. As long as you have up to date software on your Mac select QuickTime 7 Compatible. Here you are going to have five distinct video codecs to choose from, each running smaller to larger. The smallest format is H.264 100Kbps, which is labeled in here as “H.264 for low-bandwidth connections”. The largest is H.264 LAN and is intended for
Local Area Connections or Intranet downloads. The choice between these video codecs is strictly based on how large your video is and how much space you have allowed on hosting. If it is a longer and higher quality video you may want to go with the 100 or 300 Kpbs format, and if it is smaller, you can easily go for 800 Kpbs or LAN. Drag and drop your choice into the above project pane and select Submit, which will initiate the video compression and codec conversion process. When it is finished you will have a smaller sized QuickTime file that you can then upload to your internet server for later download.
This post is part of the series: Compression Types in Apple Compressor
Here is a series of Apple Compressor tutorials looking at different video compression and video codec types.


