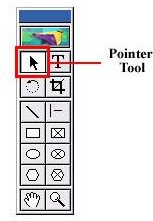
The PageMaker Pointer Tool enables you to position text boxes, as well as adjust their boundaries. It gives you the flexibility to re-size and move text boxes, as well as change other attributes of the text box. This tutorial focuses on how to make use of the Pointer tool to work with text boxes.
Working with the Pointer Tool
The Pointer Tool in Adobe PageMaker 7.0 gives you the flexibility to adjust the boundaries and placement of your text boxes. When you use the Pointer Tool, you will work with your text box as a single block of text which can be manipulated much like an image. Using the Pointer Tool, this text block can be enlarged, copied, deleted, and repositioned.
With the Pointer Tool, you can work with single or multiple text boxes, or even with all of the text boxes on a given page. If you choose to work with more than one text box at a time, you can manipulate the different boxes as a group.
The Pointer Tool
How to Select Text Blocks Using the Pointer Tool
To select a single text block
- Select the Pointer Tool from the Toolbox.
- Click anywhere inside the text box.
T****o select a multiple text blocks
- Select the Pointer Tool from the Toolbox.
- Click on the first text box
- Hold down your Shift key and then click on each consecutive text box.
To select all text blocks on a page
- Select the Pointer Tool from the Toolbox.
- Click on the Edit menu and then click on Select All from the dropdown menu.
Window Shades and the Pointer Tool
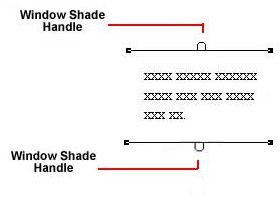
When you click on a text box or text frame with the Pointer Tool, your text will be bracketed between two window shade handles. These handles can be used to manipulate and adjust the text box’s size and its placement on the page. The text that is bracketed between the windows shade handles may also be copied, cut, or deleted.
Quick Tip: The window shade handles are only visible after you click on the text box with the pointer tool and not while you are typing or otherwise using the text tool.
.
Using the Pointer Tool to Manipulate Text Blocks
Moving a Text Box
- Click once on the text box with the Pointer Tool.
- Drag the text box to the new location and then release the mouse button.
Deleting a Text Box
- Click once on the text box with the Pointer Tool.
- Press the Delete or Backspace key on your keyboard.
Re-sizing a Text Box
- Click once on the text box with the Pointer Tool.
- Click on one of the “handles” on the corner of the box
- Drag until you have the desired new size.
Quick Tips
- Drag horizontally to adjust the width of the text box.
- Drag vertically to adjust the height of the text box.
- Drag diagonally to adjust both width and height.
Cutting, Copying and Pasting Text
- Click on the text box with the Pointer Tool. Right-click your mouse.
- Select Cut or Copy from the menu.
- Right-click at the spot where you want your text box to appear.
- Select paste from the menu.
Quick Tip
- Press [Ctrl + X] to cut text.
- Press [Ctrl + C] to copy text.
- Press [Ctrl + V] to paste text.
This post is part of the series: PageMaker 7.0 Basics
This series of Adobe PageMaker tutorials provides step-by-step instructions on using PageMaker to create professional, high-quality publications such as newsletters, brochures, reports, pamphlets, newsletters and other publications.
- PageMaker 7.0 Basics: Workspace, Toolbox & Rulers
- PageMaker 7.0 Basics: Creating a New Document
- PageMaker 7.0 Basics: Saving Your Documents
- PageMaker Basics 7.0: Printing a PageMaker Document
- Working with Text in Adobe PageMaker
- PageMaker 7.0 Basics: Using the Pointer Tool
- PageMaker 7.0 Basics: How to Use the Control Palette
- Tutorial for Importing Text and Word Documents with the Place Command in PageMaker 7.0