Adobe PageMaker’s printing options allow you to choose the number of copies to print, select the size of your print output, as well as customize additional printing options. Read on to learn how to print out your various PageMaker publications.
Printing a PageMaker Document
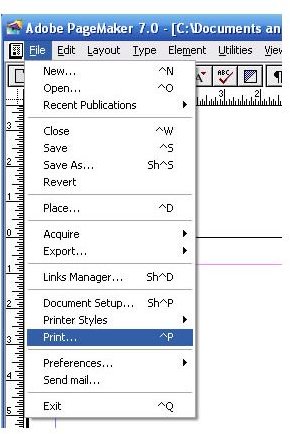
- Click on File and select Print from the dropdown menu. This opens the Print dialog box.
- Make your selections from the print options in the dialog box. See An Overview of the Print Dialog Box below.
- Click the PRINT button to begin printing.
.
An Overview of the Print Dialog Box
In this section, we will review each of the different options available in the Print Dialogue box, which you will use to set up your document for publication.
.
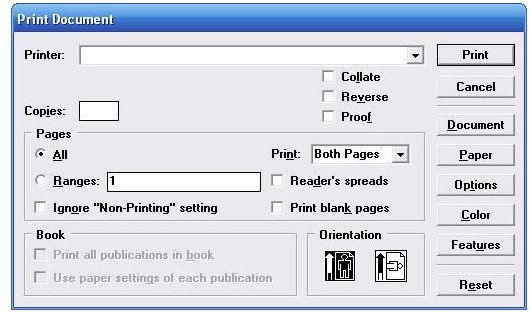
Printer
- Select your desired printer from the Printer dropdown menu. If you have more than one printer, pick the printer to which you want to send your printout.
Number of Copies
- To print multiple copies, type the number of copies of your document that you want to print out.
- To print multiple copies of your document, type the number of copies that you want into the Copies text box
Pages
- To print out every page of your document, click the All radio button
- To print out only a part of your document, use the Ranges option. Type in the range of pages you want to print into the Ranges text box. Example: To print pages 7 through18 of your document, type in 7-18.
- To print nonconsecutive pages, type in specific page numbers. Separate the page numbers with a comma. Example: To print pages 2, 6 and 12 through 18, you will type in: 2, 6, 9, 12 - 18
Orientation
- Select the paper orientation that matches the way you intend for your document to be printed. Choose between the tall (portrait) orientation and wide (landscape) orientation.
How to Print a Non-Letter Size Document
If you would like to print a document in a different size from the standard letter size, you will first need to specify the size of your document, and then configure its print size. Here’s how:
1. Document Setup for a Non-letter Size Document
- Click on File and select Document Setup… from the drop-down menu. This will open the Document Setup dialog box.
- Select the desired paper size from the Page Size pull-down list
OR
- Type in the desired dimensions for your document into the Dimensions text boxes
- Click OK
2. Print Setup for a Non-letter Size Document
- Click on File and select Print… from the drop-down menu. This will open the Print dialog box.
- Click Set Up… to open the Printer Properties dialog box.
- Click on the Paper tab. Select your desired paper size from the Size is dropdown list.
- Click on the Basics tab. Select the desired orientation of the paper from the Orientation section.
- Click OK, and then click PRINT.
NOTE: You must choose the same paper size for both Document Setup and Print Setup box.
.

How to Set a Default Printer
If you have more than one printer installed on your system, you can change from one printer to another from the Printer drop-down list. Alternatively, you can set a default printer, to which all your documents will automatically be printed from. Here’s how:
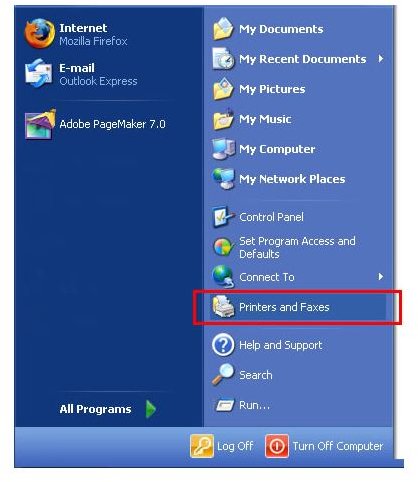
- Click on the Start button at the bottom right-hand corner of your screen. This opens a dialog box listing each printer that you have installed on your system.
- Right click on the icon of the printer that you want to set as the default.
- Click on Set as Default Printer.
- Open the File menu and select Close from the dropdown menu.
HINT: If there is already a check mark next to the printer icon or the Set as Default Printer command, this indicates that the printer has already been set as your default printer.
.
This post is part of the series: PageMaker 7.0 Basics
This series of Adobe PageMaker tutorials provides step-by-step instructions on using PageMaker to create professional, high-quality publications such as newsletters, brochures, reports, pamphlets, newsletters and other publications.
- PageMaker 7.0 Basics: Workspace, Toolbox & Rulers
- PageMaker 7.0 Basics: Creating a New Document
- PageMaker 7.0 Basics: Saving Your Documents
- PageMaker Basics 7.0: Printing a PageMaker Document
- Working with Text in Adobe PageMaker
- PageMaker 7.0 Basics: Using the Pointer Tool
- PageMaker 7.0 Basics: How to Use the Control Palette
- Tutorial for Importing Text and Word Documents with the Place Command in PageMaker 7.0


