Adobe PageMaker’s Control Palette is a versatile feature that you can use to format and manipulate text and objects in your document. The Control Palette displays the properties of a selected block of text or image, and enables you to adjust its settings. Read on to learn how to use this feature.
The PageMaker Control Palette
The PageMaker Control Palette displays the settings and properties of selected text, object or paragraph. It also enables you to adjust these settings and properties so as to manipulate your text and images.
How to Display the Control Palette
To display the Control Palette
- Click on the Window menu and then select Show Control Palette from the drop-down box.
To stop displaying the control palette
- Click on the Window menu and then select Hide Control Palette from the drop-down box.
The Different Modes of the PageMaker Control Panel
The Control Palette is context-sensitive, and will change from one mode or view to another depending on the tool that you select from the toolbox. Each mode provides different functions and enables you to manipulate your text and images by adjusting settings in the Control Palette.
Character and Paragragh Modes
You can use the Control Palette to format text when you are in layout view or in the story editor. You can switch between two modes as desired to format your text:
- Character Mode
- Paragraph Mode
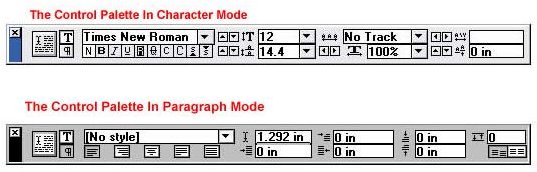
Control Palette In Character Mode
Use this mode to change character attributes. When you select the text tool, the Control Palette will be displayed in character mode. It displays and lets you adjust the properties of one or more characters in your text, including fonts, type size, type style, leading, Kerning, tracking and width of your text.
Control Palette In Paragraph Mode
Use this mode to display and change the attributes of one or more selected paragraphs. You can adjust attributes such as displays paragraph styles, indentation, alignment, paragraph spacing and alignment as well as grid alignment and grid spacing.
.
Using the Control Palette in Object Mode
When you select an object, the Control Palette will be displayed in object mode. It displays and lets you adjust the properties of your object, including: the reference point, size, position, cropping, scaling and printer resolution, as well as horizontal and vertical reflection. You can also skew, scale or rotate the object using the Control Palette in object mode.
.

Three Other Modes of the Control Palette
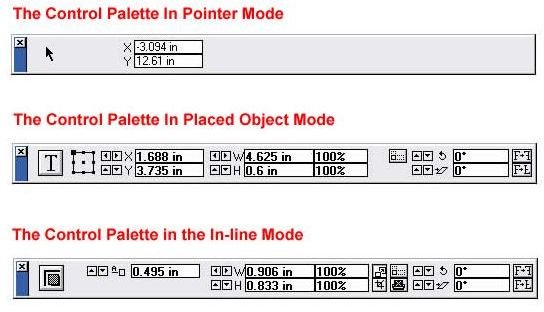
The Pointer Mode
The Pointer View indicates the X and Y coordinates of your pointer as you move it within the PageMaker window.
Placed Object Mode
When you select an image using your Pointer tool, the Placed Object View will display information on that graphic, such as its height, width and coordinates. It also gives you the options to crop, scale and rotate the image.
In-Line Graphic Mode
The In-Line Graphic View displays information about a selected image relative to the text that is around it. It also enables you to crop the image, as well as increase or decrease the spacing between the image and the text that surrounds it.
.
Quick Tip
It is helpful to always keep your Control Palette open. A convenient place to dock it is at the top of the window, just under the menu bar.
This post is part of the series: PageMaker 7.0 Basics
This series of Adobe PageMaker tutorials provides step-by-step instructions on using PageMaker to create professional, high-quality publications such as newsletters, brochures, reports, pamphlets, newsletters and other publications.
- PageMaker 7.0 Basics: Workspace, Toolbox & Rulers
- PageMaker 7.0 Basics: Creating a New Document
- PageMaker 7.0 Basics: Saving Your Documents
- PageMaker Basics 7.0: Printing a PageMaker Document
- Working with Text in Adobe PageMaker
- PageMaker 7.0 Basics: Using the Pointer Tool
- PageMaker 7.0 Basics: How to Use the Control Palette
- Tutorial for Importing Text and Word Documents with the Place Command in PageMaker 7.0