In this article we will find out how to create our own application for Android and we examine the structure of an Android application.
Creating a New Project
Once we have installed and set out the environment as I explained in the How to set up Eclipse to work in Android article , it’s time to start working with the environment to create an application for Android. We are going to work on Eclipse.
To create a new Android project, we have to access the “File” menu option. There, click on “New->”, if the “Android” option doesn’t appear in the selectable screen, you should click on “Other”.
In the next window we have to select the Android project. If it doesn’t appear then something is wrong with the plugin and SDK installation, go back to this article to learn how to do it.
We select the “Android” project and click on “Next”.
Here, it’s important to fill out most of the input texts, I will describe them one by one:
- Project name: This is the project name that will appear in the Eclipse projects column.
- Contents: If we want to create a project from the beginning, we should mark “Create new project in workspace”, if we want to open an existing project we should mark the “Create project from existing source” and set the location of the project source.
- Properties:
-Package name: this is the standard concept of “package” in Java, here, we set the name of the package which is going to hold the main code.
-Activity name: In Android, nomenclature is quite odd. An Activity is a single screen, in this case, the “Main Screen”.
-Application name: This is the name of the application that is going to appear in the Android emulator or device.
Once we have filled out the information, click on the “Finish” button.
Program Structure
Once we have created the new project, let’s see how it looks.
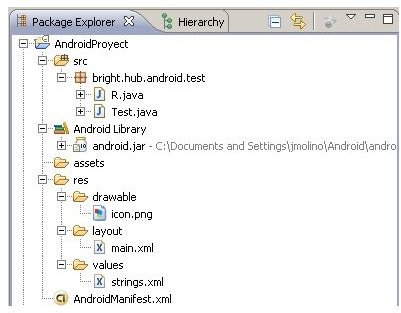
As we can see in the image, the project folder (AndroidProyect) holds some folders and files, let’s explain them step by step so we know what are they and what function they have in our application.
In the “src” folder, we have allocated the source code, ordered in packages (do you remember when we created the project? The package name is here).
The “Android Library” icon, contains all libraries we need to work with Android. You can have a look at them.
The next important folder is “res”, this is where resources are stored, we can have “drawable” (images), “layouts” (in another article I will explain How to Work With Android Layouts ) and “values” (we have the chance of using this to store static values of strings that we are going to use in the app).
The last item is “AndroidManifest.xml”, every Android app has its own AndroidManifest. This is a xml file where all information about the project is stored. From privileges to how to run the app. For now, just put in your mind that this is a VIF (Very Important File).
Want to know more?
In the next article I will show you one by one the most important files in the Android application - How Do I Develop an Android Application? Structure II .
Follow Up
If you want to know when new articles are released, subscribe yourself to the Google Android RSS .
Otherwise, you can follow my research, articles and work in my professional Twitter: jbeerdev
This post is part of the series: How to- Develop Applications on Android
In this series of articles, I will explain how to develop your own application for Android, from the beginning.
- Setting the Environment: Using Eclipse and Netbeans for Developing Google Android Apps
- How to Create an Android Application: Structure I
- How Do I Develop an Android Application? Structure II
- How to Create User Interfaces (UI) Using XML : Layouts
- How to Create a User Interface (UI) Using XML : Widgets


