Want to spruce up a photo by adding a touch of brightness or a simple, but decorative, border? Experiment a little with fill and adjustment layers.
Two Special Layer Types
There are several different types of layers in Photoshop that make it easier to edit images in a non-destructive way. Here, we’ll take a look at the following two options.
Fill Layers – Need to add a layer that is completely filled with a solid color, gradient or pattern? Try using one of these layer types instead of other tools that give similar results (such as the Paint Bucket Tool).
Adjustment Layers – Instead of making changes in brightness, exposure, saturation and other similar aspects directly to an image, you can create an adjustment layer to hold your alterations.
Locating the Tools
There are a couple of different ways to create a new fill or adjustment layer in Photoshop.
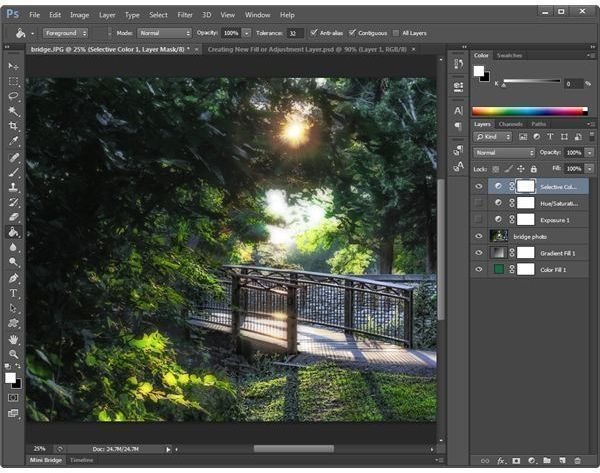
Method 1: If you prefer to work from the Layers panel, click on the icon that looks like a half-filled circle (see the image above) at the bottom of the panel. When the list of options pops up, select the type of fill or adjustment you want to make.
Note: The first three options on the list – Solid Color, Gradient, and Pattern – are classified as Fills, while all of the other options are classified as Adjustments.
Method 2: From the Layer menu on Photoshop’s main tool bar, hover over New Fill Layer or New Adjustment Layer (depending on the type of layer you want to create). Then pick your fill or adjustment type from the list that appears.
A Simple Example
These types of layers have lots of different uses, especially if you like to transform standard photographs into creative works. To illustrate this, we’ll walk through the steps needed to turn the photo shown on the above left to the image on the above right.
1. After opening the photo in Photoshop, convert the single background layer to a full layer by right-clicking on the layer and selecting Layer from Background. In this particular example, I also changed the layer’s name to “bridge photo.”
2. Add a new Fill layer. Choose the Solid Color option – just pick any color for now.
3. In the Layers panel, move the new fill layer you just created below the photo. You can do this by either clicking on the layer and dragging it below the photo layer, or by selecting Arrange -> Send to Back from the Layer menu on Photoshop’s main tool bar.

4. Resize the photo layer so that it is smaller than the background layer.
To do this, select the layer containing the photo and choose Transform -> Scale from the Edit menu. Then click on one of the transform controls found on the corners of the photo and resize just enough so that you can see the edges of the color fill layer.
In the example shown to the right, our current color fill layer is white. We’ll change that in a minute.
You may also need to reposition the layer with the photo to center it. This will make your fill layer appear to be a border for the photo.
5. Select the Solid Color fill layer again, and double-click on the layer thumbnail. This will bring up the Color Picker window. Use the eyedropper to grab a color from the photo or pick some other color you want to use for the photo border. You may want to try this a few times to find a color you like.
As you pick different colors, you’ll see a preview in your main workspace area – so you can get an idea about how that color will look with your photo. When you’re happy with your choice, click OK to close the Color Picker and your new color will be applied to your fill layer.
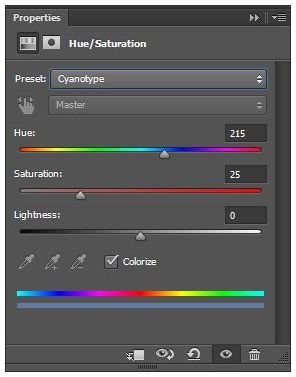
6. Select the layer with the photo again, and choose to add a new Adjustment Layer. Pick the Hue/Saturation option. You can either manually adjust the sliders to find an effect you like, or pick one of the presets. In this example, we chose the Cyanotype preset.
Make sure that this adjustment layer is the current top layer of your composition.
Don’t like that particular effect? Double-click on the layer thumbnail for your adjustment layer and try something else. Or, pick another type of adjustment and experiment some more. You may even want to apply a bevel effect to the photo itself to give the impression of a framed image.
A Few Tips
1. When experimenting, you can create multiple adjustment layers, and toggle their visibility settings on and off. This will let you see how different types of adjustments will look when combined with one another without having to start all over again each time you want to try to obtain a new look.
2. When you find a combination of adjustment layers that you like, group them together and give that group a descriptive name. You can then duplicate that group, hide the original group, and modify the copy so that you don’t lose that original combination.
3. Combine Solid Color and Gradient fill layers to easily create new gradient effects. This is particularly fun to do with partially-transparent gradients.
Have other tips to share? Tell us about them in the comments!
This post is part of the series: Working with Layers in Photoshop CS6
Are you new to Photoshop? Don’t be intimidated by layers. They can be easy to use and quite helpful for a multitude of projects. Follow this series to get on board quickly.


