When it comes to creating and editing images in Photoshop CS6, you want to keep your options as flexible as possible. That’s where layers come in.
Developing a Love for Layers
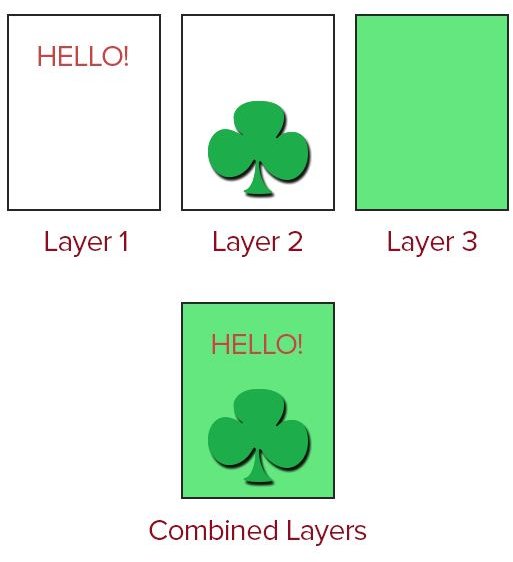
Think of a layered composition as a stack of images – some partially transparent, some of different sizes, some turned sideways, etc. When you look down at the top of the stack, you see one big picture composed of all the combined images. If you change or get rid of one of the images, that big picture changes, too.
Layers let you edit photographs and other images without modifying the original work. This is known as non-destructive editing. They also allow you to build more complicated images composed of a variety of elements – such as text, shapes, photos, and color changes – that can be easily modified and reused for multiple purposes.
For example, you can design an ad that includes the price for your product or service on a separate layer. If the price ever changes, all you have to do is take a few seconds to update the price on that single layer.
Accessing the Layers Panel
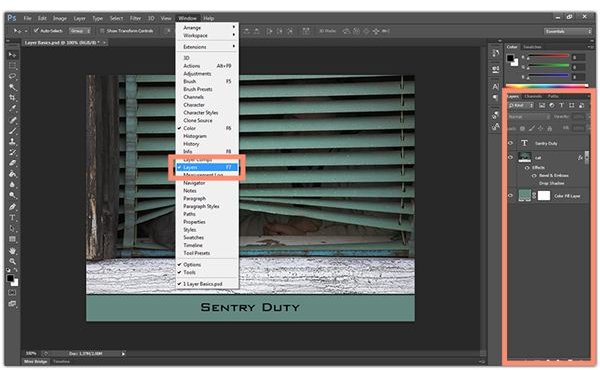
Thanks to Photoshop’s ability to modify your workspace setup, the Layers panel can be docked and undocked, moved to different areas of your workspace, and even hidden if you need the extra screen real estate.
If your Layers panel isn’t visible, you can toggle it back on by hitting the F7 key or by selecting Layers in the Window menu on Photoshop’s main tool bar.
Now, let’s take a closer look at the Layers panel and some of its more commonly-used tools.
The Layers Panel
When you open a typical flat image in Photoshop – such as a photograph, or any JPG or PNG file – you’ll only see one layer, and it will be labeled Background. Compared to other types of layers, background layers are fairly limited. For starters, they can’t be moved above other layers, and they can’t contain transparent pixels.
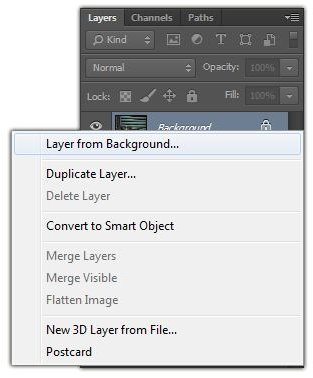
However, you can convert a background layer to a standard layer quite easily. Just right-click on the layer and select Layer from Background from the list of options that appears. Now, you can treat that layer just like any other standard one created in Photoshop.
I’ve used the word “standard” twice now to describe a layer – and that’s a bit of lazy terminology on my part. In actuality, there are several types of “standard” layers in Photoshop. Some of these are classified automatically by the software, and others are designated by the user when added.
Basic Layer Types
Raster (or Pixel-Based) Layers – Generally, if no other designation is given, this is the type of layer you’re dealing with. Any layer that includes a photo or a non-vector drawing is a raster layer. The downside to these types of layers is that they don’t magnify well. That is, if you try to make them larger, they can look fuzzy or pixelated.
Type (or Text) Layers – When you select the text tool and start typing, Photoshop will automatically create a new layer and designate it as a type layer. These are easy to spot in the Layers panel, since they’ll include the symbol T. (See the diagram above for an example.) These layers are vector layers, so they can be scaled to any size without loss of quality.
Shape Layers – As with type layers, whenever you select any of the shape tools and start drawing a shape, Photoshop automatically creates a shape layer. These are vector layers as well.
Fill Layers – True to its name, a fill layer is one that is filled with a color, gradient or pattern. To add a layer of this type, you’ll need to select the Create new fill or adjustment layer tool at the bottom of the Layers panel (see diagram). Alternatively, you can select New Fill Layer from the Layer menu on Photoshop’s main tool bar.
Adjustment Layers – These layers allow you to modify the color, brightness, saturation, exposure and other features of an image without altering the original picture. They are created in the same manner as fill layers.
Smart Object Layers – As I mentioned earlier, one of the benefits of using a layered approach to build new images is that you are able to quickly modify one layer whenever you need to, instead of creating an entirely new image from scratch. Smart objects make this process even easier. When you convert a layer to a smart object layer, you can edit, export or replace the contents of that layer with just a couple of clicks.
A Few Tips
1. Group related layers. As you may have experienced, it doesn’t take long for the number of layers in an image to get pretty big. This can make it tough to find the layer you’re looking for. One thing that you can do is use the grouping tool to collect similar layers into collapsible folders.
Just hold the CTRL key down and select the layers you want to bundle together. Then, from the Layer menu, select Group Layers – or you can use the keyboard shortcut CTRL+G.
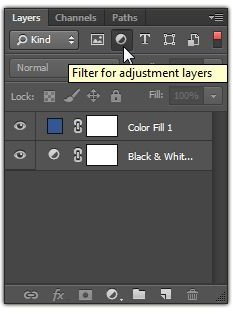
2. Filter layers by type. Another way to more easily find a specific layer is to use the filtering options available at the top of the Layers panel. By clicking on the appropriate icon, you can restrict the Layers panel to show only pixel, adjustment, type, shape, or smart object layers.
3. Rename your layers. You can change the name of any layer by double-clicking on the existing name and typing in a new one. You’ll thank yourself later on if you get into the habit of renaming your layers to something that is more descriptive of their content.
4. Lock layers you don’t want to alter right now. It’s easy to accidentally select the wrong layer and start making changes to it. You can protect yourself a little better if you lock all of the layers except for the one you’re working on – or, at least, lock those layers that you definitely don’t want to modify.
5. Use the Move tool to help identify layer contents. You’ve just noticed that you have 8 layers with red circles and can’t remember which one is which. Select the Move tool and make sure that the box next to Show transform controls on the main tool bar is checked. Now, you can select each of layer independently, and you’ll see the transform controls outlining the object contained in that layer.
Have any other tips or tricks for working with Photoshop layers? Share them with us in the comments!
This post is part of the series: Working with Layers in Photoshop CS6
Are you new to Photoshop? Don’t be intimidated by layers. They can be easy to use and quite helpful for a multitude of projects. Follow this series to get on board quickly.


