In this article we discuss the situations where a long shutter speed can be useful when photographing scenes involving water. I show you what settings work when photographing these situations, what complications can arrive, and how to get past these complications.
Introduction
Water has always been a key ingredient in landscape photography as it is riddled with lakes, ponds, oceans, rivers, streams, waterfalls, and even just rain! Many times when we are approaching landscape photography we try to get the color and exposure just right, yet we neglect the power of shutter speed. By adding a slow shutter speed into our photographic arsenal, we open the door to more creative images. In this article I will explain a few different situations when it may be good to consider using a slow shutter speed when photographing water, some complications which may arise and how to tackle this with your camera.
When to Use Long Exposure for Water
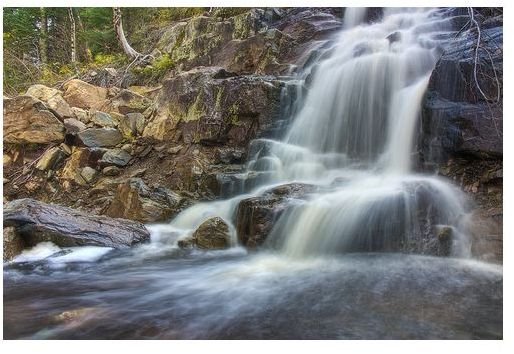
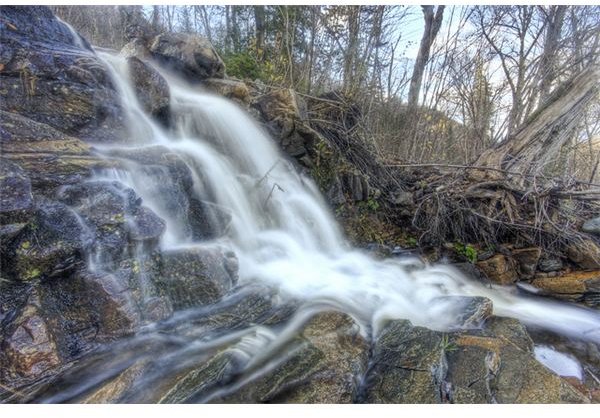
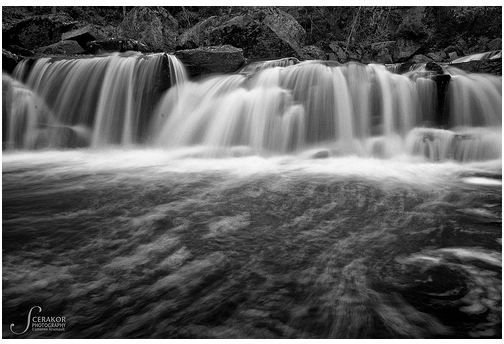
Since I know you all are thinking it, let’s get the most obvious situation when you would talk about using a slow shutter speed and water out of the way: waterfalls . In order to accentuate the movement of the water in the scene a slow shutter speed is often used. The blurring of this movement gives the waterfall a soft, silky, artistic look to it that many people find appealing. Depending on the speed of the water, the desired smoothness of the water, and the light given to you in the scene, most waterfall images will probably be shot somewhere between 1/4 second and 3 seconds. Of course, this doesn’t mean that longer or shorter exposures won’t get you what you want either.
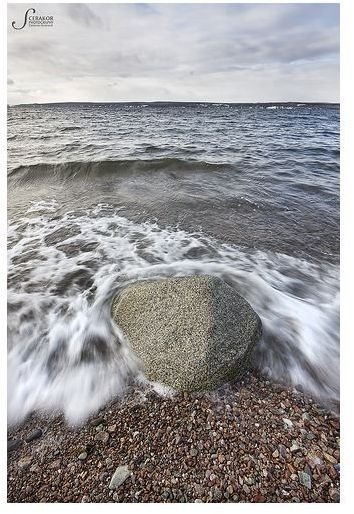
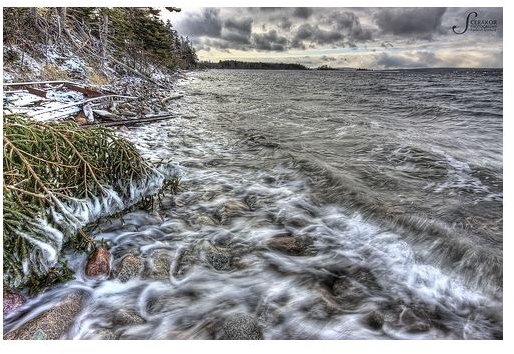
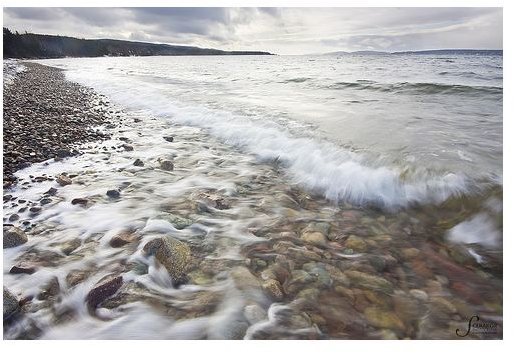
Another time when you can use a long shutter speed to photograph water would be when capturing waves rolling in and onto a beach. In this type of photography you can try to capture the waves rolling onto the pebbles of the beach, around a large rock, into some driftwood, or whatever your particular scene gives you. Use strong foreground objects, possibly interacting with the incoming (or receding) waves, to provide a strong composition for the image. Similar shutter speeds to waterfall photography can be used here as well.
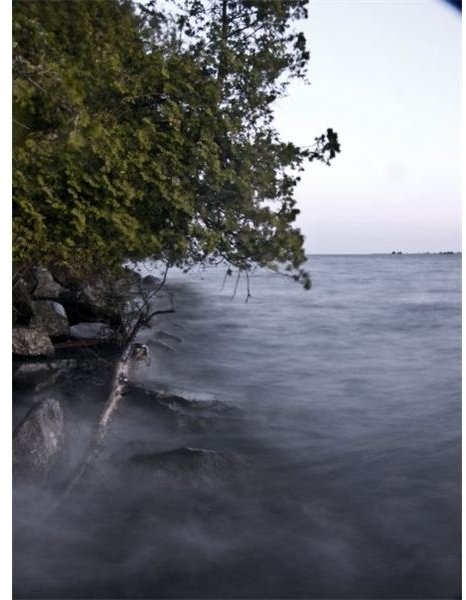
When there are large constant waves splashing into a rock wall, a dock, etc. you can get some really interesting effects by using slow shutter speeds. Leave the shutter open for an extended period of time (5 seconds, 10 seconds, or even longer if possible) and the troughs and peaks of the waves will all merge together into a haze of movement. You are at the mercy of the weather, scene, and environment for this type of photography, but the rewards can be fantastic.
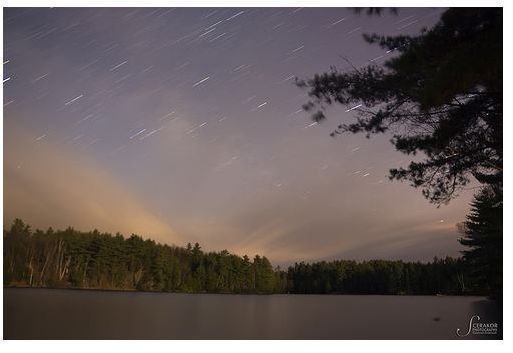
When experimenting with night or astrophotography , consider including a lake or ocean in the composition and watch what the exposure time of several minutes does to the surface of the water. The slight movement of the water over 15 or more minutes will give the whole body of water a smooth consistent feel to it. Far from the glassy look of water in the morning and just as far from a regular shot of a lake, this type of image is attractively unique.
Camera Settings and Tips
Since we are often talking about photographs whose shutter speeds are 1/4 second and slower, a sturdy tripod is an essential piece of equipment. As well, in order to minimize the effect that you will have on pressing the shutter, I would suggest either using a shutter release when possible. At the very least you should be using the two second timer for your shots.
For the case of waterfalls and waves on a beach, make sure that your ISO is on the lowest value, put your camera on shutter priority mode , and dial in the desired exposure. A good starting point to try will be either 1/2 second or 1 second. If you are getting an overexposed image when you do this, you may have to try a different approach. Try using aperture priority mode so you can eliminate as much light as possible and find out the slowest shutter speed possible without overexposing the image. Close your aperture all the way (large F number) and check the exposure. If this still won’t give you a slow enough shutter speed to give you the blurred water look, you will have to try one of the tricks in the next section.
Camera Settings and Tips Continued
When photographing choppy water you will more than likely have to do this in the evening or another part of the day with significantly less light than usual. This is because you will be looking for shutter speeds in excess of 10 seconds if possible. Ideally you will want to go for 30 seconds or longer if possible. Again, you are going to want to turn the ISO down to its lowest level (if you are in the dark of night you can turn it up as needed) and use the shutter priority mode. Dial in your starting exposure length (say 30 seconds), take the picture, and review. From here it is a game of trial and error and getting the image to look the way you want it too. What I am usually trying to go for is a long enough exposure to make the water look more of a foggy mixture than actual water. Experiment to figure out what works for you.
For astrophotography photos with water, set the ISO to its desired level (if you are doing constellation photography this will be high but star trails may be low). In manual mode , choose the aperture depending on the final subject (~ F/8 for general landscapes and low F numbers for astrophotography). Finally, use the “BULB” shutter speed. The camera keeps the shutter open as long as the button is depressed, emphasizing the need for a shutter release. After the exposure is finished, check the image, adjust, and retake as needed.
Complications
In this kind of photography, the issue may be that there too much light in the scene to use a slow shutter speed. For this reason we have to come up with ways to reduce the amount of light hitting the sensor. First, make sure that you aperture is stopped all the way down and that the ISO is at its minimum. Second, if it is at all possible to take the image somewhere or sometime else you may want to come back when there is less light in the scene. Finally, in order to cut down on the light, you can use a neutral density (ND) filter . Essentially it is a filter for your camera whose sole job is to reduce the amount of light that reaches your sensor. These can be acquired in many different strengths from ND2 (1 F stop reduction) to ND8192 (13 F stop reductions). If you don’t have an ND filter in your camera bag you can try using a polarizing filter to eliminate approximately one stop of light.
Make sure you pay attention to your exposure when shooting waterfalls and water scenes in general. Water is very reflective and can often cause regions of your image to overexpose easily. Set up your camera to show you blown out highlights when you are previewing your images so that you don’t get caught at the end of the day.
Conclusion
Water is an integral part of human life and photographers are no exception to that equation. With water, motion is usually not far behind and consequently neither is photography with a long shutter speed. There is something attractive about capturing water photographically in a form that isn’t seen by the human eye. In this article I have shown you some situations where you may want to use a slow shutter speed to photograph water including waterfalls, waves on a beach, choppy/rough water, and very long exposures of lakes or oceans. I explained that in many cases you will be using the shutter priority mode, but aperture priority and manual may also be used. Finally I showed you a few ways to get around the problem associated with using slow shutter speeds: too much light. With these quick tips and tricks, you too will be able to utilize that slow shutter speed to capture water in a way that even our eyes can’t see.
This post is part of the series: Photography and Shutter Speed
The articles in this series deal with one of the critical subjects in photography: shutter speed. These articles deal with slow and fast shutter speeds and when would be the best time to use each. Understanding shutter speed gets you that much closer to understanding photography.


