Looking for a way to share your photos with the world on your own website? Adobe Photoshop CS3 and CS4 allow someone with little or no web design experience to make stunning photo galleries. Check out this article to find out how easy it is.
Beginning in Adobe Bridge
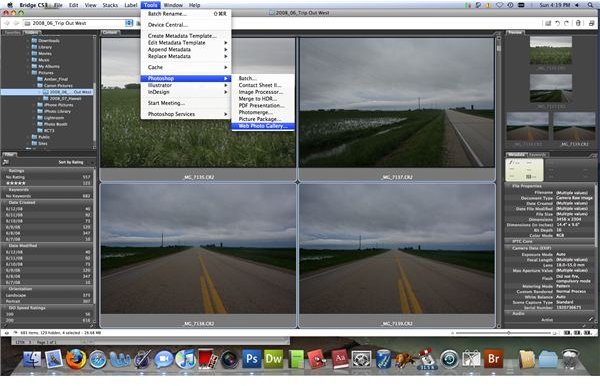
When using Adobe Photoshop CS3 or Photoshop CS4 to generate web galleries, I like to start working in Adobe Bridge. If you already have the photos selected and organized in a folder ready for publication, then you can skip this step. Usually, I have a folder labelled “Finished”, making it extremely easy to sort through them in Adobe Bridge to choose which ones I want to publish in my web gallery.
Holding down the Ctrl button (or Command, for Mac users), you can select as many photos as you want to include in your web gallery.
Once they are selected, go to Tools, Photoshop, and then click on Web Photo Gallery. This will launch Photoshop and bring up the photo gallery window, where you choose the options that you want.
(Click on images to enlarge)
Photoshop Web Photo Gallery Feature
Once in Photoshop CS3, it’s only a matter of a few more steps. The photo gallery window has some very important information on it.
If you didn’t begin in Adobe Bridge, you can access the web photo gallery tool by going to File, Automate, and then to Web Photo Gallery.
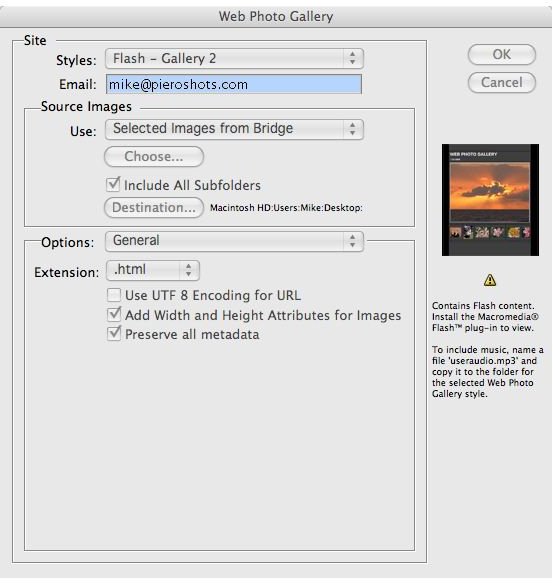
At the very top of the window, take some time to choose the template you like best under the Styles drop down menu. Keep in mind that the Flash templates will take more bandwidth, require more time to load, and must be supported by a flash plugin (which most web browsers have anyway). With this in mind, the Flash-based styles do look very modern and attractive.
Below that, insert your email address if you want it to be published on your site. If not, then just leave this segment blank.
Under Source Images, it should say Selected Images from Bridge. Now, if you didn’t start with Bridge, you can select your images from a folder on your computer.
The Destination is where you want all of the web pages and supporting files to go. I would recommend making a new folder in your documents folder or desktop and save the files there. Then, you can move the folder around as you need.
The rest of the settings can be left to their default selection. After you click OK, Photoshop will begin generating the photos, thumbnails, etc. This may take some time, depending on the size of your web gallery. If you have Dreamweaver installed, it may open the main index.html file upon completion. You can close it if you want, or make some changes such as adding meta tags and keyword descriptions. Otherwise, just close the file and exit out of Dreamweaver.
Now, all of the files you need for your own web gallery are in the folder you created. Just upload that folder to your website (I use the FTP program, Fetch ) and create a link to the index.html file in that folder, and the world will be viewing your photos in no time!
This post is part of the series: Learning Photoshop - Lessons for Photographers
These articles are part of a series of tutorials in Adobe Photoshop, geared specifically for the digital photographer. These articles will include how-to lessons, tricks of the trade, and useful shortcuts. Learn to utilize the world’s most advanced, powerful photo editing software.
- How to Crop a Digital Photo Using Adobe Photoshop
- How to Convert Your Photos to Black and White in Photoshop CS3
- How to Remove Red Eye Using Adobe Photoshop CS3
- How to Remove Blemishes using Photoshop CS3 & CS4
- How to Make a Web Photo Gallery Using Photoshop CS3 & CS4
- How to Convert RAW to JPEG Using Photoshop CS3 & CS4


