If Windows 7 cannot connect to printer, the solution is likely an overlooked step or a simple download. Learn how to connect to local or network printers in Windows 7.
Overview
Windows 7 simplifies many tasks and procedures. However, if you are trying to get set up and finding that Windows 7 can’t connect to printers, you are probably quite frustrated. There are steps you can take to resolve this issue, whether you want to connect to a local printer, a network printer or a wireless printer .
Connect to a Local Printer
A local printer is simply a printer that is connected directly to your computer. If Windows 7 cannot connect to printer, start from scratch following these steps.
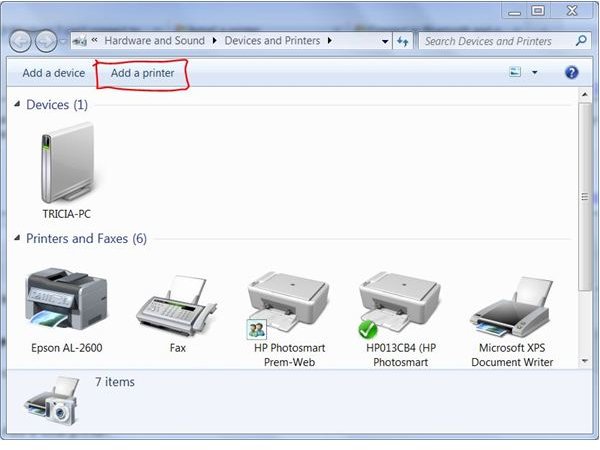
Click Start and select Devices and Printers on the right side of the Start menu. Click Add a Printer at the top of the window. The Add Printer wizard starts. Click Add a Local Printer. Make sure Use an Existing Port is selected and the recommended printer port is entered. Click Next.
Select the printer brand and model you are connecting and click Next. If your printer is not listed, click Have Disk if you have the printer’s setup CD. If you do not have the disk , click Windows Update and wait while Windows tries to find the driver for your printer.
“Windows 7 Cannot Connect to Printer” is a common error when the correct driver is not installed. If you do not have the setup disk and Windows cannot find it via Windows Update, check the manufacturer’s download page.
Connect to a Wireless or Network Printer
If Windows 7 can’t connect to your printer and the printer is wireless , try the following steps to ensure that it is set up properly.
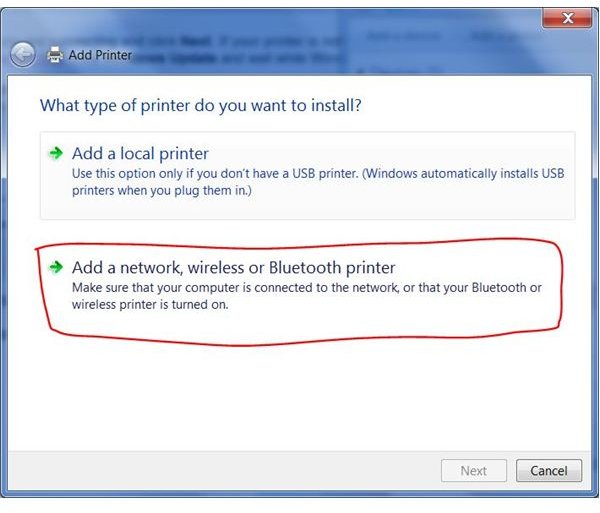
Click Start and select Devices and Printers on the right side of the Start menu. Click Add a Printer at the top of the window. The Add Printer wizard starts. Click Add a Network, Wireless or Bluetooth Printer. Windows will search for available printers.
If the printer you want to connect with appears in the list of available printers, select it and click Next.
Select the printer brand and model you are connecting and click Next. If your printer is not listed, click Have Disk if you have the printer’s setup CD. If you do not have the disk , click Windows Update and wait while Windows tries to find the driver for your printer. “Windows 7 Cannot Connect to Printer” is a common error when the correct driver is not installed. If you do not have the setup disk and Windows cannot find it via Windows Update, check the manufacturer’s download page.
If the printer is not listed, click The Printer That I Want Isn’t Listed. Browse for the printer or enter the printer’s name or TCP/IP address and complete the connection.
If Windows 7 cannot connect to the printer after doing so, troubleshoot the problem in steps. Log onto the computer as an administrator. On another computer on the network, rename the shared printer and make sure there are no spaces in the name. Start the Add Printer wizard again, but select Add a Local Printer instead. Select Create a New Port and use the address of the printer in Hostname or IP Address.
Make sure that all computers on the network are in the same workgroup. Read Windows 7 Wireless Setup & Home Networking for Vista, XP, and Windows 7 for detailed steps on how to do so. Finally, if Windows 7 cannot connect to printer and the printer is connected directly to another computer, make sure that computer and the printer are both turned on and that the printer name and settings have not changed.


