
Filemaker Pro 10 for Windows is a robust, user-friendly database that is a cross-platform (Mac/PC) alternative to Microsoft Access. This article demonstrates how to design database fields and tables in FileMaker.
Introduction
FileMaker Pro 10 for Windows (hereinafter referred to as FileMaker) is a popular database application that runs on PC and Mac computers. Like any database platform, FileMaker is based on data tables, which in turn contain the related fields that hold the database information.
FileMaker field and table design provides a user-friendly and intuitive way to design data fields that will store the information and allow consistent and reliable data entry. Microsoft Access users will appreciate the menu-driven field design approach where new fields are designed, displayed, stored and accessed from anywhere in the database.
How to Design Fields in FileMaker

Once your FileMaker database is adequately planned and you have know just what fields and tables you need to put the database together, it is time to open the FileMaker application and get to work. (The screenshot on the left illustrates the opening dialog box of FileMaker.)
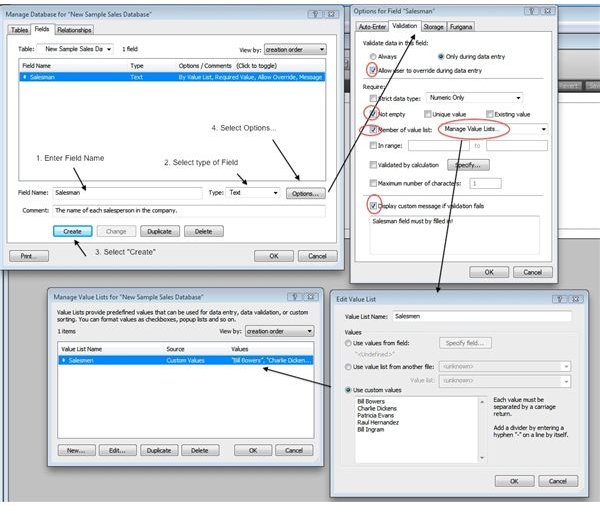
Next, open FileMaker and name your new database. By default, Filemaker saves an empty table with the same title as your database. Our next step will be to design the fields that will go into our basic table. We can begin designing our fields on the Fields tab by naming the field, giving it a field type and assigning special attributes and behaviors to the field in the Options… dialogs.
Once the field is named and the Type is selected, the Options… button is active. In our screenshot example we have named a new text field Salesman. We opened the Options dialog box, selected the Validation tab and in the Require: section, we have selected the Not empty box so that the field is always filled in. We have checked the box next to Display custom message if validation fails and filled in an appropriate message. For our example field, we have also opted to attach a user-specified list of sales people to help us fill in the names of our sales staff as we enter data. The screenshot below displays options in the Validation tab to create our list.
How to Design a Calculation (Summary) Field
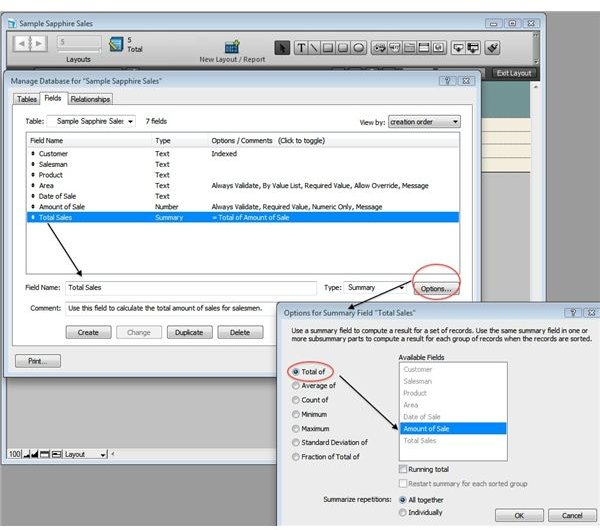
The screenshot below shows all the new fields of our new database. The last field (Total Sales) is a Summary field field that totals our Amount of Sale field. By designing the field in advance, we are ready to insert it into our subsequent layouts that will include our calculations.
Tables: The Finishing Touches
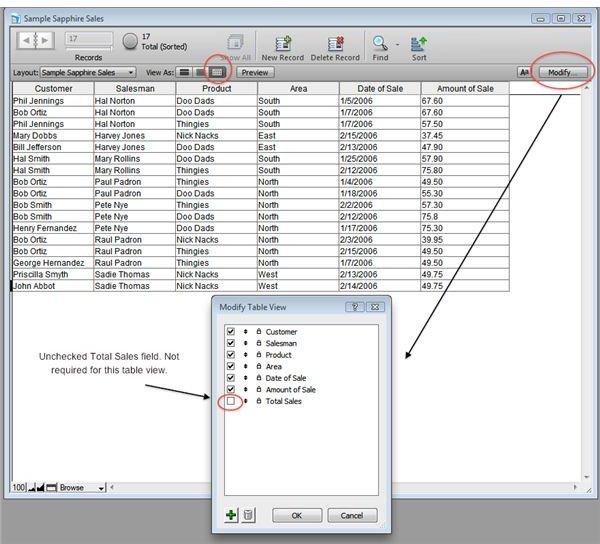
When all your fields are entered and the new table is saved, FileMaker presents a generic form layout with all the fields. We can begin entering data either in the default form view, or we could switch to the table view (View/View as Table). To enter a new record, select Records/New Record (or use keyboard Control-N). The screenshot on the left shows the table view with record entries.
Form More Information on FileMaker Field and Table Design:
FileMaker - All About Databases: Create a Database
FileMaker Pro Help - Defining Database Fields
FileMaker Pro Help - Defining Database Tables
Related Bright Hub Article
Software Review: FileMaker Pro 10 for Windows
This post is part of the series: Using FileMaker Pro 10 for Windows
FileMaker Pro 10 for Windows is a database design application that works on the Windows and Mac computers. Microsoft Access users will have no difficulty learning FileMaker and will quickly learn to create robust database applications. This series presents FileMaker basics, from fields to layouts.


