Your version of Vista determines what class of Windows Vista Backup Center you can use. Office, Enterprise and Ultimate users can backup their entire hard drive. Starter, Home Basic and Home Premium users can only create backups based on their document and file types.
The Windows Vista Backup Center
This article series will explore using the Windows Vista Backup Center for the premium versions (Ultimate, Enterprise, and Business) and the home versions (Starter, Basic, and Premium). In the next part, we’ll look at setting up automated, unattended incremental updates that run in the background in the premium versions. The next part will cover creating a bootable repair DVD to use in case of complete hard drive failure. We’ll round out this series by surveying other full-backup solutions for the home versions of Vista.
Let’s get started!
First of all, we are all aware of the importance of backing up our files and data, but many of us, including computer professionals that should know better, are less than devout about this important task.
Microsoft knows this and in Vista they did something about it.
The good news is that if you have Windows Vista Ultimate, Business, or Enterprise, Microsoft has included the most simplified, attractive, and elegant version of Windows Backup to grace Windows so far. It’s easy to set up and use, and it can back up your entire hard drive including your data and the operating system itself.
The bad news is that if you have Windows Home Premium, Basic, or Starter, you only get a subset of this functionality. The Backup Center in these versions will only do folder-based backups, not the entire hard drive. This is not a tragedy, but it does complicate things a bit.
With the exception of Dell (when this was written), the major PC manufacturers have stopped including Windows CDs or DVDs with new machines. Instead, they use a separate partition on the hard drive to install a copy of the software environment that existed on the machine when it was first unboxed. Typically, the manufacturer will then include a method of accessing this partition to start an operating system to restore the PC, like pressing a certain button on a laptop or pressing F8 during the boot process.
On a ThinkPad, it’s called “Rescue and Recovery.” On an HP PC, a similar functionality is provided called “Recovery Manager.” The thought here is either to separate the user’s data and store it externally or to provide a complete external backup to be used with a new hard drive or when a full recovery is needed.
So this leads us to the next part of a puzzle: if the hard drive fails, how does one start the computer? This is when one needs a bootable DVD to get the system restarted and attempt restoration. Rescue and Recovery and Recovery Manager know how to create a bootable DVD that will start the particular system that the manufacturer provided, so if you have been pious about doing your backups, you can restore all of your data up to that last backup.
It’s not so hot that Microsoft decided to remove the ability to create a bootable DVD in Vista, but we’ve found some ways around that problem .
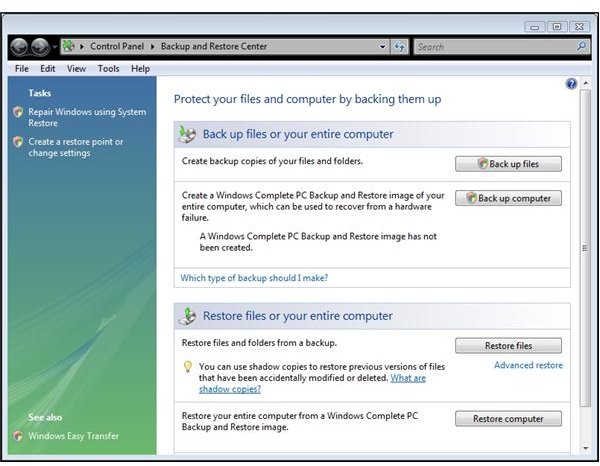
Now let’s look at the Vista Backup Center. I mentioned previously that it’s easy to use and elegant. Here’s what it looks like. Note that there are two main choices – to back up your data files or do a complete back up of the computer.
Image
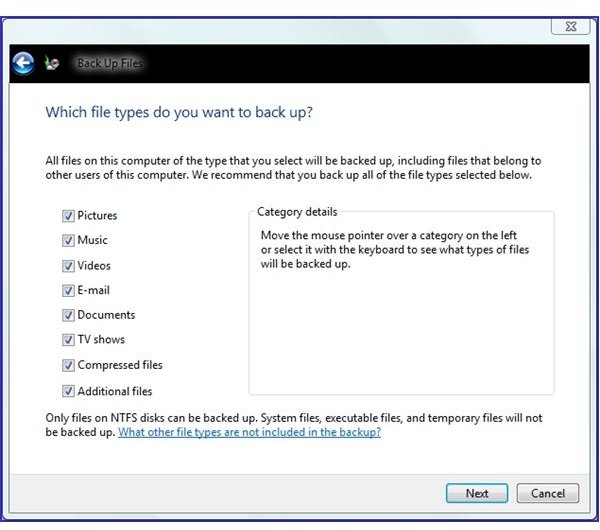
Less Capable Backup in Home Versions of Vista
This next image shows what types of files can be backed up if the complete backup is not selected. This is the only option offered to users of the Home versions of Vista.
Image
Testing the Backup Program
We decided to do a test run to see how well the complete backup worked. We used a freshly formatted 250 GB hard drive (232 GB formatted). 195 GB were to be backed up. When starting an original backup, you’ll be looking at this dialog for quite a while:
Image
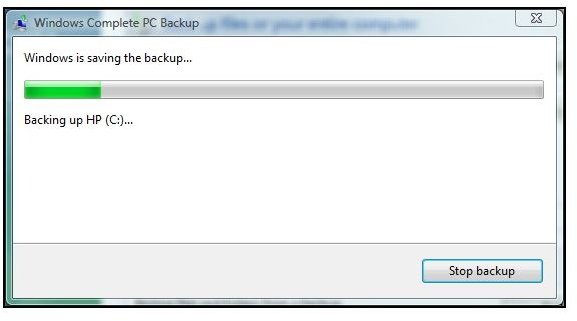
It Takes a While!
The complete backup ran for 52 minutes on a 2.3 GHz dual-core 3GB PC. It also bogged down the machine so badly that running other programs during that time was an exercise in frustration. After starting the backup, it would be a good idea to do something away from the computer for a while.
Using DVD-Rs was an option, but the Backup Center said that between 17 and 54 DVDs would be needed. 195GB divided by 4.7GB is about 41 DVDs, so the estimate was pretty optimistic on the low side and fairly conservative on the high side.
How did it actually do? 135GB were used on the external hard drive.
Vista does not place a program on the external hard drive that can be used to start the computer or restore the system. There are two methods to do this. One assumes that the hard drive is working well enough to boot and get into Vista. Simply go to the Backup Center and select “Restore files and folders from a backup.” The other method assumes that the recovery partition on the hard drive is undamaged. The mechanism there is to press F8 repeatedly during the boot session. (If it says that Windows is starting, you were too late and will need to try it again.)
Then after restoring the operating system, you can go to the Backup Center and restore your programs and data from the external backup.
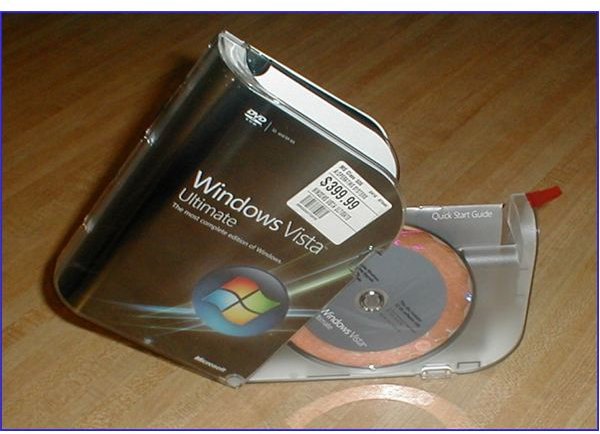
If the drive has completely failed and the PC can’t be started from the recovery partition, you’ll need one of these:
Image
Next: Troubleshooting Vista Backup Problems
Troubleshooting Vista Backup Problems
If you’re getting an error message instead of a backup, first make sure that you do have it set to the external drive. Many manufacturers like to put a recovery partition on the PC that takes up the D: drive letter.
Also, if you have an eSATA hard drive, with an adapter at the back of your computer with a cable that plugs into the motherboard (system board), Vista might do some strange drive lettering. For example, with an HP desktop with one internal hard drive, one eSATA external hard drive, and one DVD-burner, the drive assignments are:
C: internal hard drive
D: recovery partition
E. DVD-burner
F. internal drive (but it’s really external) and the drive we’d want to use as the backup target
On a ThinkPad notebook, the recovery partition is not given a drive letter, so the next drive is shown as D: even if it is external.
Look in “Computer” to make sure that you have specified the correct external drive.
If you get error 0x8004231f, that means that there’s not enough free space on the target device to create the shadow copy.Try freeing up some space and then try the backup again. It also may indicate that there’s not enough free space on the PC’s hard drive to create the shadow copy. This error message is a little vague - it means simply that there is insufficient space to create the shadow copy. I have read that very low free space on the origin hard drive (probably C:) will induce 800xxxx errors.
If that’s not the problem, you can try checking storage allocation for shadow copies, try increasing the allocated shadow storage size, or try launching the backup “by hand.” To do any of these, start an elevated command prompt by clicking the Vista start button, selecting All Programs, then Accessories, and then right-click and select “Run as administrator.” Click Continue when Vista asks for permission. Then type in
vssadmin list shadowstorage
to list all the shadow copy allocation that Vista knows about.
vssadmin /?
will show all the possible switches. One is “Resize ShadowStorage.”
This is handy when you know that you have adequate free space on the target drive but you’re still getting 0x8004231 errors when trying to back up. As an example of its use, the following command
vssadmin Resize ShadowStorage /For=C: /On=F: /MaxSize=80 GB
translates into something like “resize the shadow storage space on the F: drive for data from the C: drive to 80 GB.”
To manually launch a back-up from the command line, enter
wbadmin start backup –backupTarget:F: -include:C:
Replace F: with the drive letter where your backups are to be kept. You’ll see the program asking for permission to continue, so press “Y” on your keyboard, and then you’ll be able to capture any error messages.
If you get an error message that says, “Failed to create the shared protection point on the source volume,” it probably means that you are trying a backup to a volume that was not started at Vista’s startup. For example, if you’re using an external hard drive that was started at some time after Vista’s startup, you may see this error message. If you do, reboot the computer making sure that the external drive is running and try running the the backup again.
There may be other error messages and troubleshooting steps involved that we have not covered here. A good troubleshooting step is to carefully note the entire error message and then do a Google search for it. You may find somebody else with the same problem - and the solution.
Next: Restoring from a Vista DVD, What To Do if You Don’t Have a Vista DVD, and Links to Other Articles in this Series
Restoring from a Vista DVD
Insert it, restart the computer, and let it boot from the DVD. (If the hard drive is toast, the PC may know to look at the DVD drive next. If it doesn’t seem to, restart the PC again and start the built-in BIOS program. You should find something like “boot order” as a selection. Set the DVD drive before the hard drive, and that will let you boot from your Vista DVD.) You should see a message that says something like “Press any key to boot from DVD or CD.”
On the next screen, select your language, time and currency format, and keyboard layout. Click Next and then select “Repair your computer.”
The next screen will offer “Windows Complete PC Restore.” Select your backup location (external hard drive or DVD drive), and you will be able to complete a restoration from your previous backup.
And a suggestion: if you do elect to use an external hard drive for your backups, use one that’s larger than the hard drive in your PC. Then you can select the settings for automated backup in the Backup Center.
Update: Windows Recovery (the screen you see when you select “Repair your computer”) will show the date of the last full backup, not the incremental backups since. So if the date is shows is days or weeks old, don’t worry. It’s the date you last did a full backup, and that same set contains all the changes made since.
If You Don’t Have a Vista DVD
Now back in the real world, if your PC did not come with the Vista DVD and your drive has failed so badly that you can’t get to the recovery partition, you certainly don’t want to buy Vista again – you already bought and paid for it with the PC, right? Our friends at Microsoft tech support can probably help you out, or maybe you can borrow an associate’s or buddy’s boxed copy of Vista to install temporarily on your new hard drive.
Not so hot in your opinion? The best option is to use the Rescue or Recovery software provided by your PC’s manufacturer.
Another option is to use some third-party utilities to create a Vista-bootable DVD or CD with a very small version of Vista capable of recovering the most recent external backup.
Further Reading
Setting Up Hands-free Incremental Backups in Vista - How to use Task Scheduler to set up automatic incremental backups for your Windows Vista Business, Enterprise, or Ultimate versions on your PC. Detailed instructions to schedule daily or weekly full incremental backups. We assume you have created a full backup on your internal or external drive.
How to Create a Bootable CD or DVD in Vista - Need a backup method to start a Vista PC? Creating a bootable disc in Vista is not as easy as in previous versions of Windows, but it can be done. This article tells you how.
How to Recover Lost or Damaged Files Using Volume Snapshot Services in Vista - You have the power - In Vista you can recover lost and damaged files using Shadow Copy, ShadowExplorer, or Previous Versions. It’s fast and powerful, and this article tells you how to recover your files using the tools already in Windows Vista. (All Vista versions).
Bright Hub Review of Acronis True image 2009 - Long revered for its ability to provide perfect disk images for cloning laptop drives, Acronis True Image also includes a powerful and fast backup feature that can provide entire drive backup as well as incremental backups. In this illustrated review, we take True Image Home 2009 through its paces. (Windows XP and Vista.)
How to Clone a Hard Drive with Acronis True Image - Hard drive filling up and declining hard drive prices getting your attention? If you’re ready to move up to a bigger hard drive for your laptop, this tutorial will show you step-by-step in pictures how it’s done in Acronis True Image Home 2009.
If you want to link to this article for your blog or web page, please use:
https://www.brighthub.com/computing/windows-platform/articles/3069.aspx


