Microsoft Office Live Workspace offers free online document storage and sharing. Learn how easy it is to save all of your files to Office Live Workspace.
You jumped in and made your very own Microsoft Office Live Workspace. Now that you know how simple it is to use, you want to start saving more (or all) of your documents and other files to your Workspace. You will be pleased to learn how easy that is to do, as well.
Saving from Office Live Workspace
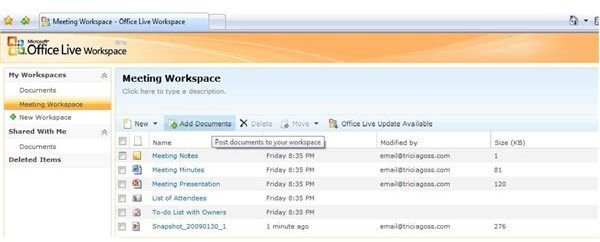
There are a couple of different methods of saving files to your Office Live Workspace. The first way is to upload existing files to a workspace. To upload current files from your computer, log into Microsoft Office Live Workspace. In the My Workspaces task pane, click on the workspace where you want to save documents, spreadsheets or other files. In the Workspace window, click the Add Documents button. An Open dialog box will appear.
Navigate to the file or files you want to save to Office Live Workspace. Click on the file name and click Open. The file will be uploaded and saved in the workspace you selected. You can save several files to a workspace at one time, if you choose. This is a good way to back up important files on your computer that are not saved elsewhere. To save all of the files in one folder to Office Live Workspace, open the folder in the Open dialog box. Click on the first file in the folder, press and hold the Shift key, and then click on the last file in the folder. Click Open and all of the files will be uploaded and saved. You can also use the keyboard shortcut Ctrl+A to select all of the files. If you want to save some but now all of the files in a folder, press and hold the Ctrl key and click each file that you want to save. Click Open and Office Live Workspace will upload and save the files you selected.
Saving from Microsoft Office
You can also save Microsoft Office files directly to an Office Live Workspace from Office applications as you create them. The first step is to download the Office Live Update . After installing this update, you will have new options available in your Microsoft Office applications.
If you are using Microsoft Office version 2003 or XP and you install the Office Live Update, your office programs will have three new buttons on the toolbar. If you are using Microsoft Office 2007, the new buttons will appear when you click the Office button.

The first button is Go to Office Live. (This button does not appear in Office 2007.) If you click this button, and have an active internet connection, your web browser will open directly to your Office Live Workspace. If you are not yet logged in with your Windows Live ID, you will be asked for your ID and password.
The second button is the Open button. When you click this button, you will see a drop down menu allowing you to select a workspace. A File Open dialog box will appear, and you can open a file of the same type (such as a document if you are in Word, or a spreadsheet if you are in Excel). The file will open from the Office Live Workspace directly into the Office program you are using.
The third button is Save. This button allows you to save a file directly to a workspace. When you click it, the drop down menu allows you to select the workspace to which you want to save the file. Give the file a name and click Save, just as you would typically save a document.
This post is part of the series: Share Files with Office Live Workspace
If you work from home, you may need to access files from a different location, or collaborate on files with someone in another location. Microsoft Office Live Workspace makes storing and sharing files easy. Bonus: it’s free! Find out how simple it is to use.


