Do you need flyers for an upcoming event and have HP Image Zone installed on your computer? Well, this guide can help you. In this guide, I will show you how to create your own flyers using the HP Image Zone software.
HP Image Zone Flyers
If you have a local event coming up and need to make flyers, try HP Image Zone. HP Image Zone lets you create flyers using your digital photos. The flyers are easy to create and you can create them right from your home office computer. In this tutorial I will show you how to create these flyers using HP Image Zone.
Selecting the Photos for Your Flyer
The first step is to select the photos that you want to use. You will need to select at least three photos to use for the flyer. You will need to click the View tab in HP Image Zone. On the left side of the program you will need to find the folder with your photos. Click that folder and the photos will appear on the left side of the program. Click the box below the photo to select it. Once you have the photos selected that you are going to use, click the Create tab.
Creating the Flyer and Adding Photos
Creating Your Flyer
You will now be on the Create section. In this section you will need to click the Flyers button. Now you will need to select the size paper that you plan to use. This is located in the middle panel. The first panel is your navigation panel, the second panel is your options panel, and the third panel is your preview panel. After you have selected the paper size, click the Next button at the bottom of the middle panel.
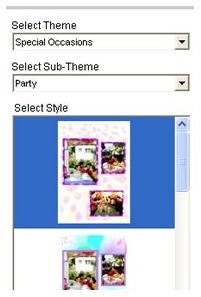
Next, you will need to select your theme. In the middle panel you will see the theme drop down box, drop that box down and select your theme. Then drop the second box down and select the sub-theme of your choice. Below those two boxes are the previews of the themes. Click a theme to select it. You will see your flyer in the third panel. Click the Next button to move on.
The next step is adding your photos. Your photos should already be added to the flyer. You can rearrange the photos by dragging them to the different slots using your mouse. After you have rearranged your photos, click the Next button.
Adding Text and Printing the Flyer
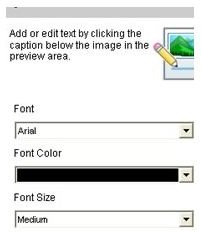
Now you are ready to add the text to your flyer. In the middle panel you can drop the boxes down and change the size of the text, color of the text, and the style of the text. Then you can click the text fields on the flyer to edit the text. Simply click a text field and start typing. After you have added all of your text, click the Next button.
Now you can print your flyer. I would print one flyer first. If it is like you want it, go ahead and print the others. If you need to make adjustments, use the menu in the first panel to go back through your flyer and make adjustments.
Image Credits
Screenshots were taken by the author and belong to the author.
This post is part of the series: HP Image Zone
This series will show how to use HP Image Zone.


