Stained Glass Photoshop Projects for Beginners

Stained Glass: Photoshop Projects
Stained glass has long been used to mark the windows of churches and other significant buildings such as courts of law and even some college buildings. In Medieval style glasswork, the borders were made of lead and each piece of glass was trimmed and carefully seated into each individual slot in the borders. Today, stained glass is still an artisan craft, but is made of steel and is frequently hand-poured rather than hand-seated glass chips.
Stained glass gives off a sophisticated, classic feel. You too can create beautiful stained glass Photoshop projects with a photo to adorn scrapbooks, book covers, invitations, or anything you can think of. This tutorial was written in Adobe Photoshop CS4, but should work fine for anyone using Adobe Photoshop CS and up.
Choosing the Proper Kind of Photo:
For this tutorial, we’re going to simply transform a photograph into a stained glass Photoshop project, rather than hand making a stained glass image. This allows people that don’t have a wealth of artistic ability, or those who don’t have the time to go through the lengthy process of starting from scratch.
This might surprise you, but not every photo can be magically transformed into stained glass. Detailed pictures or pictures that lack any contrast whatsoever often do not easily make the leap from photograph to stained glass. That being said, some do work out very well. Ideally, you want a picture where the subject has some contrast to the background. A blockier, less detailed subject often works well, but don’t think you need to limit yourself. This effect doesn’t take very long to try out and can easily be tried on several photographs until you get the right fit.
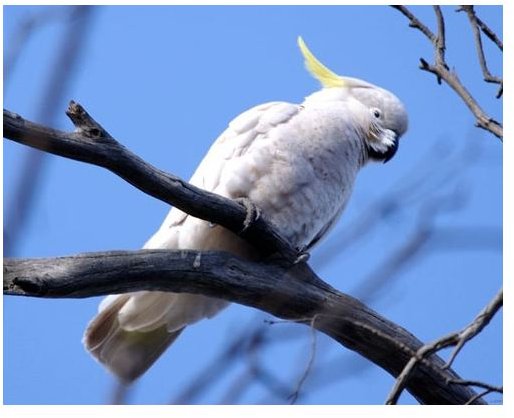
Open your photo in Photoshop. Ideally, your photograph should be a decent size, because the smaller it is, the more detail will be lost. Here I’m using a cute little Sulfur Crested Cockatoo, not only for the birds recognizable shape, but also because his white and yellow stands out very well against the blue background. This will make it so when we remove the details and place the stained glass mosaic on the picture, you will still easily be able to tell what it is.
In your filters menu, scroll down to texturize and select stained glass.

Here’s where your artist’s eye comes in. Cell size, boarder thickness, and light behind the picture are all up to you. Here I’m using:
Cell Size 5
Border Thickness: 2
Light Intensity:2
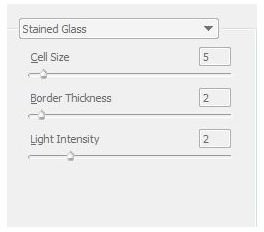
Press OK when you achieve your desired effect! It should be noted that traditionally, mosaic-style stained glass like this is traditionally medium and large pieces with a medium to thick boarder. Making the cell sizes too small will give your photograph a strange overall effect.
Here is the finished effect!
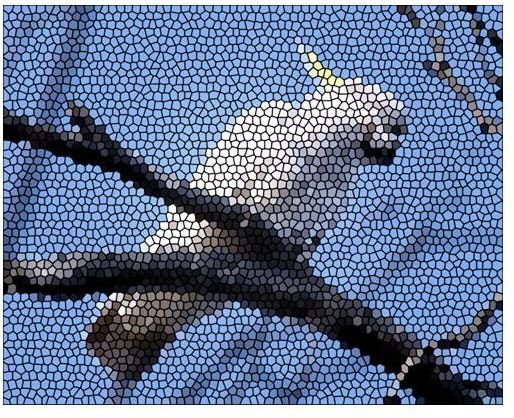
Image Credits
Cockatoo image: https://commons.wikimedia.org/wiki/File:Cacatua_galerita_-Melbourne-6.jpg
Screenshots by Amber Neely