How to Create Matching Envelopes for Your Christmas Postcards - Part 3
This is part three of the Santa Claus and Puppy Dog Christmas Postcards tutorial. In this part of the tutorial, I will show you how to create the matching envelopes to go with these postcards.
Step 1 – Creating a New Window
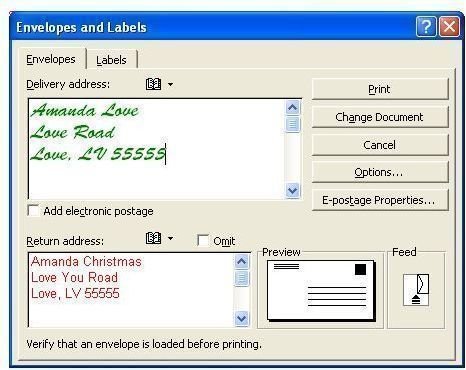
Go to the top of the window that you are in now and click the New icon. That is the white paper icon. That will open a new Microsoft Word document. In the document, go to the top and click Tools -> Letters and Mailings -> Envelopes and Labels. That will open the Envelopes box.
Step 2 – Filling in the Address Information

In the box that is now open, you will need to enter the return address and the mailing address. On the right side of the box, click the Options button. When the Options box opens, drop the top box down and select the size envelope you will be using.
Then click the Font buttons and change the font options to what you want. There are two Font buttons. One font button is for the return address and the other is for the mailing address. You can apply different font options to the mailing and return address. Once you are finished, click the OK button. Once you have your address ready to insert, click the Add to Document button on the right. Your addresses will be inserted into your envelope.
Step 3 – Inserting the Graphic
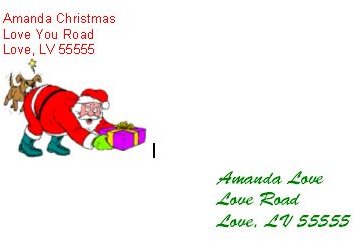
Click your mouse on your envelope. Go to the top of your window and click Insert -> Picture -> From File. Locate the Santa Claus graphic on your computer. Click it and click the Open button. The graphic will open and throw your entire envelope out of whack. Don’t panic. Click the graphic to select it, grab the bottom right corner and drag the graphic inward. You will need to make the graphic small so it will fit on the envelope. Once you have the graphic small enough, everything else will fall back into place. You can adjust the alignment of your graphic by clicking the graphic and using your alignment icons at the top of your Microsoft Word window.
You can also edit your text in the window you are in now. You can highlight the text and change the font options using the boxes and options at the top of your window. Once you have your envelope ready to print, insert your envelope into your printer. Then click File -> Print. Print one envelope to begin with, as you may need to make adjustments to your text before printing the others. That’s it–have fun and Merry Christmas!
This post is part of the series: Christmas Postcards and Envelopes in Microsoft Word
This series will show you how to create personalized Christmas postcards and matching envelopes in Microsoft Word.
