Confused as to where to resize your photos in Lightroom? Don’t worry, we’ve all been there. Learn how to use Lightroom resize and how to create presets of your resize settings.
Lightroom Library Module
Adobe Photoshop Lightroom allows users to do many of the same functions as Photoshop. Yet, for many new users, it is hard to figure out how to resize photos in Lightroom. A menu specifically for this purpose is not available, but it can be done. You just need to know where to look.
Lightroom allows users to resize individual photos or sets of photos. While it may seem counter-intuitive, photo resizing is done in the Export menu. To start resizing photos, the first thing that you want to do is go into the Library module . This will bring up all of your photos and other images.
Within this menu, you can select the image or images that you would like to export. To select images, go into the folder that holds the images that you would like to resize. Click on the images that you need to export.
Using the Export Menu
Now, go into the File menu, and click Export. Within the Export menu , you will find options for exporting images. The first menu will be the Export Location, and this is where you will choose your output folder. You can just export the images back to the original folder.
But, it may be better to create a folder that has the name of the first folder plus something like resized or edited. This way, you will know that these are the manipulated folders. Next, if you want to access these images in Lightroom again, select the Add to This Catalog box. You may also manipulate these options even further. Simply look through them until you find the options that you would like to use.
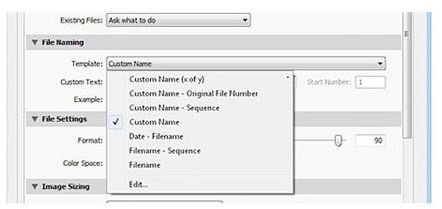
After that, type in the name that you would like to use for your photos within the File Naming Options. Now, in the File Settings, select the format in which you would like your photos to export. You may also change the Color Space based on your preferences as well.
Resizing Images
It’s now time to resize your images. Go into the Image Sizing menu, and select the resolution and size of your
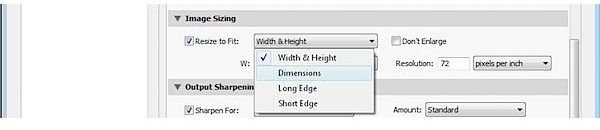
images. Select the Resize to Fix box, and select the final dimensions of the photo in the Dimensions area.
You can also manipulate the width and height of a photo. Only do this proportionally, or your photos will be distorted. Using either Long Edge or Short Edge, you can manipulate the edges of photo. Do not enable the Don’t Enlarge checkbox. If you do, your images could be extremely small.
Before you finally export the images, you can also add additional effects, including sharpening, or you can add metadata to your photos. Once you are done, hit Export. Now, your images will be resized.
Creating a Preset
If you wish to keep these settings for future images, hit the Add button on the Preset list. Then, you can create a name for it and save it.


