When you’re editing an image in Photoshop, you need to remember that there’s more than one element you need to consider. There are masks, layers, floating selections, paths and vector masks and there are different ways you can move around your image in order to get the effect you want to achieve.
How to zoom in and out of images
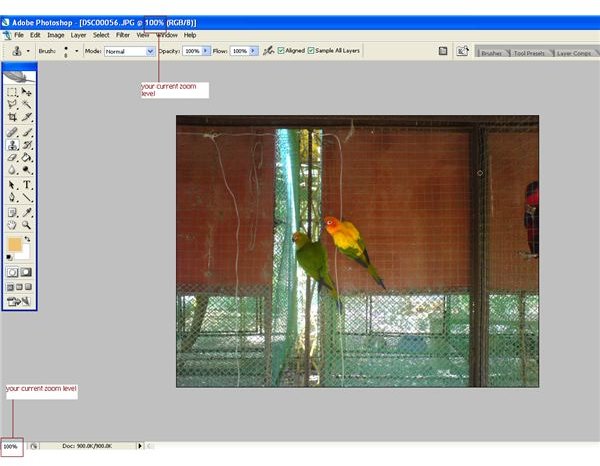
Before we actually learn about the methods which can be used to zoom in and out of images, let’s try to determine first your current zoom level. Just like anything in Photoshop , there are several ways you can do this. The first way is by looking at the very top of the document window. Using the image on the left (click on any image to enlarge), you should see [DSC00056.JPG@100% (RGB/8)]. DSC00056.JPG is the image’s filename and 100% is your document’s zoom level. Remember that zoom levels are always expressed in percentages.
Using the same image, look at the bottom left corner of the window. This is another way you can determine your zoom level. In this case, its telling us that the we’re viewing the image at a zoom level of 100%. The difference between the zoom level found at the top and at the bottom is that the information on the top of the document is for information purposes only. If you want to change your zoom level, you will have to manually change it at the bottom of the document window. Just type it in, no need for the percentage sign and Photoshop will adjust the view according to the value you specified. While this is easy for some, changing your zoom level this way can be tiresome especially if you’re in the middle of editing.
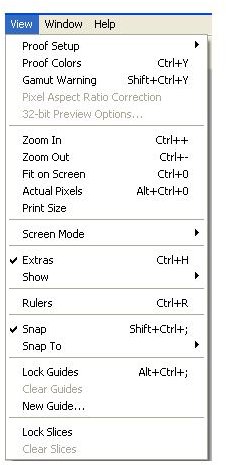
Another way you can zoom in and out of images is through the menu bar. When you click the view menu, you will be able to see the standard zoom in and zoom out commands. You can also see the Fit to Screen command which allows Photoshop to zoom to a level it needs to fill the entire screen with the image. Clicking the actual pixels command will zoom the image to 100% its size. The print size will show you how the image will look like when it is printed. In reality, however, the last option isn’t very helpful and is probably one of the least used commands in Photoshop. There are also several keyboard shortcuts you can use to access these commands:
- CTRL and +: zoom in
- CTRL and -: zoom out
- CTRL+0: fit to screen
- CTRL+ALT+0: actual pixels
Using the view menu/keyboard shortcuts, Photoshop will zoom in/zoom out at increments. It you’re viewing an image at 25%, when you zoom in, it will jump to 33.33% zoom level, then to 50%, then 66.67% and finally into a full 100%. Of course you can continue zooming beyond 100%, Photoshop will allow you to zoom to as much as 3200%. Using the view menu/keyboard shortcuts is the easiest and most convenient way you can zoom in and out of your image.
Continue on to page two to learn about the zoom tool and the hand tool .
The Zoom Tool

By far, the easiest and most popular way to zoom in and out of your images in Photoshop is through the zoom tool found in the tools palette. The zoom tool is located right beside the hand tool and it looks like a magnifying glass. Click it to select, or just press the letter Z on your keyboard.
The use of the zoom tool is pretty straightforward; all you need to do is to click on a specific area to zoom in. Just like the zoom in/zoom out commands from the view bar, the tool uses specific increments in moving from one zoom level to another.
You’ll know that your zoom tool is set to zoom in if the center of the magnifying glass has a (+) sign. On the other hand, if the center has a (-) sign, then the zoom tool is set to zoom out.
To switch between the zoom in and zoom out modes, there are a couple of ways. On the options bar, located just below the menu bar (see image above), you should see the icon for zooming in (a magnifying glass with the + sign) and zooming out (a magnifying glass with the - sign). Just click on the icon of your preference. Additionally, you have buttons for “actual pixels”, “fit to screen” and “print size”.

There are also keyboard shortcuts which you can use to zoom in and out of an image. To zoom in an image without having to select the zoom in tool, simply hold down CTRL+ Spacebar. This command will temporarily switch you from whatever tool you were using to the zoom tool set to zoom in mode. When you use this command, you can click and drag on an area of the image so that your zoom will be targeted. Once you release the mouse button, the area you dragged will fill the page (see image on the left).
Panning your images
When you have your image zoomed, you will not be able to view other areas. If you want to see the other parts of the image at the same zoom level, then you’ll have to drag around the document window. This action is called “panning”. To pan images, you will need to choose the hand tool which is located right beside the zoom tool. As the name suggests, the icon for the hand tool looks like a gloved hand. To switch to the hand tool, you simply select it from the tools palette or press the letter H on your keyboard. The easiest way to select the hand tool is to hold down your space bar. This will switch you to whatever tool you were using and the cursor will change to the hand icon. While holding down the space bar, click on the image and just drag around the document window. When you’re done, just release the spacebar and you will revert back to the original tool you were using.
If you want to switch to “actual pixels” or your want the image to “fit the screen” but can’t remember the keyboard short cuts, well, don’t worry. Simply double click on the zoom tool and this should select the “actual pixels” command. Double clicking on the hand tool will let you access the “fit to screen” command.
So there! Now you can move around your image with ease! For the next part of our series, you will learn about the navigation panel, the move tool and Direct and Path Selection tools.
This post is part of the series: Using the Navigation Tools while Editing Images in Adode Photoshop
If you want to create exact selections in Photoshop, you will need to know the easiest ways you can navigate your photos. In this series, you will learn about the different navigation tools and shortcuts and how you can use them to manage your workspace more efficiently!


