With this Corel Paint Shop Pro tutorial, you’ll learn how to use the Object Remover Tool to quickly and easily remove unwanted distractions from your photos.
Fix Your Photo in Seconds
If you forgot to do a background check before composing your shot and you find yourself with distracting elements in your otherwise excellent photo, have no fear – all is not lost! Corel Paint Shop Pro ’s Object Remover Tool allows you to easily remove these faux pas in seconds.
How to Use the Object Remover Tool
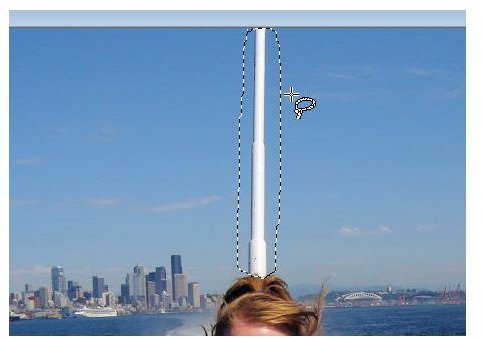
Step 1: Open the image that you’d like to edit. I’ll be working with a photo that has a huge pole protruding from my head (thank you husband!).
(Click on any image to enlarge)
Step 2: Click on the Object Remover Tool from the toolbar on the left, as shown in the screenshot below.
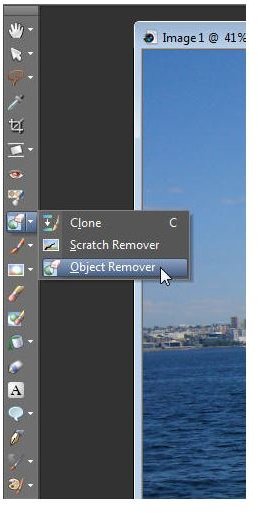
If your window is missing the toolbar shown above, simply click on View>Toolbars>Tools. It’s also important to make sure the Tool Options is selected (View>Palettes>Tool Options).
Note that the Object Remover Tool is grouped together with the Clone Brush and Scratch Remover tool. If you don’t see the Object Remover Tool within your toolbar, click on the arrow beside the active tool to change your selection.
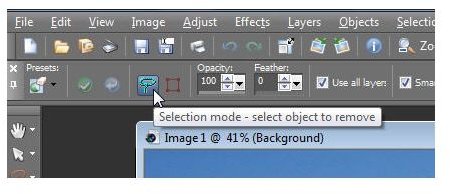
Step 3: From the Tool Options palette, click on the Selection Mode button (the little lasso).
Step 4: Carefully “draw” around the item you wish to remove from your photo – you don’t need to perfectly outline the object, but try to stay near the edges. If you are trying to remove a small object from your photo, it may be easier to outline by zooming in.
Step 5: Select the Source Mode button from the Tool Option palette (the little square located to the right of the Selection Mode button). Once selected, you’ll see a selection box on your image.
Step 6: Click anywhere within the selection box and drag it to your desired location. This selection box will determine what background your unwanted object will be replaced by.
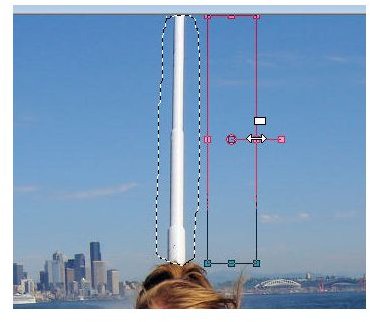
You can resize the selection box by clicking and dragging the small squares that are positioned around the box. To rotate the box, do the same with the square located inside.
Step 7: Once it’s sized and positioned to your liking, simply double-click inside the selection box or click on the Apply button (green checkmark located in the top-left of the Tool Option Palette) and your distracting object will be replaced! On your keyboard, pressing Ctrl + D will deselect the Selection and Source Modes so you can view your photo properly and, if necessary, repeat the steps to eliminate other unwanted objects within your photo.
Before & After


Additional Tutorials
Did you find this tutorial helpful? Bright Hub’s Digital Photography channel has several Paint Shop Pro tutorials ideal for beginners and advanced users! You’ll find resources on everything from using layers to reviews of the best free plugins compatible with Paint Shop Pro by visiting our master list of Paint Shop Pro tutorials and resources .


