Mastering the Art of Urban Landscape Photography
Getting to Know You
You’ve got your camera, and you want to venture out into the big city. Every city has its own unique style and personality, and in order to master urban landscape photography, you must learn how to capture that personality in your images.
Before you start, you have to get to know the city. This isn’t something that you can do in just one visit; it’s best to start off with a place that you already know quite well. Even if you think that you really know a place, still play tourist for a day. Walk around to areas that you’ve never been and consider taking a walking, history or even haunted history tour to really get a feel for your selected city.
Getting the Lighting Right
Typically, the best time to photograph urban landscapes is in the early morning because the light is usually filtered through the buildings, giving your scene a nice soft glow. Mornings are also usually the time of day when there are the fewest people and traffic about. Also, most cities clean up the refuse from the night before during the morning hours, eliminating ugly plastic bags, bottles and other garbage from your shot.
Good Mornings
While the morning is great for most shots, it may, however, not be the case for every city. What I like to do is check out the city during all hours of the day. An early afternoon shot may add the WOW factor to a particular building. This time of day has some of the softest light; the sun will illuminate your building without creating harsh glares. Plus, if the building has a lot of windows, you can capture the reflection of the sun setting in the windows.
Take a few shots and compare the effects the different lighting has on your photos back home. Then, go back out when the lighting looks the best.
Original Angles
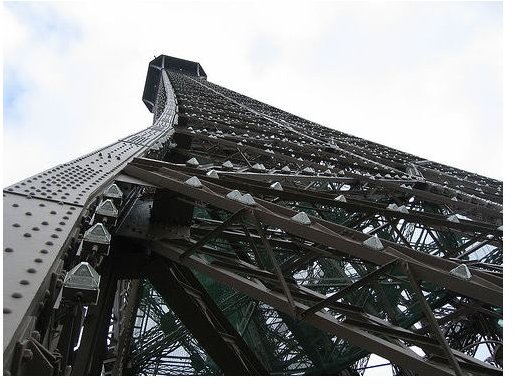
For creative urban landscape photos, think about the angle you’re shooting from - buildings are not all uniform so you surely aren’t going to shoot them all from the same perspective. For example, if the building is really tall, squat down as low to the ground as you can get, and
shoot upwards - you’ll get more of the building in your frame, and it will really emphasize its size. If the building has a dome, put something with a different shape in the foreground that shows off its rather nice shape. For example, you can take a photograph of a small rectangular building in the right-hand corner of the photograph with the dome building in the background. If you can, get a straight object next to it. That may mean dragging your friend away from the vending machine and putting him at either the right or left corner of the shot.
Find the Hidden Jewels
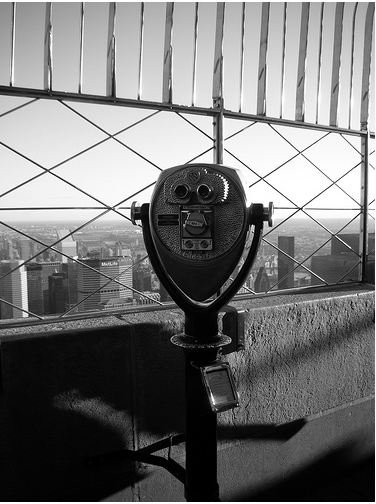
While you may be told over and over again to not sweat the small stuff, in this case DO! You want to find the small details that other photographers may have missed. This is doubly true for any building that is found in nearly every travel website, catalog and photography book (ahem, the Empire State Building, the Chrysler Building, Globe Theater … you get the picture). For example, focus on the columns near the entrance or even a few of the windows that line the entire building.
Walk around the entire length of the building. See if you can get access to places behind fences or gates since a lot of photographers won’t be going the extra mile to find the nooks and crannies the typical tourist won’t see. Since you may have to get permission to photograph certain buildings anyway, you can go ahead and ask for access at that time.
Getting the City Essence
Never forget the main purpose of your photography shoot: capture the real essence of the city. Decay is also part of the personality of a city. In this case, that garbage that you didn’t want in the previous shoot, you may actually want littering your images. For example, Paris is known for its “animal waste.” In fact, it’s everywhere. If you want to show how the pretty buildings don’t mesh with what people are stepping in, then you need to include the street mess in your shot.
Rapid growth is also a part of many cities. In this case, capture the new building being built next to the established structure. Focus on the construction workers doing their job or simply hanging out on their masterpiece.
Using Natural Lighting
Generally, you want to avoid using your flash if at all possible when photographing buildings, especially ones with reflective surfaces. Using your flash will likely result in an overexposed photo and could also show your reflection in the windows of the buildings. If the images are looking too dark, increase the ISO to about 800 but don’t increase it too much, or your images could turn out too grainy (high noise). Overall, however, a slight increase of ISO is enough to let in some additional light while still using the light bulb that Mother Nature gave us.
Get Out of the City
While most of us are familiar with only shooting the center of the city, urban landscapes don’t end there. In fact, you may have a better chance of getting a once-in-a-lifetime shot if you take the side roads. Go out to the residential sections of this world, especially countryside or shanty towns. The cleanliness of the city may be a stark contrast to the reality of the poor living outside of it. It would even make for a very cool shot if you could get a rundown house or building in the foreground and a shot of the city in the background.
Putting something in the foreground is a good idea, period. For example, you could focus on a blooming rose while having the Eiffel Tower in the background. It will add a new twist to an old idea.
Lenses and Other Gear
Your lenses are just as important as the way you take the photograph. Generally, for all types of landscape photography, you need a wide angle lens. Try a few different wide angle lenses, including a 400mm. This lens will give you a very wide view of your subject, allowing you to point the camera upwards and capture the whole building.
If you do want to zoom in on a feature or two, you can use simple 200mm telephoto lens for urban landscapes. It allows you to zoom into the little details, but it’s not so big that you need a lens support.
Invest in a few different filters and a lens hood. The lens hood will prevent sun glare, especially glare reflected off the building, from over-exposing your shot. Experiment with a few filters. A cool filter will add a bit of blue to your photograph, and a warm filter will add some orange. A blue tint filter is really good for a silver building since adds a little color, but not much. A warm filter works well for western, terra cotta or adobe buildings.
Urban landscape photography involves being creative. Always experiment with new shots. Use what others have done in the past, and add your own take on it.
References
-
Digital Photography School, Urban Landscape Photography Tips
-
Image Credits:
Image One by Craig Wyzik
Image Two by miss vichan
-
Photography Mad, Urban Landscape Photography Tips