Are you struggling to get your exposure settings right whenever you take a picture? Read the following article to find out a simple rule that will help you determine the right settings every time, along with a handy cheat sheet for quick reference.
The Essential Connection Between Light and Photography
Just like our eyes see things in light, a camera captures a photograph as a result of the amount of light that enters it. Too much light, and the picture will be over-exposed. Too little, and it will be dark and under-exposed. A properly exposed photograph will have a perfect balance between light and dark, or in other words, between the amount of light entering the camera and what the camera chooses to block.
This delicate balance is handled by three main components: ISO, shutter speed, and aperture. While these three settings can sometimes be daunting to understand, knowing them properly can help you create some amazing effects. They are also directly connected to the outside setting and the amount of light naturally present in the environment, whether it is the sun, backlighting, or an overcast sky.
I will be giving an easy to remember example of how to understand these three components at the end of this article. For now, let’s focus on how exposure relates to the amount of light present in a given situation.
The Sunny 16 Rule
One of the rules that you will hear photographers often refer to is the Sunny 16 Rule. This rule basically states: Set the Aperture to f/16 in bright sunlight and the shutter speed to the reciprocal of the ISO setting . This simple rule will help you determine the exposure easily just by examining the type of setting you are in.
Suppose your ISO is set to 200:
In Bright Sunlight
Your best aperture setting will be f/16 and your shutter speed will be the reciprocal (the reciprocal of a number is 1 divided by that number) of 200 as your ISO is set to 200. This will give you a shutter speed of 1/200 or 1/180 which is the closest setting to 1/200 on your camera.
Let’s look at another example where this rule can be applied:
Partially Overcast Sky
Remember the key principle is to let more light in through the aperture as the surrounding light decreases. So in a partially overcast situation you would need to make the aperture bigger than in bright sunlight. To do this, just add 1 stop to f/16 which should give you, f/11. For an overcast sky add 2 stops to f/16, making the aperture opening to f/8. For a heavy overcast sky add 3 stops, and so on. As the surrounding light gets darker, keep adding more stops to the aperture.
Indoors
Just like outdoors, in indoor photography you will also need to determine the source of light. If you are working with backlighting, your settings will differ from if you are in a dark room with little light. With backlighting you might want to decrease the aperture size by a few stops to compensate for the light coming in and keep the ISO setting low. However, if it is dark and your subject is moving, you will need to tweak the ISO settings a bit more.
Exposure and ISO
Understanding ISO is important because with an increase in ISO comes an increase in noise, or grain, in your photos. You generally want to avoid this as much as possible unless you are aiming for an artistic shot and purposely want more grain.
To achieve photos without noise, you can usually choose the lowest ISO setting on your camera, which is in most cases 100 (although some newer cameras allow ISO as low as 50). This is easy when there is enough light present and you can adjust the shutter speed and the aperture to compensate for a lower ISO level. But for some instances you would need a higher ISO setting, and the best example of this is indoor sports. In indoor sports your subject is usually moving which means you cannot use a tripod, and you want a faster shutter speed to be able to capture the moment. In this case a high ISO setting is the best option so that your shot is still exposed well enough.
If you are still worried about the graininess you can try to adjust it in post-processing , which might remove some of the noise from the photo.
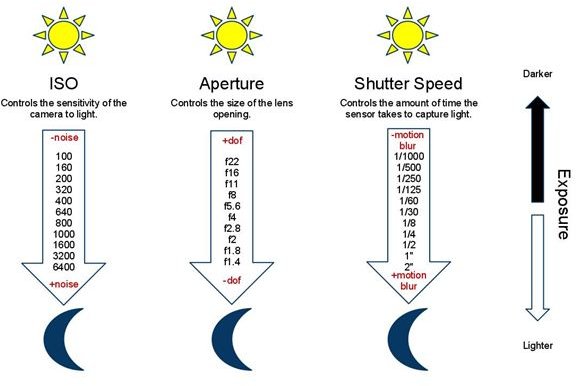
Exposure Settings Guide
The following photography exposure cheat sheet details the different exposure settings. Get a downloadable copy to print out for your own personal use in the Media Gallery . You can keep this with you on your photography expeditions so that you always have a reference point when needed.
Important Note About the Cheat Sheet
The ISO, shutter speed, and aperture numbers relate individually to the amount of light present. Each of them need to be adjusted in relation to the other based on the setting. They also determine other areas of photography such as depth of field in case of aperture, motion blur in case of shutter speed, and noise in case of ISO.
The Window Example
Now for the example promised above. I have heard of this example several times before, but it seems to explain the exposure triangle of ISO, shuttter speed and aperture in layman’s terms quite well.
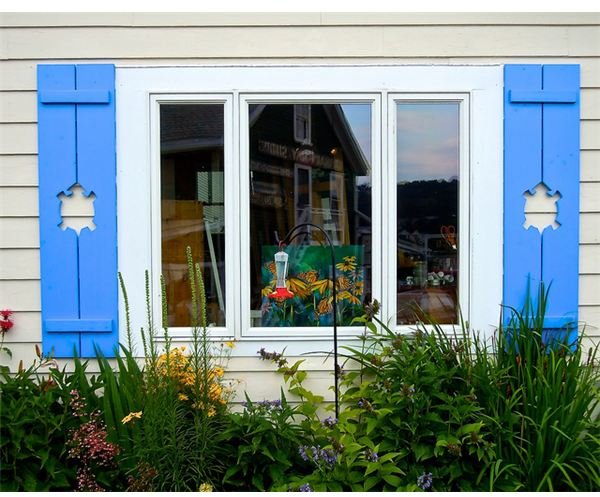
Think of your camera as a window with shutters. The size of the window is your aperture setting, the bigger the size the more light comes through. The shutters relate to the shutter speed of the camera; the faster they close the less light gets through. Now imagine you have blinds on your window which represent the ISO setting, the darker the blinds the less light they will allow through, or the lower the ISO setting the less sensitive your camera will be to the light. Okay, so the last bit was my own variation to the example usually represented by sunglasses instead of the blinds, but hopefully you get the idea.
References
Personal Experience
Image credits :


