Once you download and set up the program, it is easy to learn how to use Picasa to build your photo library and share photos with friends and family on the Internet.
Organizing Photos
Enthusiastic photographers soon find their computer’s hard drive filled with thousands of photos. Many of those photos have file names that make it impossible to know what they are unless you look at each and every one of them. Without careful organization, a photography library can grow wildly out of control.
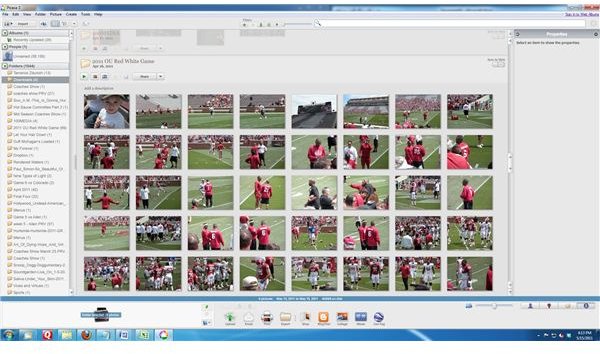
The first thing you need to do is allow Picasa to find all the photographs on your computer and various hard drives before you start using the software. Once Picasa finds all the photographs on your computer, it organizes them by date added.
After all the photographs open in Picasa, the program lists the folders they are in on the left side of the screen. The photographs display on the right so you can see exactly what each photo is. The order of the folders is “Creation Date” by default but you can change it to “Sort by Name” if that makes it easier for you. At the bottom of the screen are one-touch links to print, export, edit, e-mail, upload or geo-tag photos.
Before you make any changes, understand that what you do with Picasa will change the photos on your hard drive.
Rename Photos
The first thing you can do to organize your photos using Picasa is rename them. Luckily, you don’t have to rename every photo one-by-one because Picasa allows you to rename several with one command.
Find the folder you want to rename the photos in. Use the shift key to choose all the photos you want renamed. Click File > Rename and then choose what you want them to be named and click enter. Now, instead of photos being named DSCN2351.JPG, they can be called football-game-01.JPG and Picasa will number them for you.
Edit Photos
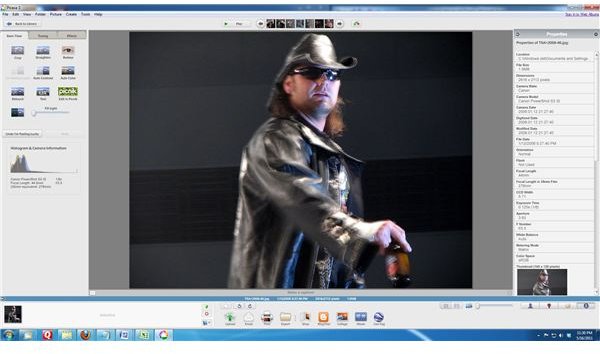
Once you get your photos organized and renamed, you can start editing them in Picasa. This software is nowhere near as exhaustive as Photoshop but its big advantage is it is easy to learn. For free software, Picasa offers quite a few options for fixing problems and altering the look of photos. All you have to do is double click the photo you want to work with and it opens in the window with three pull down menus to the left.
“Basic Fixes” allows the user to make basic fixes to photographs. The options under this category include Crop, Straighten, fix Redeye, Auto Contrast, Auto Color and Fill Light. There are also options including Retouch, which removes blemishes from photos and Text, which allows you to add text. Also included here is I’m Feeling Lucky, which does all the work for you and Edit in Picnik, which transfers you online to a new editing tool.
“Tuning Tab” includes a number of advanced editing techniques. This allows you to add fill light to the foreground of photographs, amplify bright spots in the photo, darken the shadows and adjust the color temperature.
Finally, “Effects” has a number of options including sharpen, sepia effects, black & white effects, warmify, add film grain, tint, saturation, soft focus, glow, filtered black & white, focal black & white and graduated tint.
Upload Photos
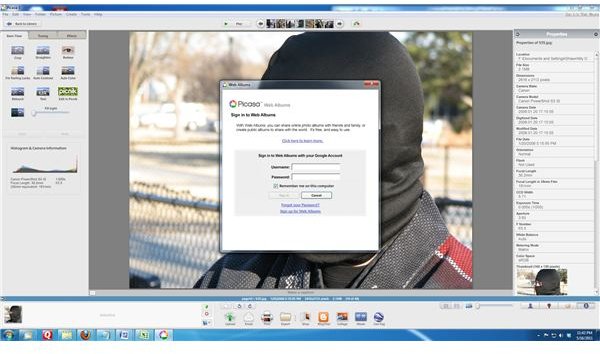
Finally, once you get your photos named and edited, you can upload them to your Picasa server on Google. This is an easy one-step function.
At the bottom of the screen are a number of options with the first one titled “Upload.” As soon as you click the button, it asks you to log in to your Google account. The next window that pops up asks you to specify which folder you want the picture in. You can either choose one that already exists or create a new folder.
You can then choose whether you want the photo to be public on the web, private or available to anyone with a specific link. The only drawback is you only get 1.0GB free space and must pay upgrade prices for more.
References
picasa.google.com - https://picasa.google.com/support/bin/topic.py?topic=14609&hl=en
screen captures by author


