
Having ongoing issues with an unresponsive iPhone or do you need to clear all data from your iPhone? This in-depth guide to this iPhone problem will show you how to restore an iPhone and discuss reasons you may need to perform these fixes.
Restoring an iPhone: What it Means and When You Should Do It
For many people, the iPhone becomes their way to store all the information they need and keep track of everything from finances to appointments. The thought of losing all the data on their phone is probably terrifying, but that is exactly what an iPhone restore does. Restoring an iPhone returns your device to its factory settings and wipes all saved data. Why on earth would you want to do that? There are a few possible reasons. If you are getting rid of your phone it is an easy way to clear it of all your information. The most common reason to restore your iPhone, however, is as a troubleshooting technique.
Reasons to Restore iPhone as a Troubleshooting Technique
- Frozen or unresponsive iPhone
- Rebooting iPhone didn’t resolve functionality issues
- Frequent issues with iPhone freezing or becoming unresponsive
- Some apps or functions do not work properly
- Battery is draining fast
How to Restore iPhone
Before restoring an iPhone, you’ll want to make sure that you have the most current version of iTunes installed. You should also create a backup of your iPhone before restoring or you will permanently lose all your data. When you are ready to perform the restore, sync iPhone to your computer and open iTunes. Follow the steps below.
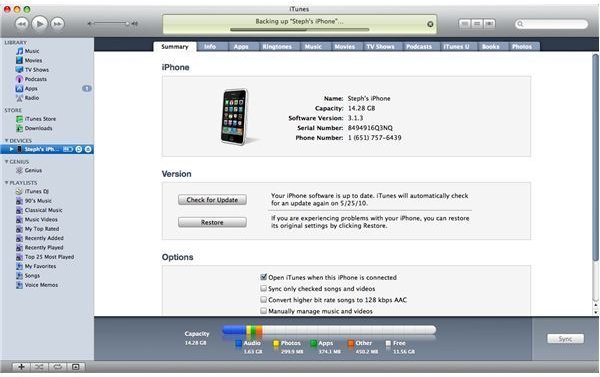
- Select your device along the left side of the screen.
- Open the Summary tab across the top of the screen.
- Click “Restore.”
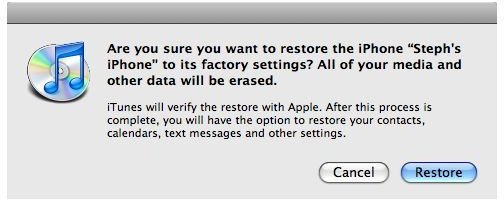
- Confirm by pressing “Restore” on the popup shown above.
- Wait for several minutes while iTunes takes your phone through the next steps of the restore. Notification popups will keep you informed of what step of the process your phone is in.
- Do not disconnect your phone while the iPhone restore is being performed
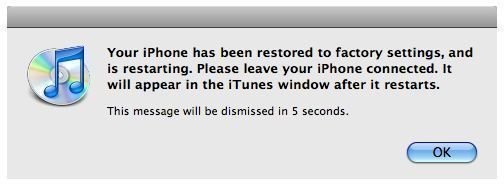
- The restore is complete when the above notification is shown. Press “OK.”
- Wait while your phone restarts
- Continue waiting until you see the “Connect to iTunes” message on your iPhone
- Restore is complete when the iPhone screen says “iPhone is activated” (as shown below)

Your iPhone is now restored and has been wiped clean of all data. Your next step is to set up the iPhone.
Restore iPhone from Backup or Set Up as New
Now that the restore is complete, you’ll need to decide whether you will be restoring the iPhone from a backup or setting it up as a new iPhone. Restoring from a backup will put all your data back on your phone. Setting up as new will keep the phone cleared of data, allowing you to start from scratch. As soon as the setup menu pops up, you’ll need to choose from one of the following two options:
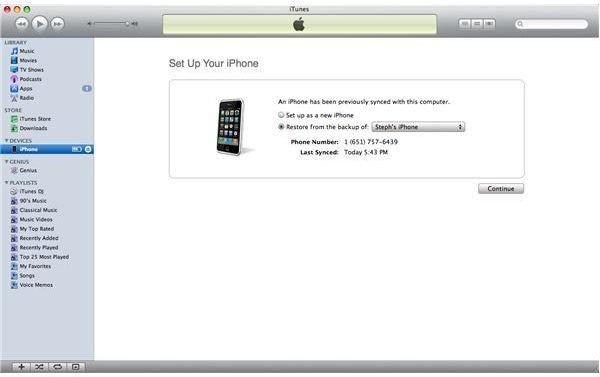
Set Up as New:
- Select “Set up as a new iPhone” and press continue. Follow the prompts. Do not disconnect from iTunes until it tells you that it is safe to do so.
Restore from Backup:
- Select “Restore from the backup of:” and select your device’s name from the drop-down list. Press continue and follow the prompts. Do not disconnect from iTunes until it tells you that it is safe to do so.
Sources and Image Credit
Apple, www.apple.com
iPhone 4 image courtesy of Apple .
Instructional screenshots provided by author courtesy of Apple.


