A more advanced tutorial on BlackBerry theme creation using the Plazmic theme creator software.
For Starters…
In December of 08’ I published a tutorial on creating your own BlackBerry themes using the Plazmic Theme Builder software program. I identified the basic steps and layout of the software and gave more advanced users a quick introduction to using the program. For beginners and many less advanced computer users that tutorial will not provide the necessary instructions and information to begin your theme building process.
The following tutorial is a more advanced look at the Plazmic Theme Builder, if you have not read the previous article it’s suggested you do so before continuing any further.
Also, before continuing make sure you have all the necessary software and tools installed which were introduced in the previous article –most important of course is the Blackberry Theme Studio (formally known as the Plazmic Theme Builder).
Changing The Background
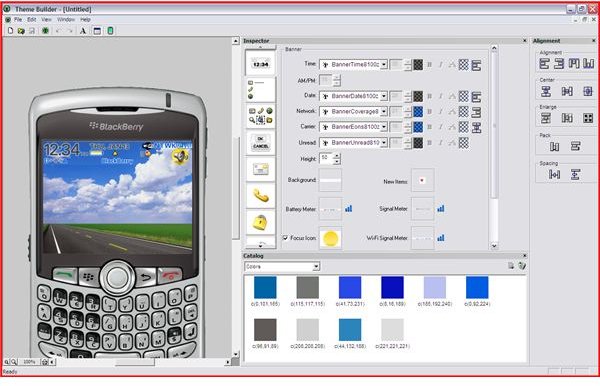
Upon program loadup you will be prompted to enter a desired name for your theme, device screen size, and type of home screen layout you would like. For the purpose of this tutorial simply enter “Tutorial” in the name entry field, choose 320*240 screen size, and “custom” from the type drop down menu.
After Plazmic has loaded up and you have chosen the above options you will be presented with a screen similar to the one on the right.
Our first task is to design the layout of the device home screen. Of course this generic roadway picture for our background isn’t very attractive so lets find something interesting! Find a picture (any picture) and resize the image to the same resolution you chose for your screen size (In this case 320*240); you may be required to crop the image if the size does not correlate correctly to keep the image from looking distorted. After the image has been cropped and resized save it somewhere on your computer that is easily accessible, such as your desktop. Once you have your image resized and saved return to the Plazmic Theme Builder.
In the top right box, select the second button on the left and the options in the right hand box should change like so (below image).
Once the screen resembles the picture on the left you need to click inside the box next to Background; a file browse window will then pop up and you must then navigate to where you saved the image you resized for your background and select it.
Then voila! The background on the left side of the screen (inside the picture of the BlackBerry phone) should update, and if everything was done correctly you should see your custom image!
Customizing the Home Screen Banner
Great; now that we have changed the background we’re going to go back to theming the banner by selecting the top left button within the top right-hand box.
The options on the right should return to the same layout they were when you first loaded up the Plazmic program (if you need to, you can refer to the picture at the very top of this article for reference).
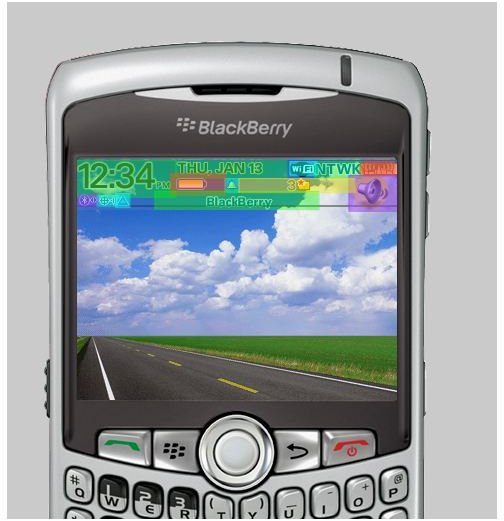
The screen you are now viewing allows you to change the home screen banner which appears on you
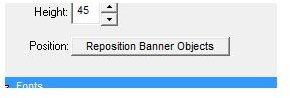
r device while no menu is selected. The banner displays options such as the active ringer profile, date and time, Bluetooth pairing icons, signal meter, battery meter and other related icons. You may position these icons and display options as you see fit; but keep in mind that ALL OBJECTS MUST REMAIN INSIDE THE BANNER or the program will not compile the theme when you are finished. This means that nothing from the banner can be above or below the space, it must remain exactly inside. In order to customize the layout of the icons you must choose the Reposition Banner Objects button.
On the left within the emulated BlackBerry device screen the objects inside the banner will then change to
moveable boxes all outlined in completely different colors. You may now move them freely about the workspace as you see fit. Customize the banner to you heart’s content and then select the Reposition Banner Objects button again to accept your changes and move on.
You can also further customize the banner by changing the font of the text items, choosing a custom graphic for all the indicators and icons or change object visibility by checking the boxes within the related section (those options can be altered by expanding the blue sections on the right hand side). For more advanced users this rewards the chance to completely customize the theme using personally generated graphics for icons such as the battery or signal meters.
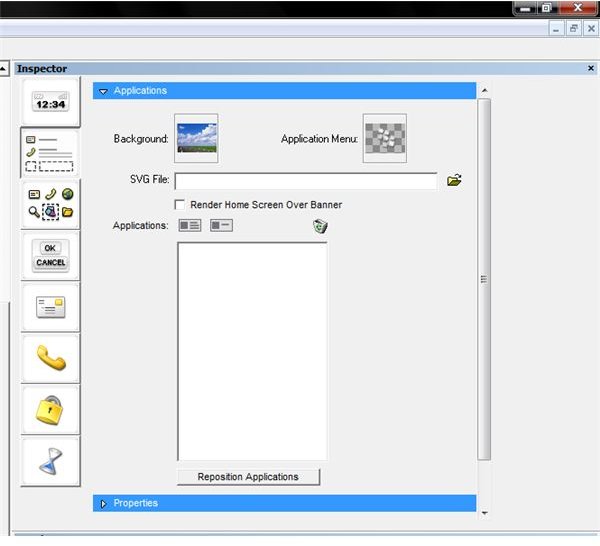
Customizing the Application Icons
The third button down in the right hand box allows users to customize the Application Icons screen. You can choose a different
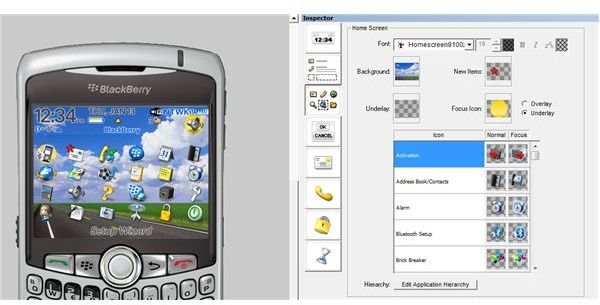
custom background for this screen than the one you used earlier for the home screen, or you can just leave it the same. In this case we’re just going to leave it for now and move on to the icons. Within the Applications Icon screen you can completely customize the graphic for each native program icon as well as change the underlay and overlay cursors that show up while navigating through the menu. This is also a good time to rearrange your icon menu list, and move those pesky programs you never use to the bottom.
The font that is displayed below the icons can also be changed to match the other fonts you are planning to use with the theme. This is great for more advanced users and allows you to choose that spooky text to go along with your perfect halloween theme!
Dialogue and Menu Customization
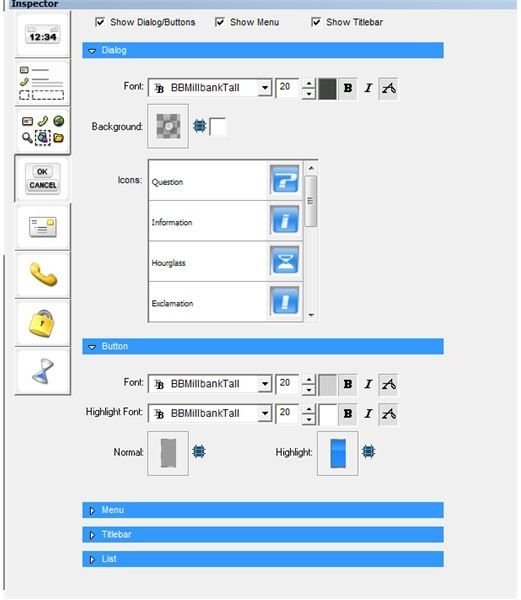
The next section is more than likely what will take up the majority of your time with every new theme you create. Select the fourth button down on the right and you will be presented with the control screen customization options. This section allows you to fully customize the actual fonts, text colors, and icons within the different pop up menus and dialogue windows.
It is a good idea to pick a font you like in the beginning and try to keep a similar font and color scheme throughout the whole theme; this makes it look much better and in many cases more professional.
For more advanced users, it is possible to create a backup of Plazmic’s default theme folder so that you may customize your own icons using the originals. Just navigate to where you installed Plazmic; Program Files > Plazmic CDK > Samples > Themes > Graphics and then the folder relating to the icons you wish to change (make sure you make a backup). This will allow you in many cases to use the same icon but alter colors and such.
There isn’t much to say about this section besides it’s actual function; users would be best suited to play around with the different font settings and colors to become more familiar with the many options available.
Phone and Lock Screen Customization
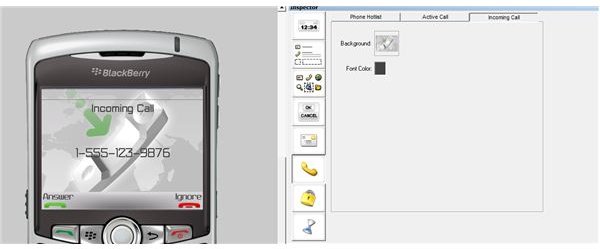
Users can also change the different call screens that show up when a number calls and customize the lock screen as well by using the next two buttons in the list. Just like the backgrounds on the home screen and application icons screen users can choose a different background image for both the lock screen and the incoming call screen.
Fonts and colors can be customized here as well to compliment the rest of your theme.
Global Item Customization
The final customization section allows users to change the colors of the loading bar and hourglass that display when the BlackBerry device is busy. This section is self-explanatory as well.
Users can change the icons for this section just like the icons in previous sections by clicking on the picture and browsing to the file they wish to exchange the default file with.
Exporting the Theme
Finished!
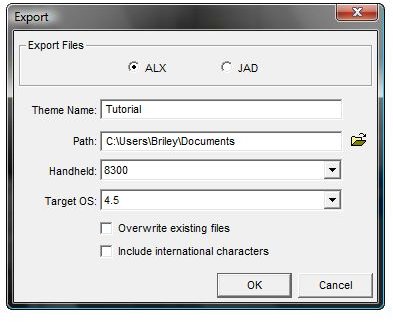
Once you are done; or at least satisfied with your first tutorial theme you can export it to be transferred to your BlackBerry device. This can be done by choosing File > Export in the top menu of the screen or by pressing [Ctrl + E]. After doing so you will then be presented with a window similar to the image on the left. This is where you must choose how the file will be exported. At the top of the window you can choose to export the theme as an ALX or JAD file depending on how you wish to transfer the theme to your device. I have found the most successful, and easiest, way to transfer themes to the device is through the BlackBerry device manager software; in order to do so the file must be exported in the ALX file format.
Users must also take note that the correct device model and operating system must be chosen or the theme will not work with your device after it has been exported!
Make sure you specify a save location that can be easily found as well in the PATH entry box.
Once you have changed the correct settings and information click OK.
Congratulations, you are finished and you have now created your first BlackBerry theme! All you must do now is transfer the theme to your BlackBerry device. Let your mind run wild and create plenty of custom and unique themes for your BlackBerry. There are even many theme creators selling their themes on their own personal blog spaces and websites.
The sky is the limit!
References
BlackBerry, https://us.blackberry.com/developers/themes/
This post is part of the series: How To Create A Custom Blackberry Theme
A guide explaining how to use the Plazmic Theme Builder to design custom Blackberry Themes.


