Starting off learning SQL? Learn the different ways of using the SQL SELECT statement. This is an easy step by step tutorial with some examples to help illustrate the process!
SQL SELECT Statement: Explanation and Syntax
The SQL SELECT statement is used to select something from somewhere. In other words, it is used to select one or more columns from a table. It is used in combination with the FROM, WHERE, ORDER BY, etc. clauses to filter the selected results.
SQL SELECT Statement - Syntax:
The syntax for SQL SELECT statement is
SELECT column_names FROM table_name;
Breaking the Syntax in Parts:
In the column_names field, enter the name of one or more columns that you want to operate upon. Separate each column name by using comma (,) Use * to select all the columns.
The FROM clause refers to the table from which the columns are to be selected.
The table_name follows the FROM clause. The statement is terminated by a semicolon(;).
Examples:
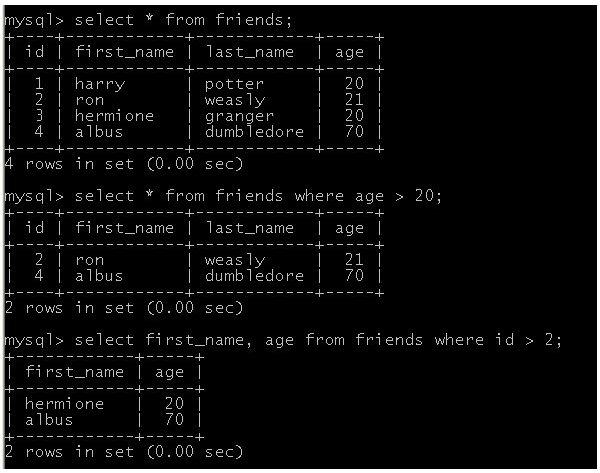
SELECT * FROM friends;
This statement will select all the columns from the table friends.
SELECT first_name, age FROM friends;
This statement will select all the data from the column first_name and age that is present in the table friends.
SELECT * FROM friends WHERE id > 2;
This statement will select all the data from the table ‘friends’ that have their id greater than 2.
SELECT first_name, age FROM friends WHERE id > 2;
This statement will select all the data from the columns first_name and age where the id is greater than 2.
There are so many other combinations using which the SELECT statement can be used.
SQL SELECT Statement - Real World Examples:
To understand the SELECT statement, first let us create a database and a table in it; populate the table (fill the table with data) and then operate on it.
- Create a database with any database name. In this example, the database is named hub. Write the following code in any SQL console. I am using a MySQL console.
CREATE DATABASE hub;
- In order to create a table in that database, first we have to use the database. To use the database enter the following code.
USE hub;
- Now create a table called ‘friends’ with four fields namely id, first_name, last_name and age. Enter the following code to create the table.
CREATE TABLE `hub`.`friends` (
`id` INT( 10 ) NOT NULL AUTO_INCREMENT PRIMARY KEY ,
`first_name` VARCHAR( 30 ) NOT NULL ,
`last_name` VARCHAR( 30 ) NOT NULL ,
`age` INT( 3 ) NOT NULL
) ENGINE = MYISAM ;
- Populate the table using the INSERT INTO statement.
INSERT INTO `hub`.`friends` (`id`, `first_name`, `last_name`, `age`) VALUES (NULL, ‘harry’, ‘potter’, ‘20’), (NULL, ‘ron’, ‘weasley’, ‘20’), (NULL, ‘hermione’, ‘granger’, ‘20’), (NULL, ‘albus’, ‘dumbledore’, ‘70’);
- Now use the SELECT statement and perform a few operations.
SELECT * FROM friends;
SELECT first_name, age FROM friends;
SELECT * FROM friends WHERE id > 2;
SELECT first_name, age FROM friends WHERE id > 2;
Common Mistakes that Should be Avoided:
- Don’t forget the semicolon (;) to end the statement .
-
Make sure that the spaces are used properly.
-
If there is lots of data present in the table, it is not advisable to use the * operator and select everything. This might lead to data corruption. If this happens, the data might be lost forever.
This post is part of the series: SQL for Beginners Series
This series of articles on SQL is aimed at those who have started programming in SQL. This series focuses on basic SQL statements like SELECT, DELETE, LIKE, REPLACE, GROUP BY and CASE.


