Learn how to install Joomla! on your own PC to avoid making mistakes with a Live website. Installing in a test environment lets you see what your Joomla! powered website will look and feel like before you even purchase hosting.
It is recommended that you install Joomla! in a test environment prior to installing it on live hosting. This helps you to work out any kinks before your website becomes open to the public. It also allows you to see what your site is going to look like without going through the tedious process of uploading individual files, then checking in your browser to see if it worked properly, etc… It is a good practice to maintain this test environment even after your website is live in order to test any patches or extensions that you may add down the road.
Test Environment
Joomla! test environments have the same requirements as a live installation. These are:
- PHP 4.2.x or later
- MySQL 3.23.x or later
- Apache 1.3.x or later
These are all web applications designed for web servers, not your typical home or office PC, so you are going to have to install special packages if you would like to use your standard PC for your test environment. Which package you use is going to vary based on what operating system your computer is running. Most readers will be using the Windows operating system in their home PC or test environment, so we will focus on that.
Installing Joomla!
Now that you have Apache/MySQL/PHP support installed on your computer, you’re ready to begin installing Joomla!
-
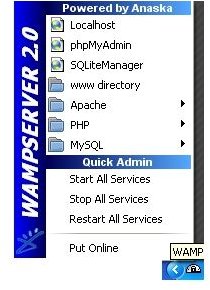
Click the WampServer 2.0 icon in your taskbar, then click on “www directory”.
Advertisement -
In the www directory create a new folder for your website project. Do not do anything with the existing index.php file.
-
Extract all the files from your Joomla! download into your c:\wamp\www\project folder. This will take some time.
Advertisement -
Open up a web browser and type: https://localhost/
-
Under “Your Projects” click on the folder you extracted Joomla! into.
Advertisement -
The next page you should see will be the Joomla! web installer interface.
Joomla! Web Interface Installation
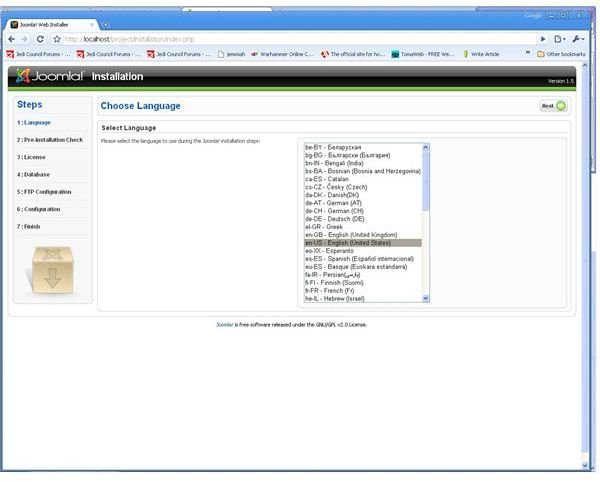
- Select your language (en-US is default). Click “Next”.
- On the next screen, you should see all “Yes”’s. If you don’t, there could have been a problem with your WAMP installation, in which case you should probably uninstall and try again.
- Click “Next”.
- Read the GPL, then click “Next”. You will see this:
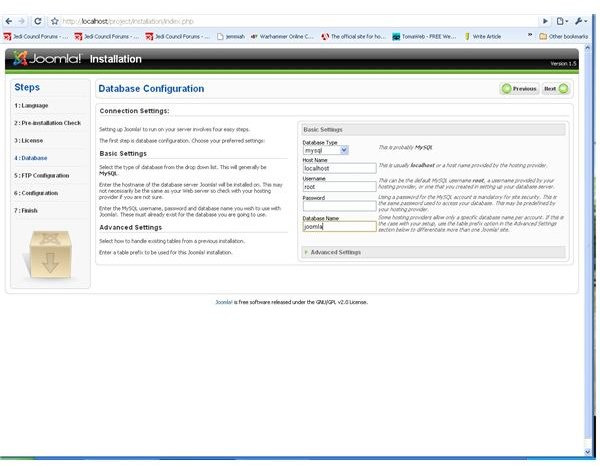
.Enter the following information in the boxes on the right side of the screen:
- Database Type: mysql
- Host Name: localhost
- Username: root
- Password: (blank)
- Database name: (this can be whatever you want. I recommend “joomla” for simplicity.
- Click “Next”.
- Click “Next” through FTP settings.
- You will see this:
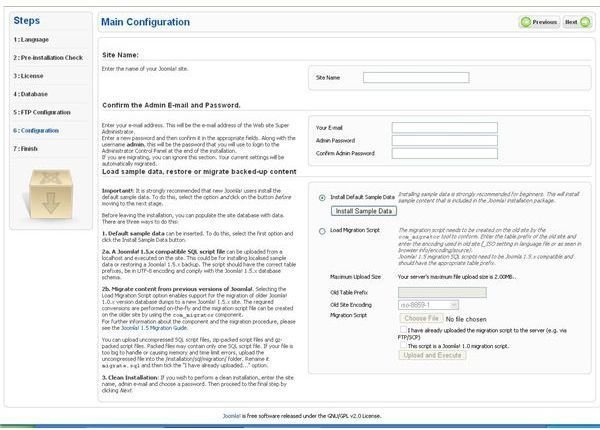
- Choose a name for your site.
- Enter your email address and choose an Admin password.
- You may choose to install sample data into the site or to do a fresh installation. Sample data allows you to see what your site is going to look like once it has content. However, once you have a good idea of how to use Joomla!, removing the sample data becomes a chore. Future guides will explain how to add content into a blank site, so whether you want to do tinkering on your own with sample data is entirely up to you.
- If you decide to add sample data, click “Install Sample Data”. When you see “sample data installed successfully” click “Next”.
- On the next page you will see a big red message to remove the “Installation Directory”. Open up your c:\wamp\www\project folder. Highlight the folder named “Installation” and hit “delete”.
- To access your Joomla! administration panel type the following into the address bar of a web browser: https://localhost/project/administrator
This post is part of the series: Joomla! 1.5 Installation Guide
In this series we learn all the steps of getting started on a Joomla! powered website. Learn how to install Joomla! on your PC to test it, how to get adequate hosting, and how to install on your live host.


