
Part of the series published in Green Computing, this article shows you how to use Amazon Web Services to set up a free web server.
In the last few articles discussing the cloud, we covered what the ‘cloud’ really is and a roundup of current Infrastructure as a Service providers (IaaS). In this article, we will use one of those IaaS providers –Amazon Web Services (AWS)– to set up a free web server and show you just how easy it is to start using the cloud.
AWS
The first thing we need to do is setup an AWS account. After that, we’ll set up an instance and configure it to serve web pages.
Here’s how to create the account:
- Navigate to aws.amazon.com and click the Signup button.
- Follow the onscreen instructions to log into an existing Amazon account or set up a new account.
- Note that you will need to add a credit card to the account. If you use more resources than are allocated to the free tier, they will charge you.
- Next, you will need to verify your identity by telephone. Follow the onscreen instructions to complete the process.
- Keep the support plan at the Basic (free) level and click Continue.
- That’s it! Now, click the link to launch the AWS Management Console. This is where we’ll interact with and create our web server (Figure 1).
Figure 1: Signup Complete
The AWS Console
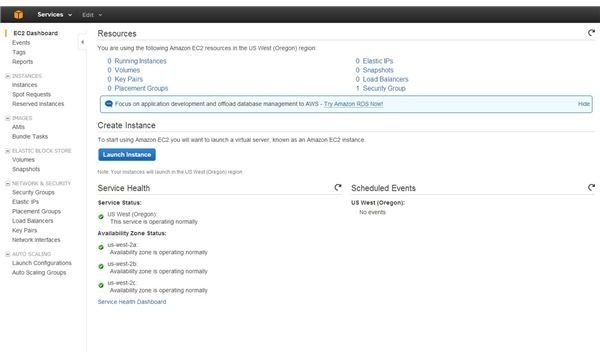
It’s going to be a bit daunting to log into the AWS console for the first time (Figure 2). There are about 30 options to choose from, but luckily, we’re just going to focus on one to start with. Click EC2.
EC2 stands for Elastic Cloud Compute and as you can probably guess, this is where we’ll set up our server instance. Amazon offers a free tier of EC2 for people just wetting their feet. You can keep the machine on all month without charge as long as you select the free tier. Amazon offers this for the first 12 months. After that, you need to pay up or find something else.
- On the EC2 dashboard, click Launch Instance (Figure 3).
- A guided walk-through will pop up letting you choose your AMI or Amazon Machine Image. Essentially, this dictates the operating system your machine will use. Note the options eligible for the free tier. Let’s select the Amazon Linux option – 64-bit.
- On the instance type, select Micro Instance. Again, you should see that it is eligible for the Free tier. Click Next to configure.
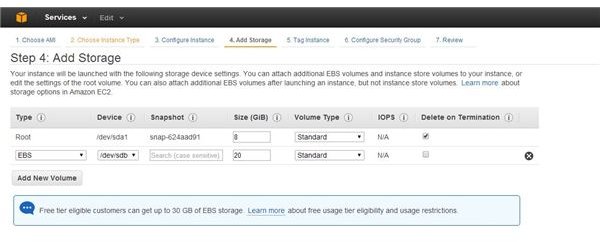
- On the Configure Instance tab, leave the defaults and click Next to add storage.
- On the Storage tab, click Add New volume and make sure EBS is selected. You can add up to 30GB of EBS storage for the free tier.
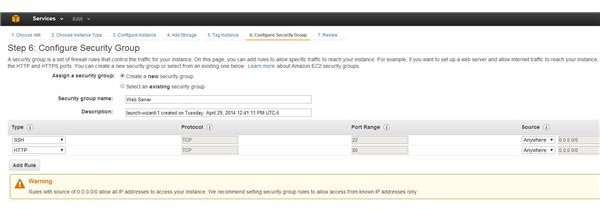
- Click Next twice so you are on the Security Group tab.
- SSH should already be allowed. Click Add Rule and select HTTP. Be sure Anywhere is selected for the source. This means our server will accept traffic on port 22 (SSH) and 80 (Web – HTTP) (Figure 5).
- Click the Review button and when ready, click Launch.
- Next, you will be asked to create a new key pair. Keys are needed to give you access to your server’s console. Select the option to create a new key pair. Give the key a name and click Download Key Pair. Be sure to save this file somewhere safe – and be sure to back it up! Once done, click Launch Instance.
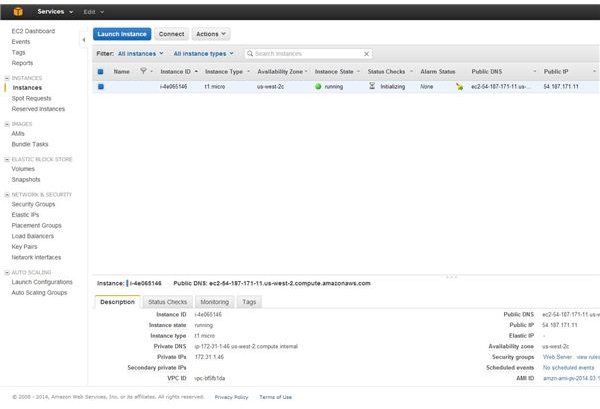
- Click the Instances button to go back to the EC2 dashboard. After a few minutes, you will see the instance state change to “running.” Once it’s running, we can connect and continue.
- Before we continue, we want to take note of the public DNS and IP address, as we will need this to connect in the next steps (Figure 6).
Images
Connecting to the AWS Instance
Now, we’ll connect to our virtual machine in the cloud using the public DNS address and key we downloaded earlier.
- Download and install PuTTy – a simple terminal program that will allow us to connect via SSH.
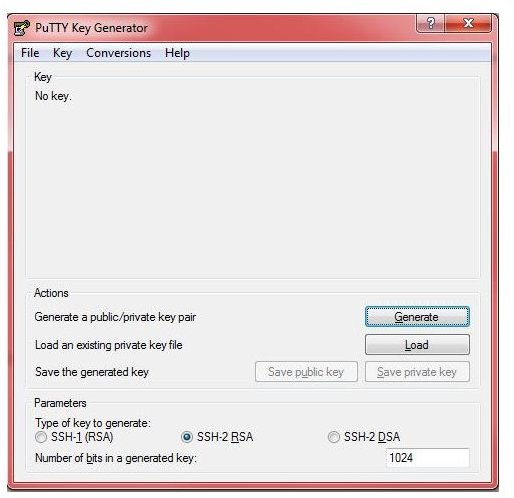
- Start PuTTygen. We’ll use this to convert the key we downloaded earlier into something PuTTy can read. Make sure SSH-2 RSA is selected and click Load (Figure 7).
- Browse for the .PEM file you downloaded and click Open. You should receive a notice that it was successfully imported.
- Click Save Private Key and click Yes on the warning that pops up.
- Give the key the same name as the original key (PuTTy will append a PPK extension) and click Save.
- Once done, close PuTTygen and open the PuTTy client.
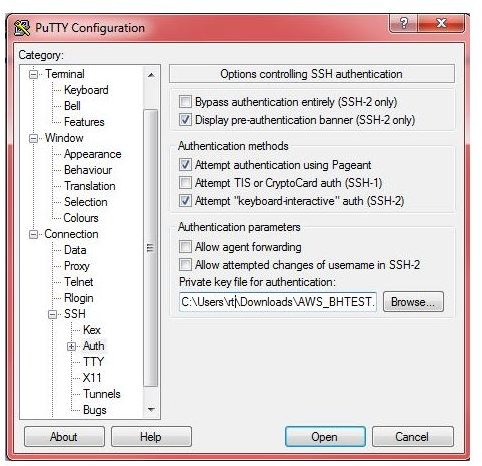
- Enter the IP address or DNS name of the host and make sure SSH is selected.
- Next expand the Connection tab and then SSH. Click Auth and browse for the PPK file we created with PuTTygen.
- Click Open and click Yes to the security alert.
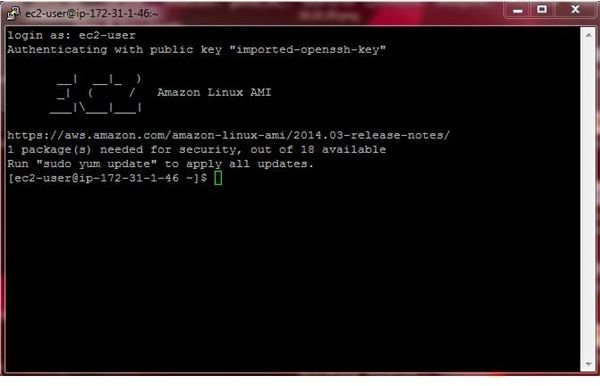
- Enter the username ec2-user and…. we’re in (Figure 9).
Images
Configuring Our Instance
Now that we have our virtual machine up and running and can connect to it, we’ll want to install the HTTP daemon and run updates to make sure our machine is secure. To do this, we’ll use a package manager called “yum.” First we need to gain administrative access to the machine. We’ll use a command called Sudo and then run yum to update and install packages.
- Type sudo su at the shell prompt. You should now see the shell say “root@ip address#”. This means you are now root.
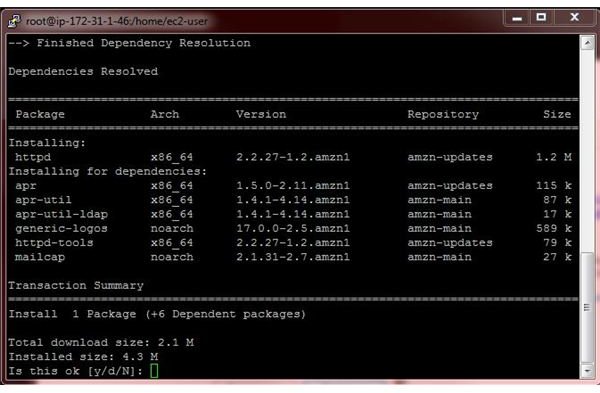
- Type yum install httpd nano. This will install httpd – the HTTP daemon and nano – a text editor. After a second, it will show you the packages that will be installed and will ask for permission to continue (Figure 10). Type y to confirm.
- Once the packages have finished installing, we will need to start the web server. Type service httpd start. You should see confirmation that the service has started.
- Now, let’s create a simple index file that we can test with. Type cd var/www/html/ and hit Enter.
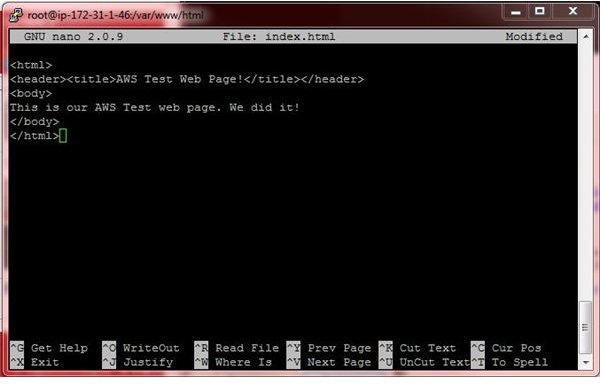
- Type nano index.html.
- We’ll just put together a very simple example. We’ll need to use HTML, HEADER and BODY tags to create our page. See Figure 11 for an example. Click CTRL+O and then Enter to save the file then CTRL+X to exit.
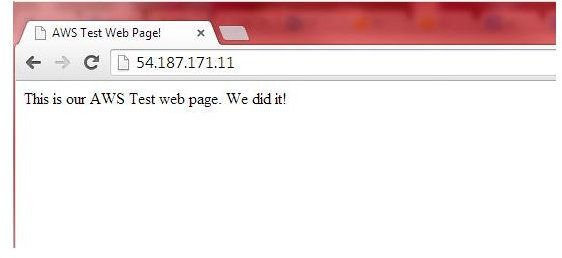
- Now is the time for the big test! Open up a web browser and navigate to the IP address or DNS name of the instance. You should see our test page pop up (Figure 12)!
So now that it works, where do we take it from here? Well…. you now have a free web server (for a year). The options are limitless. Logical next steps would be to sign up for a domain name from a reputable registrar such as GoDaddy. Once you have a domain name purchased, you can easily configure DNS for your domain to point to your instance IP address.
Since we only installed the basic HTTP Daemon, the types of web content we can publish is limited. You may want to install a LAMP stack (Linux, Apache, MySQL, PHP) so you can deploy full-blown applications.
Good luck and have fun with your new web server. Just be sure to pay attention to when that free tier through AWS is up!
Images
This post is part of the series: Basics of Cloud Computing
An overview providing basic details on the definition of “the cloud” as well as services available on the cloud.


