The 4th generation of the iPod Touch is a unique device that has a lot of new elements, while building on its tradition. Here are some tips to get new iPod Touch 4 owners started.
The newest version of the iPod Touch, which is the fourth generation, employed many of the newest features that made the iPhone 4 such a revelation to many users. Dual cameras, Retina Display, FaceTime, and a lot of iOS 4 additions have changed the capacity of what an iPod could be, and has shoved it much closer in the direction of an iPhone. For the new iPod Touch, getting started also includes getting used to how to prepare the iDevice for use later on, and this is much more depth due to the newest features that are being employed. Here is a look at how to start using the iPod Touch 4th generation, looking at all the elements that are in play.
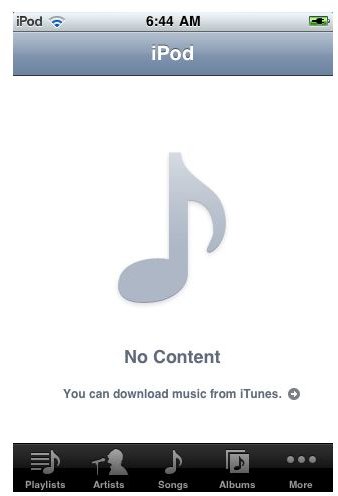
Acquiring Content
The primary thing that needs to be considered when figuring out how to to start using the iPod Touch is to get it ready to actually be used, which means syncing it to content. Your music and videos should already be available through iTunes, and once you establish your Home computer you can start the initial sync to transfer your media onto your iPod. This is standard across all iPod Touch versions, as the media content remains the foundation. Keep in mind that e-books, through iBooks and apps, will likely not be downloaded ahead of time. Videos are going to be more specific because of their size, and you will need to select the iPod Touch from under the Device heading. Select the Movies tab, and choose to sync movies. You can then choose to sync them all or select specific ones to move over.
The second step will be to utilize software, and this can again be done from the iTunes software on your home computer. To do this you will simply access the App Store, browse through the apps and games that are available, and then find and download the ones that you want. Once they are downloaded, you can then sync them to your iPod Touch during the regular syncing process, as long as you have gone into the Device in iTunes, selected the App tab, and chosen to sync the apps that have been downloaded.
FaceTime
When setting up your iPod Touch, getting started with FaceTime is one of the steps. FaceTime enables person-to-person communication in a way never before conceptualized on a non-phone mobile device. You do not have a phone number, so you have an interesting process to begin when setting this up on the iPod Touch. Instead, you will align your iPod with your email address and Apple ID.
Start by choosing the FaceTime app in the upper left hand corner, and begin with a Get Started screen. You will be asked to log in with your Apple ID to start-up a new account, and when you are finally in you will set the official email address you want to align with the FaceTime account. After you are done you will return to the FaceTime app and you can then see your contacts that are on your phone. This is the most important element of making your new iPod Touch FaceTime ready, and you will need to begin making contact profiles for those who also are utilizing FaceTime on an iDevice.
Game Center
Game Center is also a newer element, yet not unique to the iPod Touch 4th generation. This is going to tie together most of your games, create
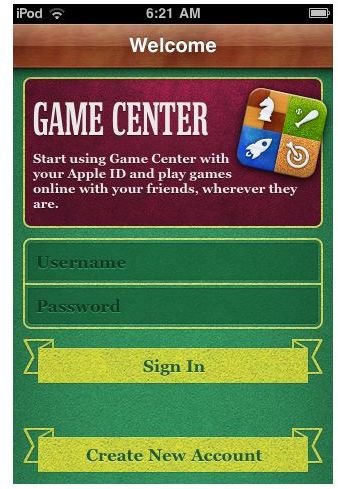
a social network, and really centralize the entire gaming community through the iOS . When you are in the iPod Touch getting started period, you will need to ensure that you begin by creating an account and star the basic log in process. When you first open Game Center you will be asked to Sign In or Create New Account. When you choose the second option you will go through a series of questions like your country, date of birth, and that you agree with the listed terms and conditions. You can then either sign up for an Apple ID or include your existing one, then use your name, email, and password for your account. There will even be a security question that you can select an answer for.
This is only the first step, as you now need to deal with your public persona, which means selecting a nickname and password. Select a name that is identifiable and available, and then make sure to keep Allow Game Invites on so you will be able to interact better with other players later on. You do not need to do much else with your profile at this point, until you begin making friends through it and playing games as part of a community.
Wi-Fi

The iPod Touch is centered almost entirely on Wi-Fi, as most functions require an Internet connection, and the device does not have the option for a 3G connection. What this means is that you will need to establish a Wi-Fi connection as early as possible on a secure connection. For connections that are known, which usually indicates connections you have already connected to with an appropriate password, your iPod Touch will be set to automatically reconnect to them when you enter their proximity. For your start-up connection, you should connect to the Wi-Fi network at your home or place of work - whichever will be the primary place that you use and update the iPod Touch.
To do this, go into your iPod Touch’s Settings and then go to Wi-Fi . This should be the second option down. First, make sure that the Wi-Fi switch is set to On. This will give you the ability to see and connect to available Wi-Fi networks. The list that shows up will be the Wi-Fi networks that are available in the area. Go ahead and find the one that you are hosting from the list and select it. This will bring up the password prompt. When you enter in the correct password it will connect to the network and you will be Internet ready, and it will remember this. You may not even be forced to go into the Settings area if the switch for Ask to Join Networks is on. It will then show you available networks when you enter an area, as long as you are not already connected to a network or have been connected to a network previously. This will make it automatically reconnect to that known network.
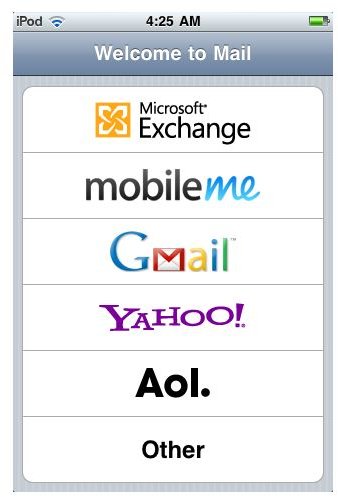
The iPod Touch may not be used for making regular phone calls or sending text messages unless you have purchased an app which allows you to do so. That, however, does not mean it is not a communication device that you can still use for mass contacts. Mail ends up being a central part of usage. You can take an existing email account and connect it up to your iPod Touch for easy use through the regular Mail app instead of being forced to use the Safari browser.
For email on the iPod Touch , getting started requires going into the Mail app and selecting the provider of your email. When you do it will ask you for your name, email address, password, and any relevant description. When you enter this information. it will attempt to connect to your email account and then will ask if you want to save the account to your mail. You can then select to receive emails as well as if you want to sync the calendar on the iPod to that in your email account.
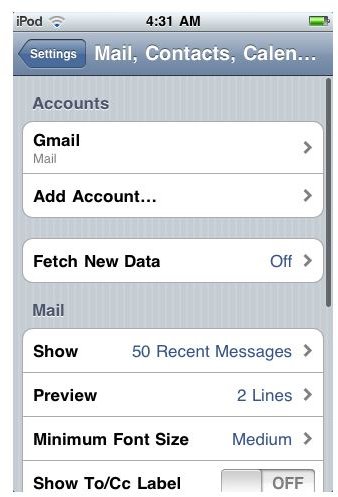
You have the option to then set Push Notifications to the Mail, which would be pop up notifications to tell you about new emails in your inbox. First, go into Settings and then to Notifications. Make sure that the switch inside is set to On, then go back to the regular settings menu. Go into Mail, Contacts, Calendar and head to Fetch New Data, which will be right under the listing of your attached email accounts. In here you will turn on Push, which will then ask you to set a time period with which to get new data from your email account. It will be set to Manually on its own, but instead you may want to change it to 30 Minutes or Hourly if you want an accurate message system for your email account.
Contacts
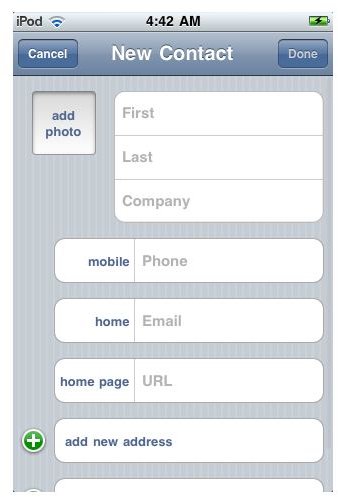
It may not seem like the first thing that most iPod Touch users think of, but setting up your Contacts list will be central to making sure you are able to connect with email and other functions from your iPod Touch. The simple way to begin developing this is to enter in contacts one at a time as they come up. This will be crucial if you intend to use FaceTime. Go into the Contacts app and then select the button in the upper right hand corner with the “+” in it. This will ask you to enter in their first and last name, phone number, email address, website homepage, and their address. You also have the ability to add customizable
fields. The address is going to be uniquely important to the Contact as it will then allow you to bring up the exact position of that contacts home in the Maps app. Once you finish a Contact you will choose the Done button and then it will appear in the list.
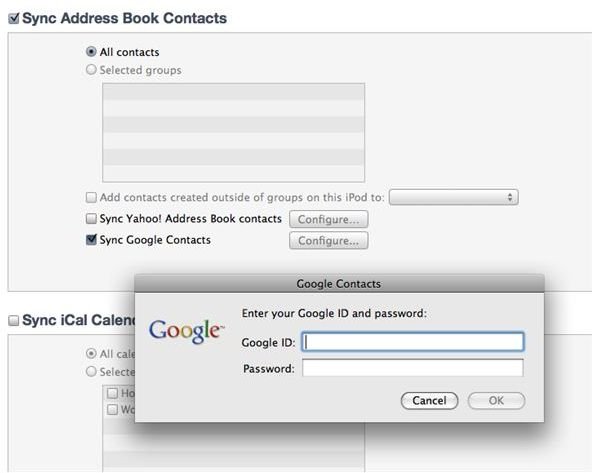
If you already have an active set of Contacts in either your Gmail or Yahoo! mail accounts then you can sync these over and have unity between the device and your email. To do this, go ahead and plug your iPod Touch into your computer and then select it from the Devices heading. Head into the main Info tab and then check the Sync Address Book Contacts option. Go down and check either the “Sync Yahoo! Address Book contacts” option or the “Sync Google Contacts” option based on which one you are already working with. A pop up menu will then ask that you enter in your ID and password information. Once you do this correctly, it will automatically go through syncing them over onto the iPod Touch for use.
These items will only get the iPod Touch ready to then be customized and worked with, but it will not be a full fledged device until the content begins filling it up. Much like a computer, it can be defined by the user depending on the kinds of things that they envision for the device. Once you begin connecting with the services that you have, you will notice that you can begin integrating much of the same tools you use on a computer. The way you use them, however, is different because of the format change. It will take a while to get used to how you can integrate this into your life, but it will essentially give you access to your media and tools wherever you go - as long as you can find a suitable Wi-Fi network.
References
- Syncing Google Contacts
- Screenshots by Shane Burley
- Source: Author’s Own Experience
- iOS: Using FaceTime
This post is part of the series: iPod Touch Questions
Here are articles that answer important questions about the iPod Touch.


