If you have a fifth generation (5G) or newer iPod Nano, then you already own a digital camcorder. With this handy guide, learn how to transfer and delete videos off it so they can be shared via email, Facebook, or YouTube.
My wife and I recently went on vacation and shot a couple of videos using our iPod Nano 5G. Naturally, we wanted to transfer the videos from the iPod to the PC in order to share them with friends, upload them to Facebook and YouTube, and so on. The iTunes software does not have any option to transfer videos this way, so it has to be done manually by browsing through the folders like on a USB flash drive. In this guide, I’ll show you how to manage videos with an iPod Nano.
Note: This guide was written using version 10.3.155 of iTunes, which was released to include Apple’s new iCloud service. Make sure your iTunes is updated to the most current version before you begin.
Enable Disk Use
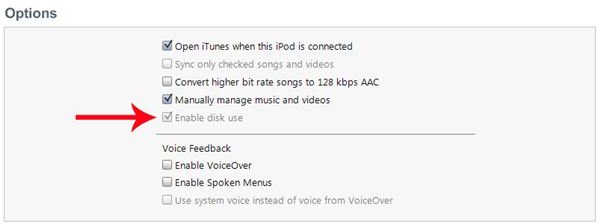
To get started, you need to make sure that Enable disk use is checked inside of iTunes. Simply connect your iPod Nano while iTunes is open, then wait for it to appear under Devices. Click on the device name, then in the options menu click the box next to Enable disk use to turn the feature on.
Note: If you have your iPod set to Manually manage music and videos, then disk usage will already be enabled and the option should be grayed out, as seen in the screenshot here.
Once you have disk use enabled, your computer will recognize the Nano just like an external hard drive or USB flash drive and it will show up under My Computer as a drive letter. You may even be prompted with a pop-up window with some options shortly after you connect the device.
Manually Manage Video Files

Open Computer or My Computer (depending on which version of Windows you have) and browse to the drive letter for your Nano. In Windows 7, for example, it shows up under Devices with Removable Storage and displays a graphic of the Nano for reference.
Locate Your Videos
Open the drive letter for the Nano, then open the folder called DCIM. On my Nano, there is a folder beneath it called 000APPLE, so open that and you’ll see a list of the videos stored on the Nano. Each video will have an MP4 video file as well as a DAT file associated with it. You only need the MP4 file for the computer.
Transfer Your Videos
Once you’ve browsed to the main video folder, you can copy them like any other file. It’s best to put them in the My Videos folder under your user profile in Windows, but you can stick them anywhere you please. Either drag and drop or copy/paste or even cut/paste to delete the video from the iPod after it has copied.
Renaming Videos
All of the videos will be stored with sequential names like IMG_0001, IMG_0002 and so on. Look at the date and time for each file to tell when it was recorded. These files can be renamed to anything you want, so watch them first and then rename accordingly for easier organization.
Deleting Videos
Any videos you don’t want can be deleted just like any other file. Just right click on the name and select Delete. Keep in mind that your Nano has a limited amount of space, so don’t leave too many videos stored on the device or you’ll run out of room really quick.
Sharing Videos
Note: You will need to install Apple QuickTime software to play back the videos, but it is a free download and should already be included on your system if you have iTunes installed. Keep that in mind when sharing the video with users which may not have the software on their machine, because not all media players support the MP4 file format.
Now that you’ve copied your Nano videos to the hard drive, you can share them any number of ways. The easiest method would be to email them to friends, but keep in mind that some ISPs (Internet Service Providers) put size limits on file attachments. If the video file is too big, it may not go through. Generally, you want to keep emails under 10-20 megabytes (MB). If the files are really large, like if the video runs ten minutes or longer, you might want to just copy it to CD or a flash drive. You could even burn them to a DVD as a movie, so long as you have the right DVD burning software .
Your best option for widespread video sharing is to use a site like YouTube. Depending on the size of the video, it may take a few minutes or a couple of hours to upload and process your video. Once that is done, just share the link with anyone that may want to see it. If you are on Facebook, you can also upload video directly to your profile just like you would a photo.
References
- Author’s personal experience with the iPod Nano 5G
- Image credits: Bill Fulks (Screenshots taken from author’s personal PC)


