How To Enable Javascript in Internet Explorer
Javascript is configured to be enabled as default for Internet Explorer, but it can be accidentally disabled. There is nothing to worry about however, as you can easily enabled Javascript in Internet Explorer if you find that you are encountering errors. In most cases, websites that have Javascript code will give warnings or error messages stating that your version of Internet Explorer needs to have Javascript enabled. In some cases, there may be a message stating that Java is not installed or needs to be enabled.
If you’ve noticed that you’re receiving these types of errors, follow these easy steps in enabling Javascript on Internet Explorer.
Step One - Open Internet Explorer
- Open Internet Explorer, it can be found in your Start menu. Click your Start button, then hover over Programs and you will see Internet Explorer listed. Click it to open Internet Explorer.
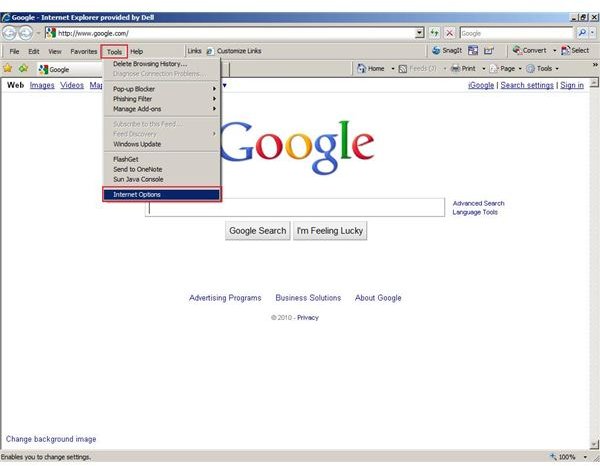
Step Two - Open Up Internet Options
- From within Internet options, on the menu bar, click on Tools and scroll down to Internet Options. Click Internet Options to open the Internet Options pop up dialog.
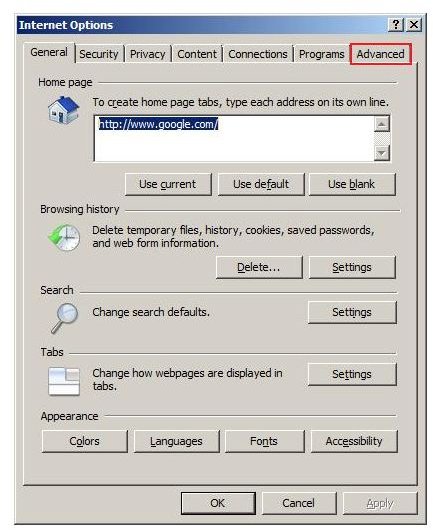
Step Three - Finding the Advanced Settings
- The Internet Options pop up dialog has several different options. It can seem a bit overwhelming but luckily, enabling Javascript in Internet Explorer is in one particular section. To enable Javascript in Internet Explorer, within the Internet Options pop up dialog click on Advanced. Advanced is one of the 7 tabs across the top, the last tab actually.
Step 4 - Enable Javascript in Internet Explorer
- In the Advanced portion of Internet Options is where the option to enable Javascript resides within Internet Explorer. You’ll have to scroll down towards the middle. Keep scrolling through until you see a section on Java (Sun). If you scroll down to Printing or Security, you’ve scrolled down too much.
- Look for Use JRE x.x.x_xx for