Windows 7 Installation is quick and easy. The main methods for installing Windows 7 include a clean install and upgrade. This article sheds light on the different installation methods and covers some tips and troubleshooting for installing Windows 7.
Windows 7 Installation – Basics
Windows 7 installation can be done from an already running Windows OS or directly from the DVD drive. For a clean install, you need a bootable DVD drive. Most of the computers today support booting from the DVD drive. All you need to do is to change the sequence of booting in the BIOS. You can get to the BIOS by pressing DEL or ESC key on most computers.
A clean install using a bootable Windows 7 installation DVD makes sure you erase any malware residing in the boot sector. If you try to install Windows 7 after booting up to another copy (previous version of Windows), chances are that if your boot sector is infected, the infection stays even after you format the drive where you install the latest version of Windows. This is because when you boot from DVD for installing Windows 7, it clears the boot sector and creates a new one. On the contrary, when you boot into an existing OS, the installer only makes some changes to the boot sector. So if you are installing Windows 7 and wish a clean install, I would recommend you boot from the DVD and then install.
When you upgrade, the installation disk makes some changes to the system files/folders and copies Windows 7 files to it. Upgrading, on the other hand, does not require you to install all the device drivers and programs again. Whether you perform a fresh installation or an upgrade, make sure you check out the memory requirements of Windows 7 .
The following sections talks about different methods for Windows 7 installation.
Fresh Installation of Windows 7 – Single, Multi Boot, and Network
You have two options for fresh installation of Windows 7 as discussed above. You can either boot and then use the DVD to install Windows 7 or you can directly boot from the DVD drive and install the operating system. The later is more preferable as it offers a clean install. The Windows 7 DVD contains both 32 and 64 bit versions with different keys. Make sure you know which edition you are installing and keep the relevant key ready. You can find the keys on the DVD label or on the DVD box. For step by step instructions for a clean, fresh Windows installation, please read our article called Windows 7 Installation Guide .
If you are setting up Windows 7 as an additional OS on same computer, please read our article on How to Multi-Boot Windows 7 .
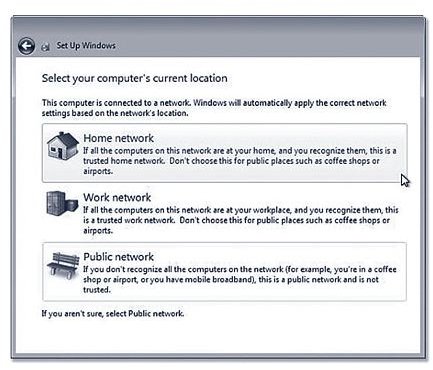
For installation of Windows 7 on a network, you need to create a shared resource for installation. In case of installation from DVD, you will share the DVD with other computers on the network. Alternatively, you can dump the contents of DVD on the main computer and share the dump. After creating the network share, make sure all the computers that you wish to run Windows 7 have access to the dump. To initiate the network setup of Windows 7, double click the setup.exe on the shared resource so that the installation program configures your network accordingly. In this case, you will be asked if it is a home network, a work network, or a public network so that the correct security settings are applied (See image).
Note: Windows 7 installation formats the drive on which you are running the installation. Hence, it is recommended that you back up all the data from the drive.
Windows 7 Installation – Upgrading
Upgrading to Windows 7 saves you money and time. Though you cannot upgrade from XP or previous versions to Windows 7, you can always use the upgrade option for Windows 7 installation if you are using Vista, Windows 7 beta, or Windows 7 trial. In this case, you do not boot from your DVD drive and the installer will not format your drive. The chances of losing data while moving to a Windows 7 installation using this upgrade method are minimal. Still I would recommend that you back up essential data. An upgrade to Windows 7 also means that you do not need to install all the programs and device drivers after the installation is complete. For more information on Windows 7 upgrades, please read our article called Windows 7: In-line Upgrade or New Install? The article tells you which edition of Windows 7 to use when you are already running different editions of Vista.
You may also wish to know the pricing of different upgrades before proceeding with the installation of Windows 7. Most of the computers worldwide still use Windows XP and many of the users are not still in a mood for transition to Windows 7. If you too are skeptical about migrating to Windows 7, you may want to know the advantages of Windows 7 over XP. You may also wish to know the advantages of Windows 7 over Vista .
For the basic information that you need to know before moving to Windows 7, please read my blog All About Transition to Windows 7 .
Talking about upgrading to Windows 7, you may also wish to know more about the options available for a custom installation of Windows 7. The article, How to perform a custom Windows 7 Install , leads you through custom installation of Windows 7 where you can leave out optional components to make your computer faster. The article also describes how to upgrade from Vista 32Bit to 64 bit Windows 7 and more.
While installation of Windows 7 is a cheese, you may encounter some problems. Here are links to the most common errors encountered during transition to Windows 7:
- Windows 7 Install Incomplete - Recovering a Failed Windows 7 Install
- How to Resolve Windows 7 Setup was Unable to Create a New System Partition
- Solving Windows 7 Installation Problems - Activation
Finally, one of our writers did research on how much memory a Windows 7 installation actually needs. Microsoft states the min requirement at 1GB of RAM. Read this research article to see how to perform a Windows 7 installation on a 256MB machine.


