Windows 7 gives you the option to upgrade from your current operating system, or the chance to perform a custom installation. For some users, a custom installation is the only option you have. Read on for step by step instructions.
What is a Custom Install?
A custom installation of Windows 7 essentially overwrites your hard drive with a clean installation of the operating system. In certain cases, such as if you are using Windows Vista, you may not need to perform a custom installation in order to upgrade. But in some cases, you absolutely will need to in order to use Windows 7. Below are certain scenarios in the event that you will need to perform a customized installation:
Regardless of which version of XP you are using: Home, Professional, or Media Center; whether it’s 32-bit or 64-bit, you will need to perform a custom installation before upgrading to Windows 7. Microsoft has released some tools in order to help you move from one operating system to the next. Windows Upgrade Advisor will tell you if your hardware can handle Windows 7, and Windows Easy Transfer can help you transfer files from an external hard drive (or anywhere else you have a back-up stored) to Windows 7. It will even compile a list of all the software you had installed in Windows XP.
Windows Vista: 32-bit to 64-bit, or 64-bit to 32-bit
If you are using Windows Vista, you can upgrade to Windows 7 without performing a custom installation, so long as you are moving from 32-bit Vista to 32-bit 7, or 64-bit Vista to 64-bit 7. However, for example, if you are using 32-bit Windows Vista and want to upgrade to 64-bit Windows 7, you will need to perform a custom installation – and the reverse applies (64-bit Windows Vista to 32-bit Windows 7). Even if you are currently using Windows 7, you will need to perform a custom installation to reinstall the operating system if you are moving from 32-bit to 64-bit, or from 64-bit to 32-bit.
If you don’t know which version of Windows you are using, open your Start menu, right-click on Computer, and select Properties. Under System Type in the new window, it will tell you whether you are using a 32-bit or 64-bit operating system. Some computers come equipped with hardware that will permit a 64-bit operating system to be run, even though a 32-bit operating system is installed. However, for those who are currently running a 64-bit operating system, you can choose to continue using 64-bit, or 32-bit. Differences between 64-bit and 32-bit Windows 7 can be found here . More information on 32-bit or 64-bit computing can be found here .
Performing the Custom Installation
Now that that’s out of the way, actually insert your Windows 7 installation DVD, or run the program if you purchased and downloaded the operating system from an online retailer. If prompted, choose the language you would like to continue in, and select your keyboard type. If on a laptop, you will be told to plug it into an electrical outlet so that your battery doesn’t die during installation.
The option you will want is in the middle of the window: **Install now**.
- The next window will show two options: to obtain updates from the internet, or not to obtain updates from the internet. It’s recommended to obtain updates, but only if you have an internet connection handy. Also, if you don’t want to be included in “making Windows installations better,” then make sure that option is un-ticked in the bottom of the window.
- Next you will be shown the license terms. You must accept them in order to continue the installation.
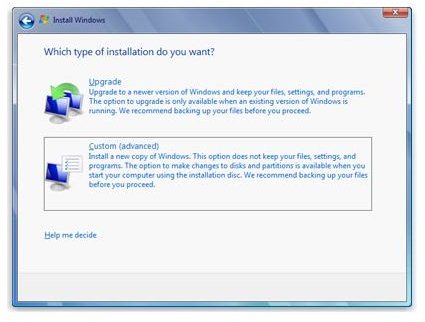
- Finally you will be shown the type of installation you want: Upgrade, or Custom. Choose Custom.
- After clicking Next, you will have to choose the hard drive where you want Windows 7 installed.
- You will receive a warning that files and folders from your current Windows installation will be moved to a folder called “Windows.old.” Some information you can access from there, but you won’t be able to use the version of Windows from which you are upgrading.
From here, Windows will begin to install Windows 7. This could take a considerable amount of time. It will also have to reboot on more than one occasion. Afterwards, the operating system should be fully installed, and you can now use Windows 7. If you need to activate your copy of Windows, there’s an article here and another one here that can help you with that.


