Are you sharing more information than you really planned with your Microsoft PowerPoint presentation? Use PowerPoint’s Document Inspector to make sure that no hidden personal information attaches itself to your slide show.
Personal Information on PowerPoint Files
You may not realize it, but it’s easy for all kinds of personal data to attach itself to a Microsoft PowerPoint presentation created on your personal computer. This isn’t necessarily a bad thing, since it prevents you from having to enter information on authorship every time you create a new presentation. However, it is something you want to be careful about when sharing your presentation either by email or publishing online.
Removing personal information can be a little tricky since it’s not always obvious it’s there. In fact, much of this personal data is hidden behind the scenes. This means that people probably won’t find it unless they’re specifically looking for it. Then again, the people who want to use this information for sketchy purposes know just where to look.
Removing Personal Information
Before making any changes, first make a copy of the PowerPoint presentation you wish to share under a new name. This way you can still keep your notes on the original version, and publish the copy without them.
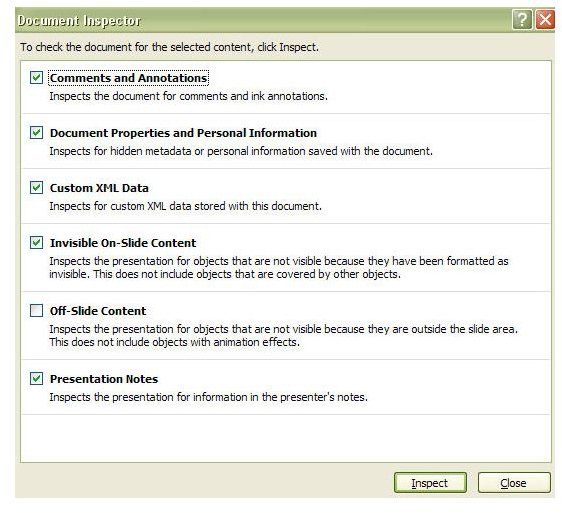
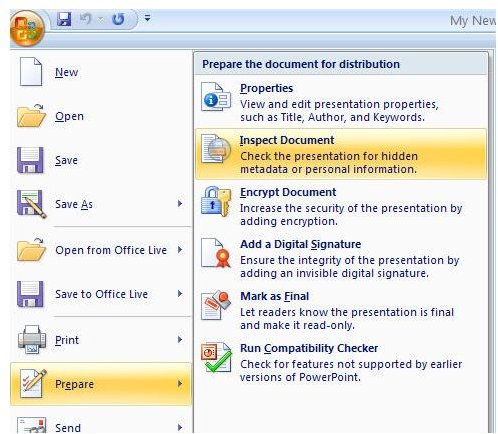
The next step is to click on the Office button, choose Prepare, and then pick Inspect Document. This will bring up the Document Inspector window as shown in the second screenshot above. Check the box in front of each type of content that you want to inspect. If you’re concerned about people accessing hidden personal data, make sure to check the box in front of Document Properties and Personal Information. Click Inspect to continue.
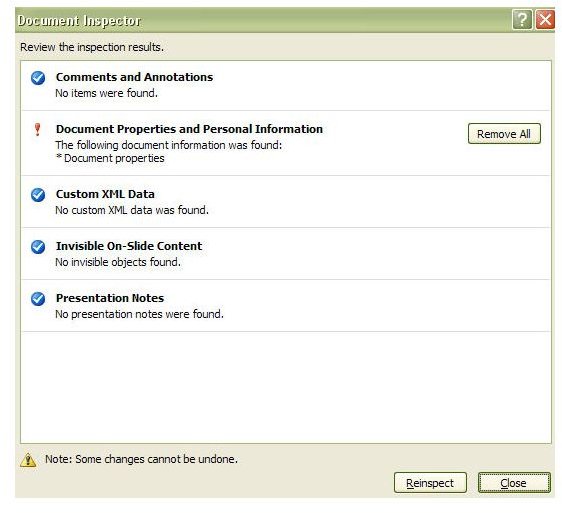
After searching the content, the Document Inspector will return with at list of items found and give you the option to Remove each of these items, one by one. Note the warning that removing some information cannot be undone. This is why it is best to be working with a copy of the original presentation.
If you haven’t created a copy of your PowerPoint presentation yet, you can click Close and no changes will be made. If you’re ready to go ahead and make the changes, click Remove All. Afterwards, to double check that everything was successfully removed, click Reinspect and repeat the process.
When you’re satisfied that all of the information has been removed, save the file again. Now you can share your presentation without worrying about any lingering hidden personal data.
Additional Resources: For more tips, be sure to take a look at the other Microsoft PowerPoint hints and tricks available here on Bright Hub’s Windows Channel. New and updated material is being added on a regular basis, so bookmark the site and check back often.
This post is part of the series: Sharing Your Microsoft PowerPoint Presentations
Once you have your Microsoft PowerPoint presentation in tip-top shape, the next step is to share it with others. In this series, we take a look at how to share a presentation online or through email as well as give advice on things to watch out for when making your presentation public.


