If you’ve rolled out SharePoint 2007 to your company you may soon find a need to categorize your sub-sites and the content on your portal. This article will walk you through setting up a site map for your Microsoft SharePoint intranet.
Overview
SharePoint 2007 is a great collaboration and knowledge sharing tool to help your company gather data and resources into a single searchable place. The only issue with putting all of your proverbial eggs in this basket is that if you don’t set the structure of your sites up in a logical manner, it will be difficult to navigate your site as more content gets created.
Luckily, there is a great free template and web part built into SharePoint that will allow you to create a site map for your Microsoft SharePoint Office intranet portal. This article will focus on setting up a Site Directory, but you can skip ahead to “Customizing the Site Map” if you only want to put a site map on sub-site pages.
If you are new to SharePoint and would like some more information, check out these articles on Brighthub - The History of SharePoint or How To Use Microsoft SharePoint .
Getting Started
Before you get started, make sure you have permissions to create new sites on your SharePoint portal. We will be using a site template to create a new sub-site under your main site collection.
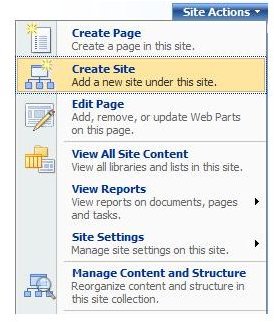
- Log into the main page of your portal. Click the Site Actions menu and select Create Site (Figure 1).
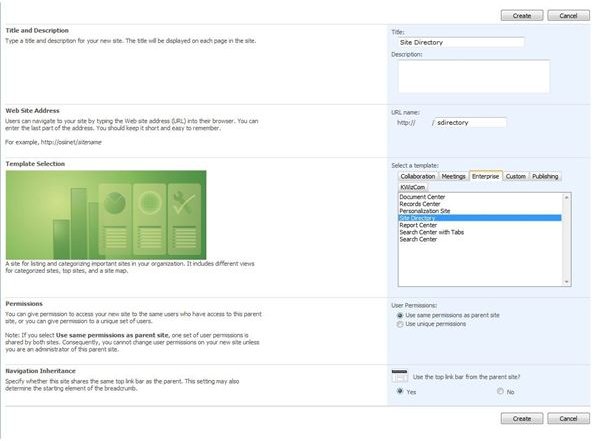
- Enter a Title for the site. I would suggest something along the lines of “Site Directory” or something similar (Figure 2).
- Next, enter the URL name. Again, something along the lines of “sitedirectory” or “sd” should be sufficient (Figure 2).
- Under the Template selection, click the Enterprise tab and then Site Directory. Select your permission scheme (default should be fine) and whether or not you want to use the link bar from the parent site. Click Create when you’re done (Figure 2).
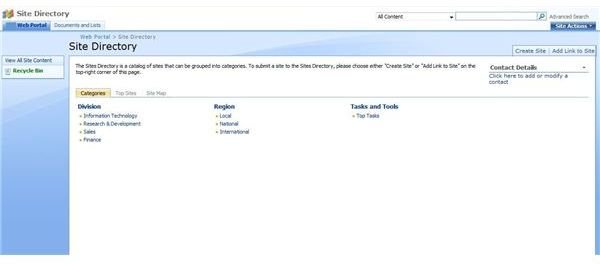
- You will be taken to the new Site Directory portal (Figure 3).
Customizing the Site Map
The default site directory creates a page with tabs for Categories, Top Sites and the Site Map. I’ll leave customizing the Categories and Top Sites section up to you, but it essentially gives you a way to easily create a custom ‘table of contents’ for your site covering the most frequently used sites.
The Site Map page is really just a special web part (called the “Table of Contents Web Part”) that allows you to modify exactly how your Site Map is displayed. Note that you can add this web part to any page in your site collection to have similar site map functionality. To modify the Site Map web part…
- In the Site Directory, click Site Actions and then Edit Page.
- Click the little arrow next to the ‘x’ on the Site Map web part. Select Modify Shared Webpart.
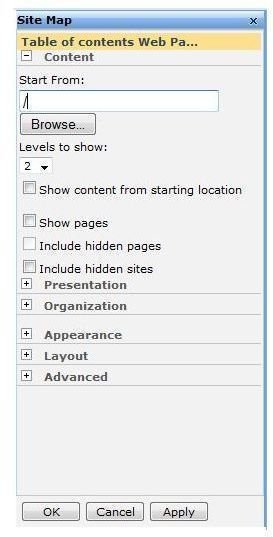
- You now have access to the Table of Contents web part (Figure 4). In this area, you can select criteria – which I will explain below - to dictate what is shown in your site map. Modify the site map to fit your needs and click OK.
Site Map Configuration Options
Under the Content heading, you are able to choose the starting point of your map as well as how many levels. For example, if you have sub-sites under sub-sites, you may want to limit this number as appropriate. Note that you can also choose to show pages in your site map (as opposed to only libraries and lists).
The Presentation heading allows you to select the number of columns displayed and how the text will be displayed within those columns. For example, you can choose to have borders around sites at the top level and pick level two content to be displayed in plain text.
The Organization heading allows you to specify sorting of the content – whether you sort by the site title or modification date is up to you.
The Appearance, Layout and Advanced headings give you the same options as any other web part in dictating the size of the actual web part and other layout options for the page.
Hopefully with these tips you can now find it a bit easier to navigate your site.
Image Credit: Screenshots taken by Ryan Tetzlaff


