This article shows readers how to apply Visual Basic for Applications (VBA) to automate and extend Microsoft Excel and Word.
VBA Examples
If you already thought Microsoft Office was powerful, you’re in for a surprise when you see what Visual Basic for Applications (VBA) can do with it: VBA isn’t just an add-on to Office; it’s Office put on automatic pilot – if you know how to use it. Work through a few examples to learn how to configure this autopilot.
Text finding and replacement
Finding and replacing text is one of the most commonly performed Word tasks. Because it’s so common, any improvement in speed you can bring to this task stands a good chance of greatly cutting down your workload. VBA can deliver that speed improvement.
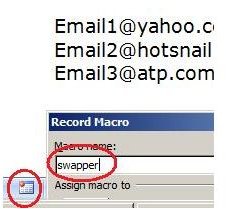
Use VBA to replace the first and last fields in a comma-separated table of data. Start by entering some sample data in Word:
Email1@yahoo.com , Dolores Claiborne, 555-1234
Email2@hotsnail.com , Charles Dickens, 555-4321
Email3@atp.com , Albert Einstein, 555-5005
Start the macro recorder
- Fire up the macro recorder: press the small rectangular button near the lower left corner of your screen. Enter “swapper” for the Macro name.
- Press control-H, select “Use Wildcards,” and enter these text strings in the Find and Replace boxes, respectively:
Find: (<?@>), (???\-????)
Replace: \2, \1
- Click “Replace All,” then stop the macro recording by pressing the small square, again in your screen’s lower left corner.
_
Replay your macro to test it: restore the sample data to its original form before you did the replace operation. Press “alt-F8” to bring up the list of macros to run, and double-click the “swapper” macro. The table’s first and last fields should again switch places.
Learn more about recording macros here .
Document navigation
Getting from where you are in a document to where you need to be is another essential Office task that VBA can greatly speed up. We’ll do two quick VBA routines to prove this: one to set a placeholder in a Word document and another to return to that placeholder. We’ll attach keyboard shortcuts to both routines to make using them as fast as possible.
Begin by opening Word and pressing alt-F11 to enter the Visual Basic IDE (integrated development environment). Paste the following code into the IDE’s code window (the large blank area in the central part of the window):
Enter this VBA code
Public Sub addBmark()
Call Bookmarks.Add(“whereIwas”, Selection.Range)
End Sub
Public Sub retrieveBmark()
ActiveDocument.Bookmarks(“whereIwas”).Range.Select
End Sub
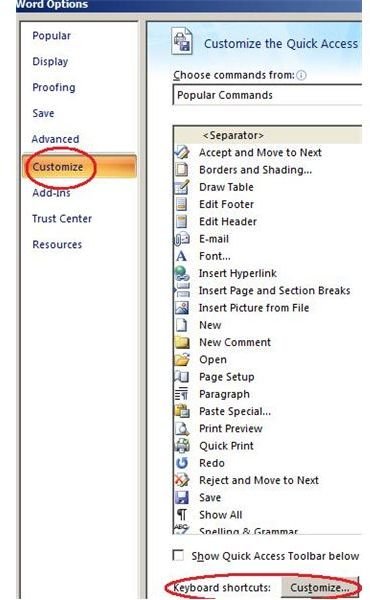
Now for the shortcut keys: return to Word, press the Office button, click “Word options,” then “Customize.” Click the “Customize” button at the bottom of the “Word Options” window. In the “Customize Keyboard” dialog box, select the “Macros” category, then select the “addBmark” macro. Type a shortcut key for this macro, then press “Assign.” Repeat the steps in this paragraph to assign a shortcut key for the “retrieveBmark” macro, making sure you assign a shortcut key different from addBmark’s.
Test your shortcut keys and their macros: paste a large chunk of text into your document, press the shortcut key assigned to “addBmark,” move to another part of the text, then press the shortcut key for “retrieveBmark.” VBA will return you to your placeholder.
Read more about Word’s bookmarking feature here .
User defined formulas
Through VBA, you can write functions that you’ll be able to access through Excel’s “Insert Function” tool–just like Excel’s built-in functions. Learn how by programming this function that calculates the number of days between two given dates.
A custom date functionFrom a new Excel workbook, enter the Visual Basic IDE (alt-F11). Create a new code module by select “Insert>Module.” In the new code window that appears, paste the following program code:
Function nDaysDiff(dt1 As String, dt2 As String) As Integer
Dim dat1, dat2 As Date
dat1 = DateValue(dt1)
dat2 = DateValue(dt2)
nDaysDiff = DateDiff(“d”, dat1, dat2)
End Function
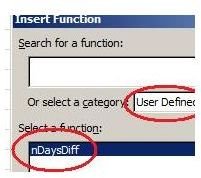
Test the functionBack in Excel, test the new function by inserting it in a worksheet: select “Formulas>Insert function,” then select the “User Defined” category. Double-click the “nDaysDiff” function.
In the “Function Argument” window, choose any two different cells as inputs to the function. Press “OK,” then navigate to the cells you chose and enter any two dates in this format: “mm/dd/yyyy.” Notice that the nDaysDiff function displays the number of days between the two dates.
Get more details on user-defined functions here .
Data sorting
Try a VBA example in Excel that sorts a column of numbers. This example introduces you to VBA functions that take several parameters.
Enter the VBA IDE for a new Excel workbook, as the foregoing examples showed you how to do. Paste the following program into the IDE’s code window:
Sub sortColumn()
With ActiveSheet.Sort
.SortFields.Clear
Call .SortFields.Add(Selection.Columns(1), xlSortOnValues, xlDescending, False, xlSortNormal)
.MatchCase = False
.Header = xlGuess: .SetRange Selection
.Orientation = xlTopToBottom: .Apply
End With
End Sub
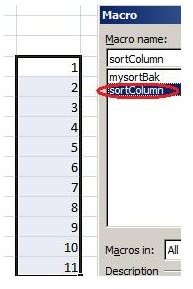
Return to the Excel workbook and enter a column of about 10 numbers, from 1 to 10.
Run the macro by pressing “alt-f8” and double-clicking the “sortColumn” item in the list of macros. The macro will do a descending sort of your column of numbers.
Read more about Excel’s sorting function here .
Application settings and VBA
VBA is handy for turning application options on or off, as the following example shows. Open any Word document, then paste the following code into the IDE’s code window, as you did in the foregoing examples:
Sub toggAutoCorrect()
Dim s
AutoCorrect.ReplaceText = Not AutoCorrect.ReplaceText
If (AutoCorrect.ReplaceText = True) Then
s = “ON”
Else
s = “OFF”
End If
MsgBox “Autocorrect is " & s
End Sub
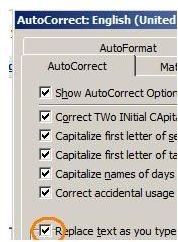
Return to Word and assign a shortcut key to the macro, as the document navigation example showed you how to do. Type the “:)” (smiley face) characters in the document and notice if Autocorrect replaces them with the smiley face symbol. Press the toggAutoCorrect shortcut key and then retype “:)”. Your macro has either toggled on or off the Autocorrect option.
Read more about Word’s Autocorrect feature here .
Don’t stop here
The more Office tasks you learn how to automate with VBA, the quicker you’ll be able to complete your work. Use the program samples in this article as a springboard to developing your own programs.
References


