This article shows readers how to use Visual Basic for Applications (VBA) to perform common tasks in Microsoft Office quickly.
VBA Tutorials
Visual Basic for Applications (VBA) is a programming language you can use to extend Microsoft Office. Working through a few sample VBA programs will spark your own ideas for maxing out Office.
This article’s samples will help you automate these common Office tasks:
- Filtering data
- Navigating documents quickly
- Finding and replacing text
- Setting document options
- Creating custom formulas
Filtering Excel Data with VBA
Here’s a quick VBA snippet that applies a custom filter to a selected column of data. To install and run this macro, do the following:
- Create a new Excel workbook, then enter the Visual Basic IDE (integrated development environment) by pressing alt-F11.
- Double-click the ThisWorkbook icon in the Project window.
- Paste the following program code into the code window (the blank area to the right of the Project window).
Sub myFilter()
Selection.AutoFilter Field:=1, Criteria1:="<=2", Operator:=xlAnd
End Sub
- Return to Excel (alt-F11), then create a column of numbers extending from 1 to 10 or so.
- Select the column, then press alt-F8 to bring up the list of macros..
- Double click the myFilter macro to run it. The macro will filter the numbers in the column..
Tip: Notice how easy it is to spot the macro’s filtering criteria (i.e. “…Criteria1=…”). Try redefining the filter to work with different criteria.
Read more about Excel’s filtering tool here .
Fast document navigation
Another practical use of VBA is to create placeholders you can quickly set and then return to later. This is especially useful for those big labyrinthine files you tend to get lost in.
Try this example for setting placeholders (AKA bookmarks) with VBA:
- Inside Word, press alt-F11 to enter the Visual Basic IDE and navigate to the current document’s code window, as you did with the previous example.
- Paste the following code into the code window:
Public Sub setBmark()
ActiveDocument.Bookmarks.Add Name:=“mybmark”, Range:=Selection.Range
End Sub
Sub gotoBmark()
Selection.GoTo What:=wdGoToBookmark, Name:=“mybmark”
End Sub
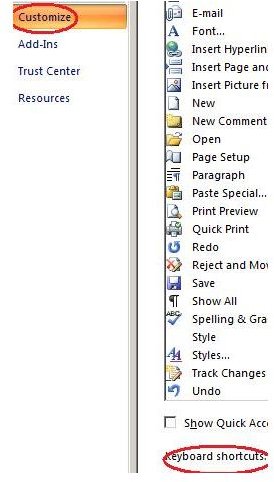
Return to Word and assign shut keys to both macros: press Office Button>Word options>Customize, then click the Customize button near the window’s bottom. Enter an unused keyboard combination in the dialog box and press OK.
Try out your bookmark macros: open a document, press the shortcut key for the setBMark macro, navigate to another part of the document, then press the shortcut key for the gotoBmark macro. Word will return you to the set bookmark.
Bookmarks for Excel
Excel doesn’t have Word’s bookmarks per se, but something similar you can adapt the navigation macros to: names. Here’s how to use VBA to create and return to placeholders using Excel’s Names:
Open an Excel workbook and enter the VB IDE’s code window using the instructions from the previous examples. Paste the following code into the code window:
Sub setName()
ActiveWorkbook.Names.Add Name:="_bmark", RefersTo:=Selection
End Sub
Sub gotoName()
Application.Goto Reference:="_bmark"
End Sub
Read more about assigning names to Excel’s ranges here.
Set Excel’s shortcut keys
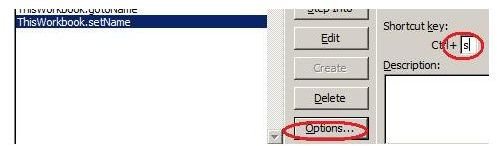
Return to Excel and assign shortcut keys to both macros: press alt-F8, select the setName macro from the list, then press Options. Enter a memorable shortcut key (which must be used together with the control key). Press OK, then repeat this step to assign a new shortcut key to the gotoName macro.
Try out your macros by pressing the shortcut key for setName, navigating to another cell, then pressing the shortcut key for gotoName. Excel will return you to the placeholder you set with setName.
Finding and replacing with VBA
This next exercise shows you how to write VBA code by recording it. We’ll record a macro that swaps the first and last names in a list of names.
Start by creating a Word document and entering names in the format lastname, first name. Here’s some sample content:
may, maggie
wayne, bruce
kent, clark
Record the macro
Record the macro to swap the names:
- Press the macro recording button, which is the little square in the lower left corner of the Word workspace.
- Enter “nameswap” for the macro’s name and press OK.
- Press control-H and enter these parameters in the Find/Replace dialog box:
- Use wildcards.
- Find box: (<[a-z,A-Z]@>), (<[a-z,A-Z]@>)
(Note: enter those characters exactly as written, including the parentheses)
- Replace box: \2 \1
- Press Replace all.
- Stop the recording, then press alt-F8 to bring up the macro list. Select “nameswap” and click the Edit button.
- In the IDE, check the nameswap code against the following listing. Don’t worry that your code doesn’t match the listing exactly; the listing’s code was manually compressed to allow more than one statement per line (by using the colon operator).

Sub nameswap()
Selection.Find.ClearFormatting: Selection.Find.Replacement.ClearFormatting
With Selection.Find .Text = “(<[a-z,A-Z]@>), (<[a-z,A-Z]@>)”: .Replacement.Text = “\2 \1”
.Forward = True: .Wrap = wdFindContinue
.Format = False: .MatchCase = False
.MatchWholeWord = False:
.MatchAllWordForms = False
.MatchSoundsLike = False:
.MatchWildcards = True
End With: Selection.Find.Execute Replace:=wdReplaceAll
End Sub
Use this macro any time you need to swap two columns of comma-separated text. Also, remember the process you used to “write” this macro: you didn’t have to write anything, but only record the macro. Often, though, you will need to tweak your macro-recorded code in the IDE, so be prepared to invest a little time learning the VBA language.
Learn more about Word’s Find and Replace feature here .
Setting document options
Use VBA to set document options quickly, starting with the following Excel macro. The macro turns off the option allowing Excel to show new workbooks as separate processes on the Windows Taskbar. After recording the macro, we’ll tweak its code so it toggles the option from off to on and back off again.
- Open Excel and press the macro recording button. Name the macro “toggMultiBook”
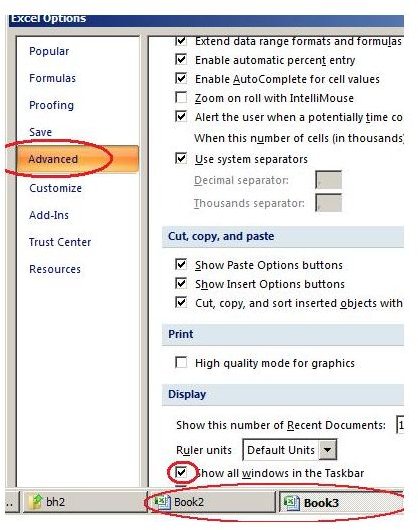
- When the macro starts recording, select the Office button>Excel Options>Advanced, and under the Display heading, uncheck the “show all windows in the Taskbar” option.
- Stop the macro, then make one or two new workbooks (control-N) to verify the option change has kicked in.
Change the code to toggle the option
Now we’ll change the macro so that it turns on the show-multiple-books option if it’s currently off, and turns it off if it’s on: press alt-F8 to bring up the listing of macros, choose toggMultiBook and press Edit. Change the program code for toggMultiBook so it reads as follows:
Sub toggMultiBook()
Dim msg As String
Application.ShowWindowsInTaskbar = Not (Application.ShowWindowsInTaskbar)
If (Application.ShowWindowsInTaskbar) Then msg = “ON”
Else
msg = “OFF”
End If
MsgBox (“The Multi-Window option is " & msg)
End Sub
Return to Excel, assign a shortcut key to the macro, and then re-run it to test it: press control-N to make new workbooks, noticing where their icons appear on the Windows Taskbar; call up the macro and watch the workbooks’ icons combine or split apart on the Taskbar.
Read about changing Excel’s other options here .
Using VBA to define custom functions in Excel
Use VBA to write your own functions, which will available in the Formulas>Insert Function tool. Begin with this example, which calculates the difference in days from a user-specified date to Christmas of this year.
Enter the custom by function by hand, not by recording
Open an Excel workbook and enter the VBA IDE. Click Insert>Module. In the new code window that appears, paste the following function definition:
Function nDaysToChristmas(strDate As String) As Integer
Dim dat, dat2 As Date
Dim yr, nDays As Integer
dat = DateValue(strDate)
yr = Year(Now)
dat2 = DateValue(“December 25, " & CStr(yr))
nDays = DateDiff(“d”, dat, dat2)
nDaysToChristmas = nDays
End Function
Return to Excel and enter today’s date in a worksheet cell, whose format should match that of this date: 12/1/2009.
Click a nearby cell and insert your custom function: select Formulas>Insert Function, then choose the User Defined category. Select “nDaysToChristmas” and then click OK.
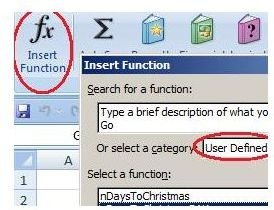
In the Function Arguments dialog box, navigate to the cell containing the date you entered, then press OK. Excel will enter the nDaysToChristmas function, which will display its result: the number of days between the date you entered and next Christmas Day.
Notice the top of the program code in this example: it begins with “function” rather than the “sub” keyword we’ve been using for other macros. Use a VBA function when a value must be passed back to the caller of the code. (The caller in this example is the worksheet cell displaying the results of the nDaysToChristmas function.)
Keep in mind that you can’t record functions, but must code them by hand. However, you can record macros and paste portions of the resulting code in a function.
Learn more about VBA
This article introduced just a few of the many ways you can use VBA to extend Office’s out-of-the box functionality. Invest the time to create more VBA programs to produce and manage Office documents with speed and accuracy.
References


