This step-by-step Windows Vista tutorial provides instruction on how to use Vista’s Defrag utility to de-clutter your hard drive and optimize its performance.
Whenever you move or copy a file, delete an email, download or uninstall a program, you change the location in which related information is stored in your system. Over time, several blocks of data related to a specific file can be stored in multiple places on your hard disk, where ever there is space available.
When data gets fragmented in this manner, it increases your hard drive’s data access time, burdening your hard disk and significantly slowing down your computer. It may even cause physical damage to your system as your hard drive’s read/write head is forced to work extra hard searching for data all over the hard disk.
Vista’s Disk Defragmenter utility scans your system to locate all of the non-contiguous data and file fragments. It then re-arranges and consolidates them on the hard disk. This system tool can free up potentially huge amounts of hard disk space, increase disk access performance and enable the hard disk to run more efficiently.
Tip # 20: Manually Run the Disk Defragmenter
- Click on the Vista Orb to open the Start menu. Select All Programs from the context menu and then click on Accessories.
- Enter your password or click to provide confirmation if prompted by the UAC.
- Click System Tools and then Disk Defragmenter. This opens the Disk Defragmenter window.
- Highlight the drive that you have Vista installed on or the partitions that you would like to defragment.
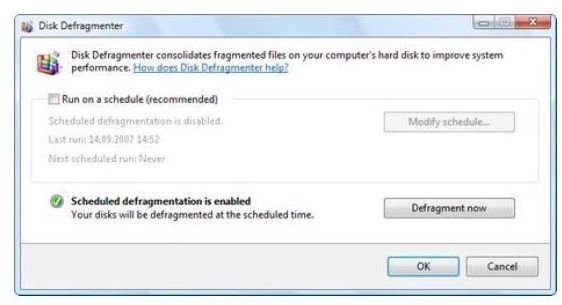
- Click on the “Defragment now” button to launch the defragmentation process.
Quick Tip
The process can take a long while, so it is best to defrag your system when you are not using it such as at night when you go to sleep.
Tip # 21: Turn off Automatic Disk Defragmentation
By default, Vista has disk defragmentation scheduled to run automatically. In effect, it will determine for itself the best time to defrag your system. This automatic setting, while helpful, can really slow down your system every so often. You can turn it off and instead manually run your disk defrag utility on your own chosen schedule.
- Click on the Vista Orb to open the Start menu. Right click on the C: drive and then select Properties**.**
- Click on the Tools tab.
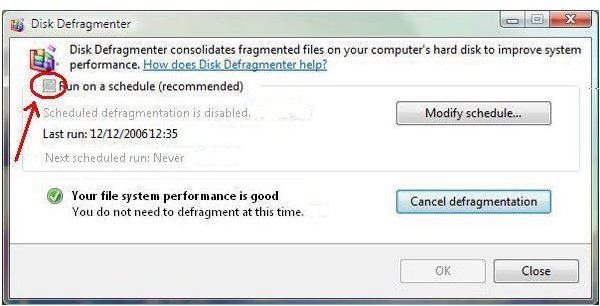
- Uncheck the Run on a schedule option.
- Click OK (or close if OK is grayed out).
How to Create a Scheduled Defragmentation
- Click System Tools and then Disk Defragmenter. This opens the Disk Defragmenter window
- Highlight the drive that you have Vista installed on or the partitions that you would like to defragment.
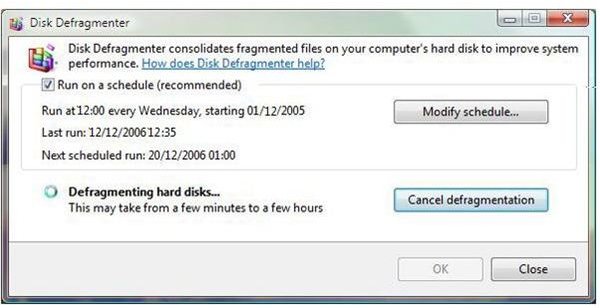
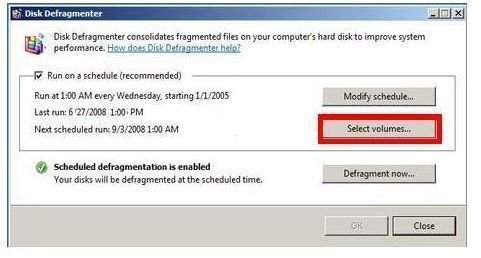
- Check on the option labeled: Run on a schedule (Recommended)
- Click on the Select volumes__… button.
- Select one or more disks to be defragmented. If you have added any new disks to your PC and want them added to the schedule, then check the option that reads: Automatically Defragment New Disks. Click OK.
- Click on the Modify schedule… button in the Disk Defragmenter window to modify the time that is for automatic defragmentation.
- Select the frequency with which you want the Disk Defragmenter to run (Monthly, Weekly, Daily). Indicate the day and exact time when it should run. Ideally, if you use your computer on a daily basis, you should defrag on a weekly basis.
Quick Tips
- You can get the Disk Defragmenter tool to run faster and more effectively by defragmenting your hard disk in Safe Mode. To do this, tap the F8 key at system startup and then choose the Safe Mode option. When in Safe mode, your computer will only boot up with essential processes and services.
- Running the Disk Cleanup utility before you defragment will also speed up the process.
This post is part of the series: 21 Great Ways to Speed Up Vista
Continuing this excellent series, Dianna Monda Dill brings us twenty-one more handy, useful, and well described tips for speeding up Windows Vista.
- More Great Ways to Speed up Vista: Uninstall Spyware
- More Great Ways to Speed up Vista: Protect Against Malware
- More Great Ways to Speed up Vista: Perform a System Restore
- More Great Ways to Speed up Vista: Stop Resource Intensive Processes
- More Great Ways to Speed up Vista: Close Unresponsive or Frozen Programs
- More Great Ways to Speed up Vista: Scan your Hard Drive for Errors
- More Great Ways to Speed up Vista: Disk Cleanup Utility
- More Great Ways to Speed up Vista: Run the Disk Defragmenter


