Learn the different ways that column widths can be adjusted when working with Microsoft Word tables. Columns in Word tables are designed to automatically adjust by default. But you can turn this feature off, as well as apply your own column width options to your Word tables.
Adjust Column Width Using Click and Drag
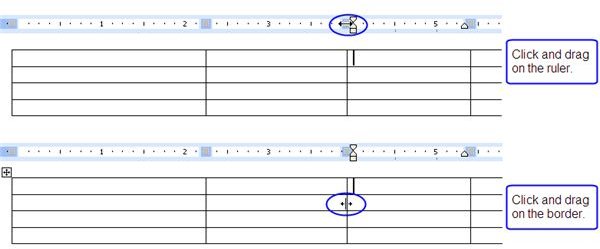
You can easily adjust the width of a column in a Word table by using the click and drag method. There are two different ways you can “click and drag” to adjust the size of a column. One way is to click and drag on the ruler bar; the other way is to click and drag on the column border.
Using the Ruler Bar: Place your cursor anywhere within the table. If you look at the ruler bar at the top of the document, you will see “gray boxes” where each table border is. You can resize a column by grabbing the “grey box” on the ruler bar and dragging left or right. However, you will notice that not only did the column width change, but so did the entire table. So to use this method effectively, make sure to hold down the SHIFT key while dragging the gray box on the ruler bar. This will allow you to resize the column without moving the table.
Using the Table Border: This is probably the easier and safer way to adjust the column width since it does not change the size of the table. Just grab a column border and drag to the left or right to resize the column. The table will stay the same.
Adjust Column Width Using Table Properties
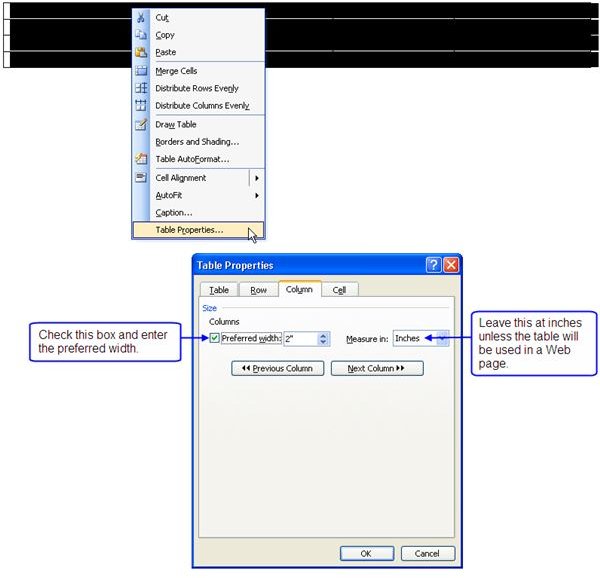
If you prefer being more exact when setting column widths, you should adjust columns by going into Table Properties.
- Select the columns that you want to adjust (or select the entire table to edit all the columns with the same setting at one time).
- Right-click on the selected column(s) and choose Table Properties. (Or click Table on the menu bar and choose Table Properties.)
- Click on the Column tab.
- Check the box next to Preferred Width and enter the desired column width.
NOTE: Leave “Measure In Inches” alone. Choose “percent” only if you intend to use the table in a Web page.
Adjust Column Width Using AutoFit
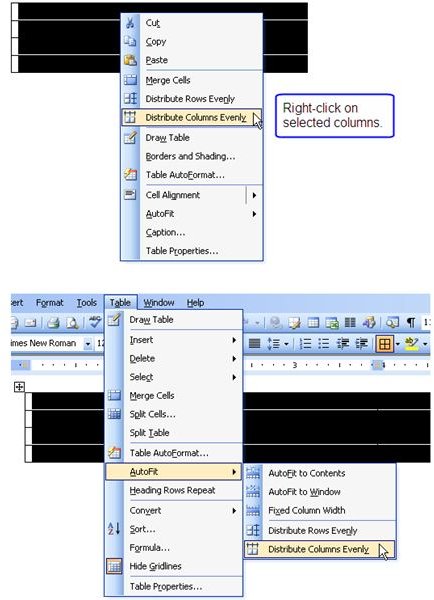
If you want to make all the columns in your table the same width, then you’ll want to use the Distribute Columns Evenly feature.
- Select the columns you want to adjust (or select the entire table).
- Right-click and choose Distribute Columns Evenly. (Or click Table on the menu bar, choose AutoFit, then Distribute Columns Evenly.)
NOTE: You must select consecutive columns for this feature to work. Also, when selecting columns, do not use the CTRL key. If you use the CTRL key, even when selecting consecutive columns, the Distribute Columns Evenly feature will not be available.
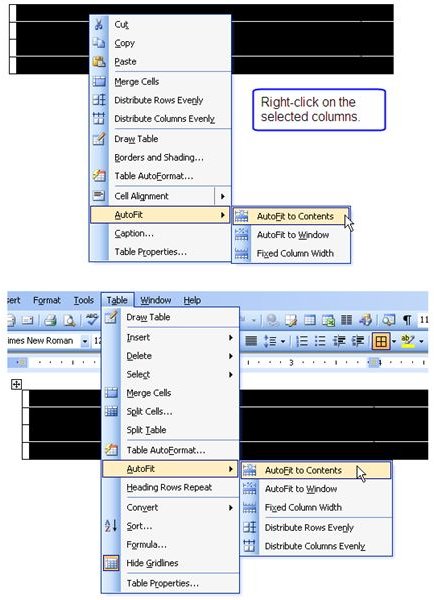
If you want to adjust the column width to fit the widest entry, then you’ll want to use Word’s AutoFit to Contents feature:
- Select the columns you want to adjust (or select the entire table).
- Right-click and choose AutoFit, then AutoFit to Contents. (Or click Table on the menu bar, choose AutoFit, then AutoFit to Contents.)
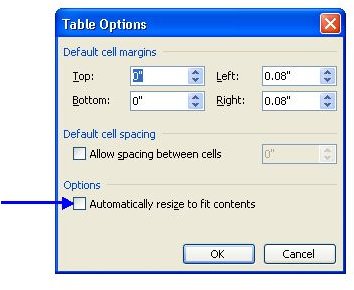
How to Turn Off Automatic Resizing of Columns
By default, Microsoft Word tables are setup to automatically resize to fit the contents. This means that if you have a word that is too big for the column, the column will automatically expand to fit the word. If you don’t want this to happen, then you will need to turn this feature off:
- Click anywhere in your table, right-click and choose Table Properties (or go to Table on the menu bar and choose Table Properties).
- On the Table tab, click on the Options button.
- Uncheck the box next to Automatically resize to fit contents.
Conclusion
Now you can confidently adjust the column widths in your Microsoft Word tables.
This post is part of the series: Word 2003 Tables
Everything you need to know to create tables in Microsoft Word.


