If you have ever needed to create different headers or footers in your document, you know how frustrating and confusing this can be. But after reading the following article, you will learn how easy it actually is to create different headers and footers in a Word document.
Understanding Section Breaks
To fully understand how to create different headers and footers, you first need to be knowledgeable in how “section breaks” work in Word. Section breaks allow you to create different types of page-specific formatting within the same document. Every section can contain unique page numbering, margin sizes, headers and footers , and page orientation.
Section Breaks would be used in the following circumstances:
- Documents with different headers and footers
- A document with both letter size and legal size pages
- Documents with both portrait and landscape orientation
- Documents with pages that need different margin widths
- Documents with columns
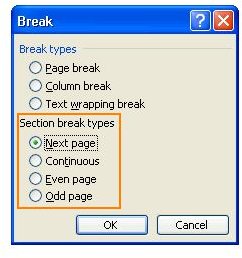
There are four different types of section breaks:
- Next Page: Inserts a section break so the new section begins on the next page.
- Continuous: Inserts a section break on the same page.
- Even Page: Inserts a section break and starts the section on the next even numbered page in the document.
- Odd Page: Inserts a section break and starts the section on the next odd numbered page in the document.
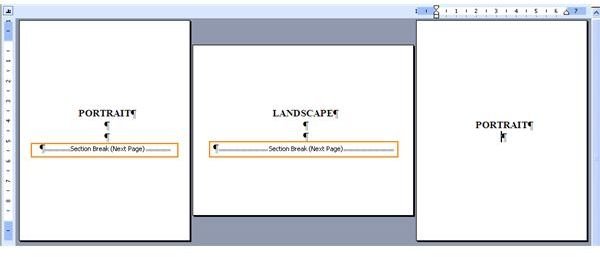
The following image depicts how section breaks have been used to change the page orientation from Portrait to Landscape and back to Portrait in a single document.
STEP 1: Insert a Section Break
1. Place your cursor where you want the section break to start.
2. Click Insert on the menu bar and choose Break.
3. The Break dialog box opens. Under ‘Section break types’, select the appropriate section break. Typically, when creating different headers and footers, you will select Next Page.
STEP 2: Add or Edit Headers and Footers
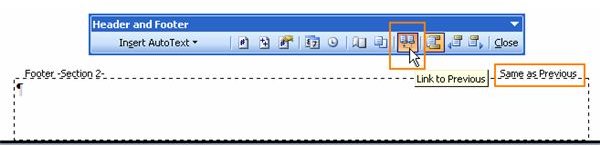
1. After you have inserted the Section Break, place your insertion point on the first page of your new section.
2. Click View on the menu bar and choose Header and Footer.
3. Then place your cursor in the header or footer that you want to edit. You will see “Same as Previous” displayed on the header/footer border (dotted line that surrounds the header or footer). You need to turn this option OFF so that you can create a new header and footer that is not linked to the previous section. To turn it off, click on the Link to Previous button on the Header and Footer toolbar. The button should no longer be highlighted and you should no longer see the words “Same as Previous” on the dotted border. With this feature turned off, you can now modify your header and/or footer without it affecting other sections of the document.
Conclusion
Each time that you want to start a different header or footer in your document, you will need to first insert a Next Page Section Break, then turn off the Same as Previous option before you can edit the header or footer. If you do not do these two things, you will not be able to create a different header or footer in your document.
To learn more about what you can do in Word, check out the other tips and tutorials for Microsoft Word .
This post is part of the series: Word 2003 Headers and Footers
Learn everything you’ve ever wanted to know about creating headers and footers in MS Word.


