
If you’re having trouble trying to align objects in Microsoft Word 2007 documents, it’s a good idea to turn on the layout grid and let it help guide your positioning. Here, we’ll show how to activate and use this powerful feature.
Sometimes, it can seem like a bit of a chore to get images and text to align properly in a Microsoft Word 2007 document, especially if you have several objects inserted on a single page. In the following steps, we’ll show how you can use Word’s layout grid to position an object perfectly on a page.
How to Position an Image
Step 1: Insert the image in the approximate location where you want it to appear in your Word document. See Part 1 of this series if you have questions concerning how to do this. You may also want to resize (again, see Part 1) or select text wrapping options (see Part 3) before continuing.
Step 2: Make sure that the image is selected, and then open up the Format tab under Picture Tools on the PowerPoint ribbon.
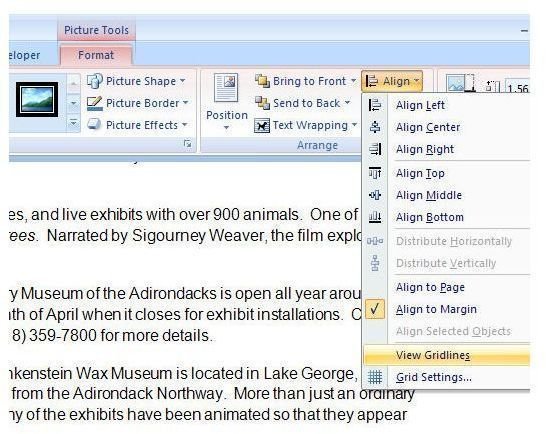
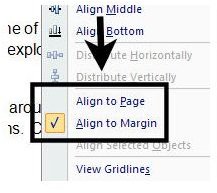
Step 3: Expand the Align menu by clicking on the down arrow. First decide if you want to align the object relative to the page margins (Align to Margin) or relative to the very edge of the page (Align to Page). In this example, we will use the Align to Margin option. Click on the selection that you would like to use.
Step 4: Expand the Align menu again, and this time, select View Gridlines. Once you’ve done this, a layout grid will appear on your Word document – don’t worry, even if you forget to turn it off, it won’t be printed along with the rest of the file.
Tip: If you don’t like the size of the grid you can change it by selecting Grid Settings from the Align menu and adjusting the horizontal and vertical spacing.
Step 5: Click on the picture and drag it to a new location, using the gridlines as a guide to help you align the image to other objects on the page.

Step 6: When you’ve finished positioning your image, expand the Align menu and click on View Gridlines again to get rid of the layout grid.
Aligning Two or More Images
What if you have several objects on a page that you want to align at the same time, keeping the same relative distance between each one? For the most part, this is done in the same manner, except for one minor change related to Step 3 of the above process.
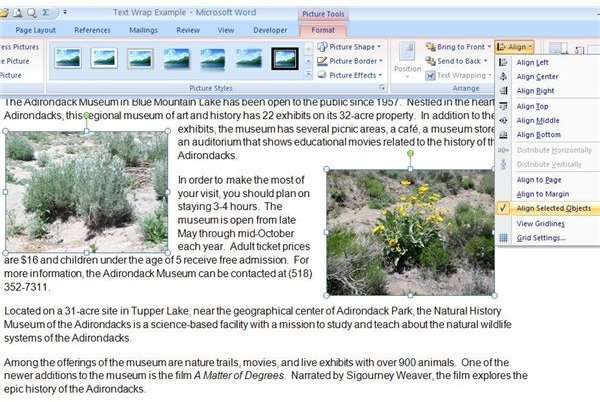
Replace Step 3 in the above instructions with the following: Select all of the objects that you want to align as a group. (After selecting the first image, hold down the Ctrl key while selecting the remainder.) Expand the Align menu and select the Align Selected Objects option. From this point, you can proceed to Step 4 and continue as above.
This post is part of the series: Working with Images in Microsoft Word 2007
Need some tips, tricks, and pointers for handling images in Microsoft Word 2007? In this series, we’ll start with the basics and work our way up.


