Although you don’t have to add formatting and design elements to tables in order for them to be functional, it sure does make them look nicer! In Part 4 of this series, we’ll take a closer look at the available design tools for tables in Microsoft Word 2007.
Improving a Table’s Appearance
Once you’ve created a basic table in Microsoft Word 2007, you don’t want to stop there. There are numerous formatting and design tools available that can really bring a drab table to life. In this guide, we’ll explore how to use some of these table design features.
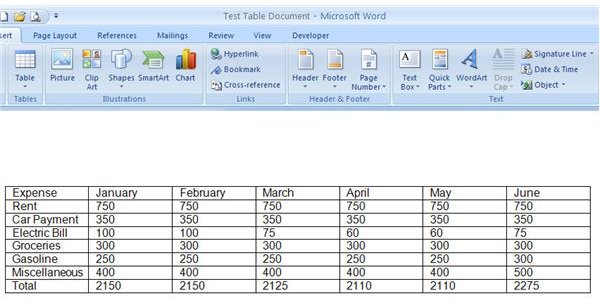
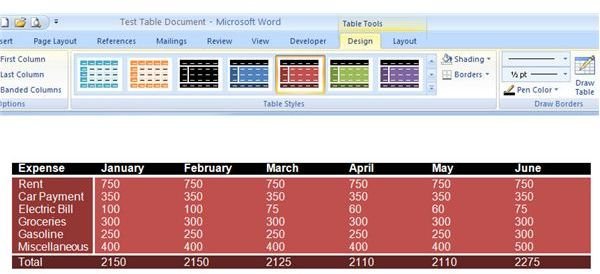
The first thing you want to do is create your basic table within your Word document. If you’re looking for pointers on this process, take a look back at Parts 1-3 of this series. For our example, we’ll use a monthly budget table that is shown in the screenshot below. (Click the image for a larger view.)
Although it contains all of the necessary information, this table looks pretty dull. It’s doubtful that it would catch anyone’s eye based on its appearance alone. Let’s see if we can spice it up a bit.
We’ll begin by selecting the table and then opening the Design tab under Table Tools on the PowerPoint ribbon.

The first thing that we want to take a look at is the information in the Table Style Options portion of this tab.
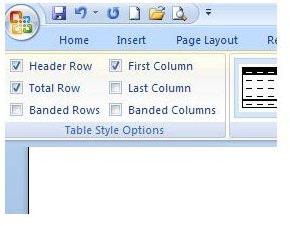
There are six options in this segment, and you can apply any combination (or none at all) to your table format. We’ll take a look at each choice in more detail.
- Header Row – Although most tables will have a header row, it’s possible to have a table that doesn’t. If you do have a header row, and you want the design of your table to make the header row stand out so that it is easily distinguishable from the rest of the table, check this option.
- Total Row – If you’re table contains numerical data, like our example does, you may have a separate row at the bottom that summarizes this data. If you do, and you want the table formatting to reflect this, select this option.
- First Column – In many tables, such as our monthly budget example, the first column will break down the table into further categories. If you would like special formatting applied to this column, check this option.
- Last Column – Just as with the First Column option, many tables will reserve the last column for a categorical listing or summary of data. Select this option if you want this column to be distinguished as such.
- Banded Rows – This special formatting option applies shading to alternate rows of the table. It’s mostly used purely for appearance, but it can help the reader visually separate rows if the table contains a large amount of data.
- Banded Columns – Very similar to the Banded Rows option, this selection will apply shading to alternate columns of a table.
For our example, we’ll just put a check next to the Header Row, First Column, and Total Row options. We could have also chosen either or both of the Banded options, but we’ll stick to the basics for now. If we change our minds later, we can always go back and apply them at any point during the formatting and design process.
You may have noticed that nothing happened to the table itself when these options were checked. Before we’ll be able to see the effects of our choices, we’ll have to select a look for our table from the Table Styles segment of the ribbon.
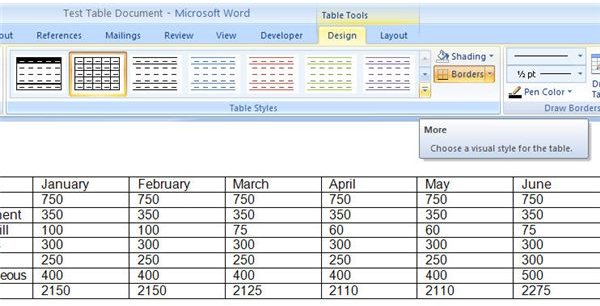
Click on the More arrow (the arrow with a bar over the top) to open up a larger window that will contain all of the choices available for the Table Styles feature. As you can see in the screenshot below, there are a lot of styles to choose from!
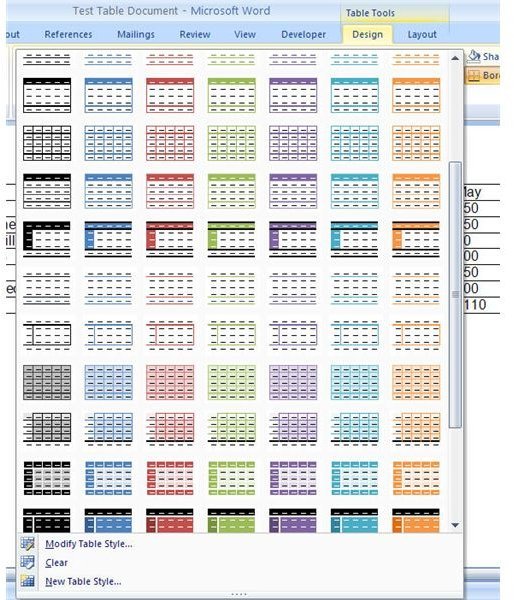
Scroll through the list until you find a style you like. Not all of these choices will take into account the options you chose from the Table Style Options list, so if you want to be sure that certain columns are emphasized, your choices may be more limited. However, you can always choose any style and then modify it after it has been applied.
To help with your selection, hover the mouse over any style, and a preview of your table with that style applied will be seen in your Word document. For this example, we’ll select the style named Dark List – Accent 2.
If you want to make further adjustments to the table, you can use the options in the Shading and Border dropdown lists to modify the entire table or any selected group of table cells. However, if you want to modify any of the font properties of the text within a cell, you’ll have to do that on the Home tab in the same manner that you would use to modify any other type of text in a Word document.
This post is part of the series: Using Tables and Charts in Microsoft Word 2007
In this series, we’ll take a look at how charts and tables can be used in Microsoft Word 2007 documents to help illustrate important concepts and keep the reader’s attention.


