
Creating forms in Microsoft Word means that users can fill in the forms easily right from their computers. If you have made fillable forms in Word 2003 or earlier versions, you might be perplexed about doing so in Word 2007 and 2010. Fortunately, it is easy when you know where to look.
Display the Developer Tab
In order to access the content controls you need to create fillable forms in Word 2007 or 2010, you must display the Developer tab of the ribbon, which is not visible by default.
Click the Microsoft Office Button in Word 2007 and click on Word Options. Select Popular in the left pane of the window. Select the Show Developer tab in the Ribbon check box and then click OK.
In Word 2010, go to the File tab and click Options. Click on Customize Ribbon in the left pane. Select the Developer check box under Customize the Ribbon on the right side of the window and then click OK.
The Developer tab displays on the right end of the ribbon.
Add Content Controls
Now that you have the Developer tab at your fingertips, you can begin adding content controls to your document. Open an existing document or template that you want to use as your basis for creating forms in Microsoft Word, or make a new document and add the controls as you go along.
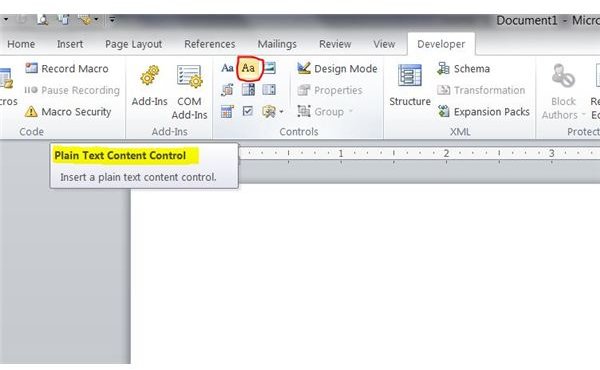
To add a content control, go to the Developer tab. Click on the document where you wish to add the control and then click on the type of control you want to add.
For example, if you want users to be able to type in plain text, click on the Plain Text Content Control (image right). Doing so will add a box labeled Click Here to Enter Text. Other controls include Picture Content Control, which inserts a picture placeholder, Check Box Content Control, which inserts a “Yes or No” type check box, a drop down list control and more.
Set Properties for the Controls
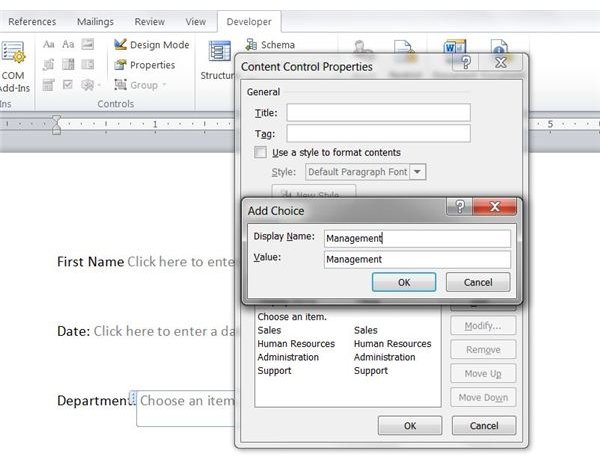
For most of the controls you add when creating forms in Microsoft Word, you will want to modify the properties. Click on the field you want to modify and click Properties in the Control group. Then you can add options for users to choose. For instance, for a drop down list, click the Add button on the Properties dialog, type an option into the Display Name box and click OK. Repeat for each item you wish to add to the list.
Protect the Form
Once you have completed the form and added all of the fillable form fields you want to use, you will need to protect the form. In Word 2007, click on Protect Document in the Protect group of the Developer tab. Select Restrict Formatting and Editing from the Protect Document list. The Restrict Formatting and Editing task pane opens.
In Word 2010, click on Restrict Editing in the Protect group of the Developer tab to open the Restrict Formatting and Editing task pane.
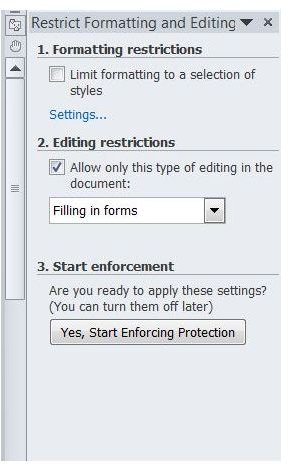
Select the Allow Only This Type of Editing in the Document under Editing Restrictions. Select Filling in Forms from the list of options and then click the Yes, Start Enforcing Protection button.
Enter a password if you want to protect the form with one and then reenter it to confirm it. Otherwise, simply click OK. Save the form and begin distributing it as you need to.


