Creating macros in Microsoft PowerPoint 2007 may not be as easy as it was in earlier versions of the software, but the process of running macros has changed very little. In Part 3 of this series, we’ll show how to run an existing macro in PowerPoint 2007.
Even if you don’t want to dive into the fray of creating your own macros in VBA as we described in Part 2 of this series, you still may want to use those created by others. The steps needed to execute a macro in Microsoft PowerPoint 2007 are basically the same as in earlier versions of the software. In this article, we’ll walk through that process.
How to Run a Macro
Make sure that the Developer tab is visible on your PowerPoint ribbon and that macros have been enabled. See Part 1 of this series if you need additional information on how to perform these tasks.
Open both the presentation that contains the macro and the presentation in which you want to run the macro. Many times, these presentations will be the same. However, there are also numerous cases where you might want to apply a macro contained in one presentation to an entirely different one. For instance, you may write a macro to crop and resize an image in one PowerPoint 2007 presentation and then use that same macro in several others.
If the macro you wish to apply only affects one slide in your presentation, open that slide first. Similarly, if the macro is designed so that it only modifies a single object on a slide, select that object before running the macro.
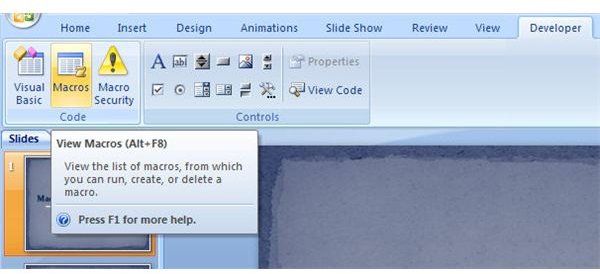
For our example, we will use the simple macro created in Part 2 of this series. To run this macro, open the Developer tab and click the View Macros button as shown in the screenshot below. (Click on the image for a larger view.)
In the Macro window that appears on your screen, there will be an option that allows you to view the macros in the current presentation or in all presentations open (see the image below). By default, PowerPoint 2007 will only show the macros available in the active presentation. If you want to see the macros that are available in all open files, select All open presentations from the Macro in: drop-down list.
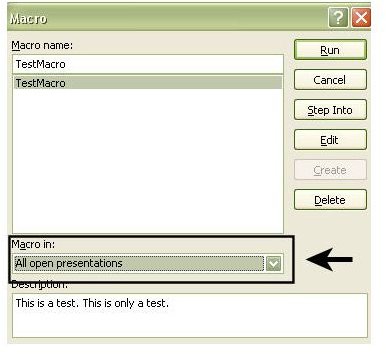
Since this particular presentation only has one macro, it is the only one listed. If there were more, the entire list would be present in the Macro window, and you could scroll through the options. Selecting any macro here will also bring up the description that was entered. As we mentioned in Part 2 of this series, you don’t have to enter a description when creating a macro. However, when it comes time to run the macro and there are several to choose from, that description field starts looking pretty nice.
Once you’ve selected the macro you wish to use, click the Run button. Depending on the complexity of the macro, it may take some time to execute. When it’s finished, the Macro window will close, and you’ll be returned to your presentation.
For more tips and tricks, be sure to take a look at the other items in Bright Hub’s collection of Microsoft PowerPoint tutorials and user guides . New and updated items are added on a regular basis, so bookmark us and check back often.
This post is part of the series: Using Macros in Microsoft PowerPoint 2007
If you constantly find yourself performing the same tasks over and over again in PowerPoint 2007, break free from the monotony by learning to create and use macros. In this series we will cover how to use macros in PowerPoint 2007 and how they have changed from previous versions of the application.
- Microsoft PowerPoint 2007 Macro Basics
- Creating New Macros in Microsoft PowerPoint 2007
- Executing Macros in Microsoft PowerPoint 2007
- Inserting Multiple Slides in Microsoft PowerPoint 2007 Presentations
- Slide Layout Values in Microsoft PowerPoint 2007
- Best Add-Ins for Microsoft PowerPoint 2007
- Microsoft PowerPoint 2007: Installing Third-Party Add-Ins
- Using OfficeOne Shortcut Manager in Microsoft PowerPoint 2007


