Have you ever visited a website where you had to upload a photo using one of those familiar “Browse” buttons. Maybe the button said “Upload” instead. This article explains how to easily get your iPhoto photos onto these sites.
Get Your Photos Uploaded
Have you ever visited a website where you had to upload a photo using one of those familiar “Browse” buttons. Maybe the buttons said “Upload” or “Upload Image” instead. These are very common on photo sites and contest sites, among others. When you click one of these buttons you are presented with a window similar to the window you get when you open a file. If your photos are in iPhoto, how do you upload the image to the site? This article will tell you how.
The first step to uploading the image is to get the image out of iPhoto, or to export it. The easiest way to do this is to drag and drop from your iPhoto window to your desktop. Doing this will place a duplicate file of the photo on your desktop. I like placing files for this purpose on the desktop because it is the easiest and fastest place to find a file (in my opinion).
Once the file is on your Desktop the process is as easy as opening a file. Go to the website, fill out your information, and click the “Upload/Browse/etc.” button. In the window that opens click “Desktop” in the side panel to see your files in your desktop. Double click your photo file to choose it and the window will close. Click “Upload” or whatever the button reads and the file will be sent to the site. Don’t close that window until you get a confirmation page stating the upload has been completed.
You’re done! It is just that easy…sort of.
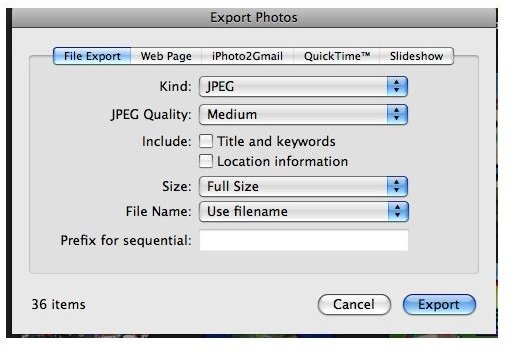
Dragging and dropping the file from iPhoto will result in the largest file possible in the highest quality you have it. Some sites want small files. If that is the case dragging and dropping will not work. Now you have to use “Export” from the “File” menu (or the “Share” menu in some iPhoto versions). Choosing to export the photo will present you with the window in figure 1. Here is where you control the file size and more.
In the “File type” pull down choose JPG. JPG is your best bet for the site accepting your file. It is a very common file type for photos. In “…Quality” choose something smaller than “Full Quality.” You won’t be able to see the file size so I suggest starting with medium uploading. If that won’t work go for the smallest. The site should tell you if the file is too large. Just like the dragging method, I think the Desktop is the best place to export to for easily locating the file.
Stay tuned for part three in the series on how to upload to websites from within iPhoto.
Images
Plug-in Selection
Uploading photos from iPhoto to a particular website can be a bit tricky. However, certain sites like Kodak Gallery have specific iPhoto plugins that allow you to upload photos straight to your account from within iPhoto.
To install these plugins, quit iPhoto and run the downloaded installer as if you were installing any other application. The plugin will appear in iPhoto when you reopen it (usually in the export window as a new tab for that site).
Typically, you select the photos you want to upload, go to “File-Export”. Choose the tab for the site, and enter the requested account information. Click “Export” or “Upload” and of the images go to your account.
Here’s a list of iPhoto plugins you might be interested in:
The links below go to the company’s download page, which includes directions for their specific plugin.
Kodak Gallery (formerly Ofoto): KODAK Gallery Upload Plug-in Software
Flickr: Connected Flow - FlickrExport for iPhoto
Shutterfly: Shutterfly | Free software | Upload Features for Mac
Costco: (Yes, even Costco supports iPhoto. You have to be a Costco member to access this download)Costco Photo Center - Account
Picasa: Picasa Web Albums Picassa is Google’s online photo gallery. They even have the Picasa software now available for use on the Mac. It is very similar to iPhoto. If you want a free alternative to iPhoto you might want to check it out. You can find the link here https://picasa.google.com/mac/ .
Want an all-in-one solution? While searching for links to the above plugins I discovered something called Pixelpipe. Pixelpipe allows you to upload photos to over 80 differents sites, including most of those mentioned above. Pixelpipe - Pixelpipe on your desktop Pixelpipe does not support iPhoto ’09, but if you have an older iPhoto tou might want to check this out.
There you go. Yet another way to use iPhoto to share your photos with the world.
This post is part of the series: Using Your Photos Outside of iPhoto
iPhoto is great for editing and storing your photos. However, what if you need to use a photo file outside of iPhoto? Maybe you want to upload it to a website or burn it to a CD for a photo kiosk. This series will cover many ways to use your photos outside of iPhoto.


