Ubuntu Linux comes with all the software needed to complete your basic daily tasks. In cases where you need to install additional software you encounter the Ubuntu Linux package management system, aptitude. We will take a brief look at what software is included and how to install more as needed.
Installed Software
Ubuntu Linux comes with an impressive array of software installed by default. You will find a web browser, e-mail client, instant messenger client, bittorrent client, office suite, graphics program and audio/video player all installed by default. Ubuntu Linux is ready to meet all your general day to day needs out-of-the-box without the need for installation of additional software. That being said you are likely to encounter situations where you want to install additional software. Whether it be your preferred audio player or that specialized video editing program you use for work you will find it is very easy to locate and install whatever software you may need. Lets take a look at the Ubuntu Linux package management system. This is the system that will allow you to install new software quickly and easily.
Installing Additional Software
Installing software on Ubuntu Linux is done through a system called aptitude. The basic syntax for installing software from the command line is apt-get install
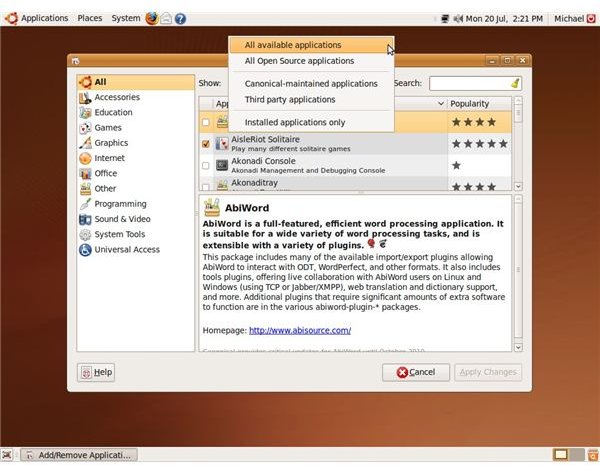
You will find the Ubuntu Linux Add/Remove Software GUI under the Application menu (located on the top panel) > Add/Remove … The first thing you will want to do once you have the GUI open is to change the “Show” drop-down box to All available applications. This will give you access to all open-source applications as well as third party applications, providing you with a greater selection of applications to choose from.
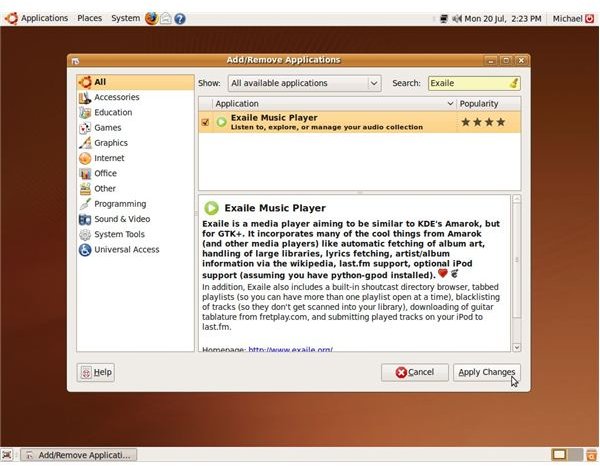
I recommend taking your time and browsing through the available applications. You can browse all applications in a single list or browse using the categories in the left hand panel. If you know the name of the application you would like to install you can also use the search box located in the top right corner of the Add/Remove GUI. In the screenshot to the right I did a search for the Exaile media player and as you can see the applications were filtered giving me only the applications that meet my search criteria. At this point I simply check the application and hit apply changes and let Ubuntu do it’s thing! Ubuntu will install the application as well as take care of any dependencies the application may have.
Restricted Formats
Ubuntu’s commitment to only include completely free software by default means that proprietary media formats are not configured ‘out of the box’. What this means is you will have to configure the codecs needed to play mp3, DVD, flash, quicktime, wma and wmv should you decide you can legally do so. Don’t worry though as this is a very straightforward process.
On Jaunty Jackalope you can enable these restricted formats by visiting the Ubuntu community documentation page on the subject. This page contains instructions on how to install codecs for the restricted codecs as well as how to enable DVD playback.
Must Have Applications!
Amarok, Exaile or Songbird: the default audio player in Ubuntu Linux is Rythmbox but should you want to try something different, Amarok or Exaile are excellent choices. Amarok is an application designed to run on the KDE desktop environment but will run equally as well on GNOME, only requiring a few extra libraries to be installed. Exaile is native to GNOME and an excellent music management application. I would not hesitate to recommend it to any GNOME user as their music management system. Songbird is an open-source customizable music player that’s under active development. The main goal of this project is creating a non-proprietary, cross platform, extensible tool that will help enable new ways to playback, manage, and discover music. While it’s true Songbird has come a long way, it is still in beta, and I would not recommend it as your main music management system. I mention it here because I feel it has great potential and is definitely worth keeping an eye on!
VLC Media Player: This is an audio and video player that plays almost every format imaginable without the need to install additional codecs. The codecs are integrated into the player, allowing it to play files that other players struggle with. A great choice for your main multimedia management system and a must have for those situations where you have a file that nothing else will play.
Deluge BT Client: Simple bittorrent client. I prefer it over the default bittorrent client in Ubuntu Linux, Transmission.
GIMP: Gimp is a graphics program that is handy to have around even if you do not plan on doing a lot of graphics work. A useful program to learn and a fantastic program to use to crop/resize/modify your digital photo collection.
Skype: VoIP (Voice over IP) client. Talk to your friends and family next door or halfway across the world. For free!
Google Earth: Google Earth is a virtual globe. This is a must have just for the cool factor!
Bluefish: If you ever need to modify a webpage, this is the program to use.
In the final part of this series, we will take a look at what other Linux distributions use GNOME as their default desktop environment and what they have to offer in terms of extra applications, configuration options and more!
This post is part of the series: The Ultimate Beginners Guide to Ubuntu Linux
If you’ve decided to make the switch to one of the world’s most popular Linux distributions (Ubuntu), but are unsure where to start, you’ve come to the right place! In this guide I will introduce you to the basics of the Ubuntu Linux OS (operating system).


