In this article, you will learn to understand fstab (File System Table) and its entries. We’ll show you how to add a new hard drive to fstab and mount the partitions automatically on boot. We’ll also explain some of the terminology used in fstab, and we take a look at the fdisk command.
Background for this Article
- Konsole - Terminal also know as command line. Read : The Beginners Guide To Ubuntu Terminal by Josef Nankivell for more information on using Terminal commands.
- Nano - Terminal text editor.
Please read part one of this series: How To Partition A Hard Drive In Linux
What is Fstab, and Why do I Need It?
Fstab (File System Table) is a file used by Linux operating systems to mount partitions on boot. It needs this because it can’t guess what the partitions are and what to mount them to.
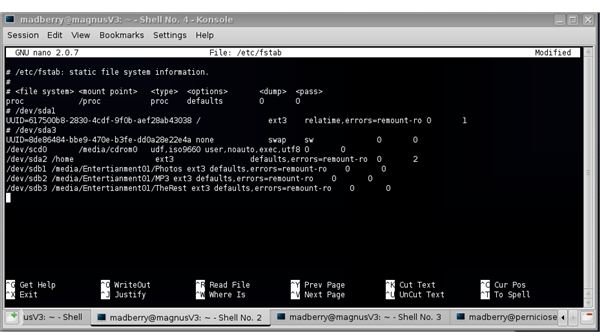
Take a look at the contents of fstab open Terminal and type:
nano /etc/fstab
There’s no editing yet, so there’s no need to sudo this command at this time.
See the screenshot to the left for the result of this action.
Let’s pick the line for root apart.

The columns are as follows:
1. The device name or other means of locating the partition or data source.
2. The mount point, where the data is to be attached to the file system.
3. The file system type or algorithm used to interpret the file system.
4. Options that should be used when mounting at boot.
5. Dump-freq adjusts the archiving schedule for the partition (used by dump).
6. Pass-number indicates the order in which the fsck utility will scan the partitions for errors, when the computer powers on.
To close fstab file “ctrl+x”, “n” and “enter”.
Now let’s find out what the device identifier is of the new partition. In Terminal type:
sudo fdisk -l
This is the result:
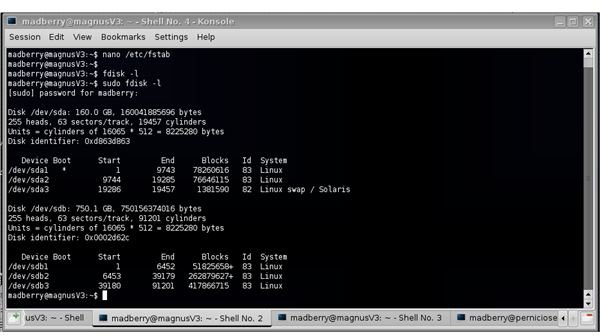
In this case the first disk sda is a 120GB disk the second sdb is a 750GB disk.
Sda has 5 partitions: sda1, sda2, et cetera.
Sdb has 3 partitions: sdb1, sdb2, and sdb3.
We will add sdb1 to the fstab file. First we need to create a mount point. Most mount points are created in /media or /mnt, they can be put in the mount point any where you want. In this case, we will use /media.
In Terminal type:
sudo mkdir /media/partitionname1
Partitionname1 is the directory name for this mount point. You can use any name you want - data, entertainment, multimedia - whatever suits your needs.
Open fstab for editing in Terminal type:
sudo nano /etc/fstab
Add the following line below to what is already there:
/dev/sdb1 /media/partition1 ext3 defaults 0 3
I’ll explain:
/dev/sdb1: Dev stands for “device file system” and sdb1 the partition on the hard disk.
/media/partition1: The mount point or in other words the folder that the new partition will be mounted to.
ext3: The file system used on the partition.
defaults: Defaults will automatically define these options: rw, suid, dev, exec, auto, nouser, async. These are all the options needed to get the partition to work properly.
0: The dump frequency of all the fstabs I’ve seen so far don’t change this setting. So I have no explanation of it at this time. I will follow up on this in another article at a later date.
3: This sets the order of the fsck file system checking. I like all partitions checked every once in a while so I changed this to 3. If you don’t want the partition checked, simply set this to 0.
Close the fstab file: “ctrl+x”, “y” and “enter”.
Check to make sure it mounts. In Terminal type:
sudo mount -a
This will mount any unmounted devices. Now, your partitions will be mounted automatically every time you boot.
This post is part of the series: Partitioning And Mounting Made Easy
This multi-part article will explain and demystify Linux hard drive Partitioning and Mounting. If you are a beginner in the Linux world and just bought a new hard drive then this article is a must read.


